TUTORIALS

Sunday, March 31, 2013

The Easter Parade

Fashion Doll Stylist would like to wish everyone a very Happy Easter!


And what Easter wouldn't be complete without the proverbial Easter Bonnet. What makes a hat an Easter bonnet? A great big, catwalk-worthy hat with lots of flare and drama.

For some of this head gear, I cut down an existing straw hat and attempted to shape the bits into smaller hats. I will be honest. It was way, too difficult and I found myself doing lots of "styling" to make it all work. My suggestion would be to purchase doll size straw hats (which you can find in craft stores or on line) then dress them up or modify them. Two of the hats pictured below, were cheap hat key-chains sold at stores in warm weather tourist destinations which made excellent supports for the typical "Sunday-go-to-meeting" Easter head hgear.


Straw hat from mini rum bottle with a fluff of hand painted silk
A straw hat keychain given a golden bow makes for a glorious Easter bonnet.


Silk chiffon and rosebuds transforms a straw hat into a springtime melody.


A silk rose brooch is transformed into a hat with the addition of flowers and polka dots.


Jewelry bags make easy-to-make, very chic hats.


A bit of straw, a handful of tulle, a lot of high fashion.
Inspired by Duchess Kate Middleton's "Fascinator," a touch of lace, feathers & tulle goes a long way.


Sometimes simplicity is best. Pictured here, a curl of ribbon makes for the perfect "Fascinator"

All Photos & Text property of  © Fashion Doll Stylist 2013. Please do not reproduce without prior permission.

Thursday, March 28, 2013

Accessory to the Fact

Fashion is the sum of its parts. The modern woman puts herself together by selecting very simple clothing which, whether dressed up or dressed down, is always updated with the addition of just the right necklace, handbag or shoes.

While following current trends is very important to your doll's overall fashion look, it is equally important to translate this seasons' smartest accessories into chic items for your doll.

Some items (like jewelry and handbags) are easier to recreate than others. This is one area where it is worth buying basic doll scaled items (eye wear, hats, shoes) which you can modify later.

In this posting, I have wrapped a child-sized small necklace around the doll's neck to simulate the over sized pearl necklace featured in Chanel's spring collection. This and the matching bracelet are throwbacks from the 1960's which I am sure will be popular items, this season. For the bracelet, I bought tiny seed pearls from my local crafts store which I strung on thin wire then wrapped around the doll's wrist. The wire helps maintain shape.

"Chanel-inspired" necklace with similar glasses.

See-thru handbags, like the one featured at Dolce & Gabana, is another popular trend for summer. (I still have my clear vinyl bags left from years past.) What's nice about that bag is that, with a change of "scarf" it can go with any outfit.

And then there is the whole black and white theme with clutch bags from Marc Jacobs and Marni that are simple to reproduce with duck tape cut to scale. Also consider scarves and shawls which are not only easy to make (tear and wear), but they also add drama to the outfit (and hides any mistakes you've made)!

Chanel inspired bracelet with a clear vinyl D&G inspired handbag complete with charms & scarf


With a change of scarf, the plexi bag adapts to any outfit. The bag is made from the plastic box your doll comes in.
By adding tape to an existing purse, the Marc Jacobs bag is replicated.
Use beads of different sizes for the "Chanel" bracelet.
Your chain bracelet makes the perfect Ferragamo necklace for the doll.
A tiny bit of malar makes an inexpensive Givenchy collar.

An existing bag is transformed into a Marni bag with tape.


All Photos & Text property of  © Fashion Doll Stylist 2013. Please do not reproduce without prior permission.


Monday, March 25, 2013

Good Foundations: The Sheath Dress


While thumbing through the Sunday paper, there was a store advertising supplement that caught my eye. The simplicity of the sheath dress in bright Easter egg colors is a timeless silhouette that is eternally simple and modern! And that's the key to great contemporary fashion.

Many beginning students in Fashion Design want to create things that have everything and the kitchen sink in one dress. But think about it. No one dresses in a complicated manner today and even when they do...it's usually an ensemble of simple items.
 

The basic sheath is figure-flattering and can be worn everywhere from day to night. This versatile garment looks great when cut from the simplest of fabrics to the busiest of prints and textures. And, it may be paired with almost any other outerwear....from sweaters to coats to dramatic shawls.
 
However, successfully creating a garment so simple can be most challenging. Admittedly I don't care very much for the dress I posted in my 2-piece dress demonstration. The waistline seam adds bulk and the overall look is a tad matronly. On the other hand, the sheath dress is a timeless garment. The easiest way to create a pattern for it is by draping it directly on the doll or form. (I have updated the post "Block Club: Upper East Side." I have designated a doll as my permanent "fit model" and created a marked bodysuit for her.) 
 
The drape begins in exactly the same manner as the basic sloper. I mark a piece of cotton fabric (a old bed sheet cut into rags will do) with a vertical line placed at the doll's center front (CF) line, and a horizontal line placed at her bust line.
 
Keep these two lines straight and pin down the fabric at the CF. While maintaining the horizontal line perpendicular, smooth the cloth over her body and pin the cloth down the side.
 
The fabric will have a gap under the bust. You should pinch that into a dart along the side front line from under the bust to the hips as shown until the pattern lies snug against the doll's body. With a soft pencil, mark the neckline, armhole and side. Then mark both sides of the dart you have just created.

Turn the doll over and repeat the same procedure on the back. Note: you are creating half a pattern, for reasons of symmetry.  Again, pin the fabric down the center back line (CB). Then join the back to the front pattern at the sides and pin. seams out. Create a dart that falls on the side back line from the bust line to the hip line.
 
Where you have marked the seam lines, fold the front pattern over the back at the shoulders and the side and mark. Make any adjustments necessary to ensure your darts are balanced. It is worth taking your time because this is a pattern you will use often!
Cloth pattern after the drape (l) and the transfer to graph paper with seam allowance (r).
 
Transfer your cloth pattern to paper. Add 1/4-inch seam allowance and cut from fabric. For those of you doing this for the first time, I encourage you to make the first dress out of a cheap fabric to make sure the fit is perfect. If there are problems, you will correct the paper pattern. Here is my doll wearing a copy of the sheath dress inspired by the ad!


Divine in an abstract print.


Here's our dress worn under the Patrick Kelly cocoon coat

You can also begin by first draping the basic foundation, then lengthening it into the sheath dress. Here is a video tutorial:


All Photos & Text property of  © Fashion Doll Stylist 2013. Please do not reproduce without prior permission.

Friday, March 22, 2013

Karate Kid: The Kimono

Today I decided I needed a "fit model." I brought "Cathy," a new girl into the house who will serve as both the dress form and our fit model, upon which all clothes will be draped, fitted and finished. In real life, fit models and the "show girls" are usually different sets of models. All of the models have roughly the same measurements, so the designer will only need a full time girl or two in his atelier.


In between fittings, the girls slip into robes. So, based on my own bath robe, I decided to make Cathy one as well. For this exercise, I raided my father's stash of rags....all of which originate from his underwear drawer. In this case, the cream colored, waffle textured fabric which used to be his long-johns, is a near replica of the fabric used for my robe.

Start out with the jacket pattern. I wanted a V-neck in the front (which is about 2-inches down from the shoulder point). Decide how low you want the neckline then place your ruler on the point where the neck meets the shoulder and draw a diagonal line to the end point of the neckline (#1 see red line in Fig. a). Now take your sleeve sloper (#2) and place the midpoint at the tip of the shoulder (upper red circle) and the bottom of it should touch the jacket bodice (second red circle). Measure down 1" from the armhole of the bodice and 1" from the under arm of the sleeve. Draw a line (see green line) to connect these two points (#3). At the center of this line, measure 1/8". Now draw a curve where the arc falls on the 1/8 inch mark. To create the front panels of the kimono, trace off (#4-see the blue lines).

Take the jacket back and again, measure 1-inch down from the underarm point. Go back to the front and trace off that little triangle that formed under the arm. Be sure to indicate which side touches the sleeve and the bodice as you see in the Fig b. Flip this triangle over (horizontally). You will use this as a guide.

Fig b
Place the sleeve sloper so that its midpoint lines up with the tip of the shoulder (#5). Place the guide on the side of the bodice (the bottom tip should touch the 1-inch mark on the side-#6). Now, slant the sleeve sloper so that the it rests against the top diagonal of the guide. Trace the pattern (#7 refer to blue lines).

Add 1/4-inch seam allowance to your pattern which should look like the picture below. Okay, so your question to me is, why not make a T shape without all of the measuring? It is a matter of fit. Your shoulders (and the doll's) have a natural slope. By using the sleeve sloper, we can ensure the sleeve will fall properly and not ride up at the top. Using the underarm guide ensures the curve will be the same from front to back.


This is not the only garment you can create with this pattern. Think of daywear jackets over jeans. Think of luxury lingerie or evening coats in patterned silk, brocade or satin.

The silk robe pictured below (worn over a matching slip dress) was cut from the exact same pattern. Inspired by the Fall/Winter 2013 collection Marc Jacobs created for Louis Vuitton. We used peach silk and trimmed it with black lace (stitched by hand).


All Photos & Text property of  © Fashion Doll Stylist 2013. Please do not reproduce without prior permission.

Wednesday, March 20, 2013

A Trace of Style

At one time, the fashion department at Parsons (The New School for Design) involved students in a "garment rub" exercise requiring them to make a pattern from an existing article of clothing without dismantling it. Many of the foreign students accused us of teaching them how to knock off a garment for commercial reasons(a practice in which many companies do engage). The instructors, however,  insisted it was a great way for them to acquire an intimate comprehension of construction, particularly of complicated or high market garments.

Usually the first thing I do after bringing a new doll into the fold, is to undress her and give her something new to wear. Even if the style of the garment she's wearing is okay, usually the fabric leaves much to be desired. There are exceptions of course. Where Mattel really gets it right is with fashion basics like T-shirts and jeans. As I mentioned in my very first post, the little black dresses worn by Barbie Basics are phenomenal.

The problem with keeping our foot-high fashionistas in clothes is that you cannot pop by the store to pick one up another pair of leggings or a shirt the way you do for yourself. This brings me to the purpose of this exercise. It is not so much to familiarize you with the construction of store bought clothes (which may or may not be interesting) but rather, to help you replicate the garment in better fabric or to create more of the same garment.

The T-shirt is one of those "must-have" garments you can never have enough of. As such,it's the garment I've chosen to duplicate (minus the yoke).

You'll need a very sheer paper for the trace. In this instance, I'm using waxed paper which lets me see the garment beneath. First, turn the garment inside out to expose the seams. Flatten the garment against the waxed paper and pin in place. Now trace the seams. (Fig a)

In this case, the garment is simple so I've traced all components in the same "sketch." (Fig. b) I'll trace them separately later. It's only important to sketch a little past the half of the garment.

Remove the waxed paper and fold your sketch in half. Trace the half sketch onto graph paper, placing the center front on a vertical line. Straighten up crooked lines, then fold your paper and trace the half you've just drawn onto the other side. Repeat for the back. Measure to be sure the shoulder lines and the side seams are identical front to back.


Fig. a
Fig. b
Use the same procedure for the sleeve, tracing the one half to the other side to make a complete sleeve. I curve the top point.

Again, when sewing, join the shirt at the shoulder seams and stitch the sleeve while the garment is flat. Then fold inside out and stitch under the sleeve and the side seams (see demonstration of the jacket.)


The pattern (upper left side) made from the trace-off in the lower right side
Before stitching up the side seams, finish the neckline, the hem of the sleeve. Personally, I prefer to roll the edges and tack down using fabric glue.

This T-shirt is open down the back, so you'll need to close it with a strip of Velcro. But just before you do that. Check the fit and adjust.

If you plan to make  numerous garments of the same type, it is worth it to make a "trial run" in fabric (called a muslin or toile). Mark any needed adjustments. Take this muslin apart and transfer your corrections to the paper pattern.


All Photos & Text property of  © Fashion Doll Stylist 2013. Please do not reproduce without prior permission.

Monday, March 18, 2013

The Luck of the Irish

Well......you really didn't expect me to do cute little green dresses, did you!!! John Rocha is not exactly Irish, but he is a major fashion player who resides in Dublin. Born in Hong Kong of Chinese descent, Rocha moved to Ireland after his university studies, where he made a name for himself with his "Chinatown" label. By the 1990's he was part of the London fashion scene and is credited for winning the "Designer of the Year" distinction from The British Fashion Awards in 1993. Rocha is best known for hand crafted details on his clothing, notably beading and applique and currently designs a line of crystal for the iconic brand, Waterford. This spring, Rocha's collection is in bloom with giant rose petal dresses in bell silhouettes. Can Spring be far away???


For the doll version, we began with the two-piece dress using the basic bodice sloper stitched to the A-line skirt cut from raw silk. In random fashion, we used 2-inch wide strips of China silk with which we wound, sculpted and hand stitched around the dress. You can also use ribbon or prefabricated silk flowers.


All Photos & Text property of  © Fashion Doll Stylist 2013. Please do not reproduce without prior permission.


Friday, March 15, 2013

Out of Africa: The Safari Jacket


The Safari Jacket, one of my favorite fashion staples, has been around for the past hundred years. Modeled after British military uniforms for warm climates, it is characterized by light colored khaki twill fabric, shoulder epaulets and lots of cargo patch pockets. The light color kept the individual cool and the pockets allowed the wearer to carry along lots of extra things. First popularized by the Anglo-American adventurers and Ernest Hemingway, it was chiefly a menswear item introduced to women's wardrobes and transformed into the height of fashion in 1968 thanks to legendary designer, Yves Saint Laurent and his "Rive Gauche" label.
In the previous post, I showed you how to create a basic jacket using the bodice slopers. And that's where we will begin. The only thing you will do differently is to extend the jacket at the front by 1/2 inch from the CF line. On your left side of the jacket. Fold the edge over, stitch. Turn the jacket to the right side and top stitch. (This simulates the front plackets.) After you have created that jacket, we only need to add the details which will transform it into the safari jacket.

For the epaulets, I take a narrow bit of fabric and fold into thirds. Glue the strip together. You will fold over the ends and hand sew in place after the rest of the jacket has been completed.

Let's make the pockets. Again cut a narrow rectangular strip of fabric and fold in half. Stitch this 1/4 from the edge, then press it so that it creates a box pleat. Turn the edges under and glue. For the breast pockets which are smaller, make one narrow strip. Fold in half and machine stitch close to the edge. Turn right side up and again, cut two small squares. Fold the edges under and glue. Be careful that the two breast pockets are the same size and the two larger pockets are also equal. Pin your pockets in place and glue to the jacket.


Let's add a collar. Cut another rectangle about 1/2 inch long and the width of the neck opening plus an 1/8 inch on both sides. Fold the outer edges under and glue. Then pin this rectangle flat to the inside of the neck. Be sure to adjust the rectangle so that it is pretty much equal in height at all points at the neck. Stitch down. Now add your epaulets to the shoulders, hand stitching them in place.

I add "buttons." In this case, I've used bead caps here, But you can use tiny beads. It is important the buttons are in scale.

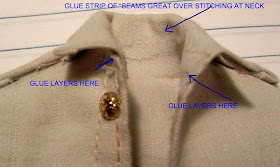
Typically, safari jackets are not lined. At this point, however, it will look a bit rough in the front of the collar. That is why it is important to glue the layers flat. To further disguise the rough edges and stitches around the neck, I've used a product called "Seams Great" by Dritz, a 1/2 inch sheer seam tape. Cut to fit the inner neckline and glue the tape down.

I cut pants using the pant sloper which I have made 1/2 inch narrower. Add a belt. Push up the sleeves. Let's head out on an African safari!!!


All Photos & Text property of  © Fashion Doll Stylist 2013. Please do not reproduce without prior permission.