Friday, August 29, 2014

Baggage Claim

With summer's end, it's time to set our thoughts on what the French refer to as "La Rentree." Simply put, it means back to school, back to work, back in action. And for that my dolls are packed and ready to go......now that they have their own luggage!

I have been looking for Barbie sized luggage for quite some time now. But what I find is either a Mattel's molded (pink) plastic variety occasionally found on Ebay (cheap), Fashion Royalty's bags (expensive), or some marvelous miniatures you find on Etsy for the same price I spend on my own luggage! If you Google DIY doll luggage most bloggers use soap containers. My dolls needed something a wee bit classier! Finally, I figured it was time to make my girls some luggage they could love (and that I could afford). Quite naturally, they wanted designer luggage.

The pattern for these items is quite simple. However, the challenge is in the finishing. My items pictured here are not as perfect as I'd like them, but they are still better than a plastic soap container with wheels. Moreover, the roller bag actually opens and closes! I'm giving you the dimensions for a few very basic items, but feel free to change the dimensions. I only made one size of roller bag because it's how I travel, but maybe your girls need more luggage!

Ambitious person that I am, instead of choosing a simple fabric, I went straight for the LV baggage. And yes, I struggled. I used a sheet of (inkjet) printable canvas I emblazoned with a scaled down logo (using the technique I showed you when we did Dolly Versace prints last year). I do NOT recommend using this material for the roller bag as it was VERY hard to work with. AND, it is NOT waterproof. Nonetheless, I was so thrilled when I saw the printed canvas emerge from the printer, there was no stopping me. Next time around I will try using one of those inkjet iron-on transfer sheets over a thinner material.

THE TOTE BAG
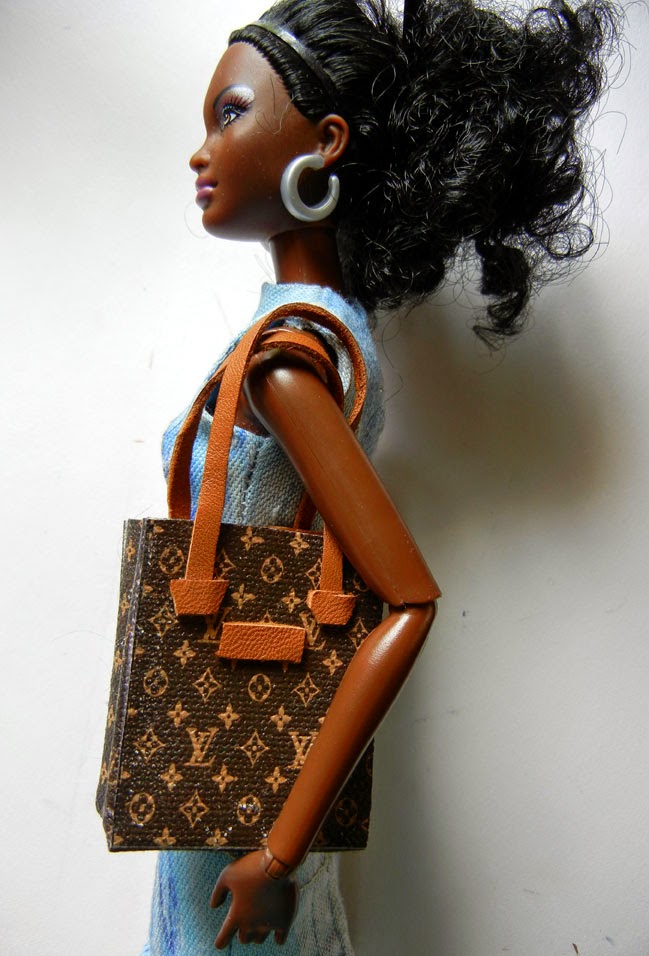
This is quite simple with great results. The pattern in in two pieces with the measurements as shown. My bag is 1-1/2 in wide by 2" high by 1/2" deep (39x52x13mm).

Cut out the tote bag along the black lines. Fold on the grey lines to shape the bag. Fold the "gusset."  Glue the side and back tabs to the inside of the side/bottom piece.

Most designer luggage is a combination of canvas + leather. With the LV set, I've cut two thin strips of leather (1/8 in or 3mm) in width. I added tiny triangles at both ends then glued it onto the bag. Cut a tiny rectangle of leather to set in for the "label."

THE SMALL DUFFLE
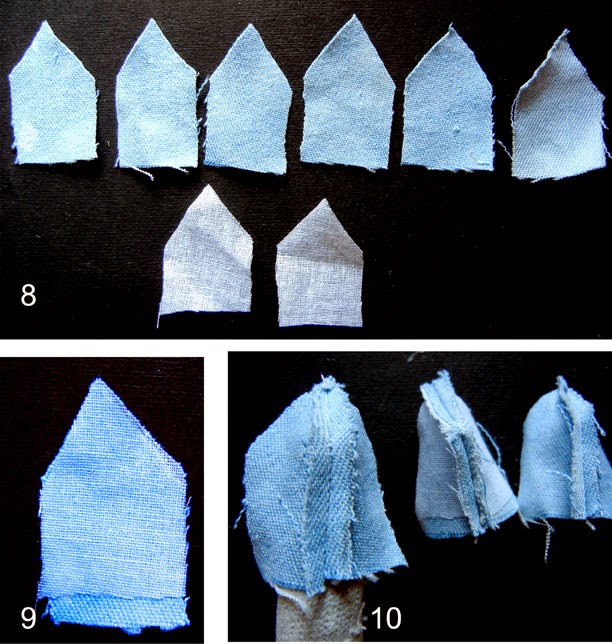
I did not want to complicate this by trying to plan a closure. My duffle is, as they say...for display purposes. Here is my pattern. The top part is glued to the bottom and measures 3x3 inches (72x72 mm). You can scale this up should you want to make a bigger duffle bag. Again, the cutting lines are black. Fold along the grey lines. You can leave it as is or add a strip of leather to the bottom (Honestly, I made a miscalculation and used the bottom strip of leather to hide that mistake.)
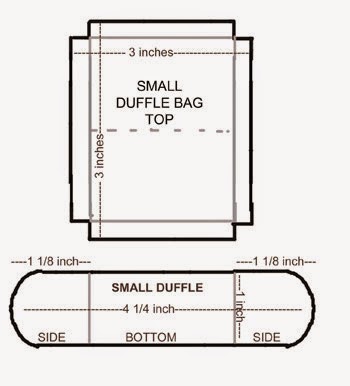
Make several cuts along the curves of both ends. I added a piece of cardboard cut to the shape of the ends which add structure to this part of the bag and provide a support to glue the clipped edges to. Glue the flap over this. Add two straps cut from strips of leather (1/8 inch or 3mm).
One last thing.....don't forget the leather label!
 
 
THE ROLLER BAG
There is a reason why you don't find the roller bag in commerce. Though there are only two main pattern pieces, getting a decent result is a bit of a challenge.
The bag consists of a front, back and another side piece on which you stitch a 9 inch (22 cm) zipper. Most luggage has piping in the seams but my "designer" canvas was so stiff, I decided to keep things simple and not use it for this bag.
 I stitch one edge of the zipper to the long strip. I stitch the canvas very close to the zipper teeth. Attach the first rectangle (luggage side) to the other edge and hand sew. The zipper wraps around the this rectangle. Make a single stitch at the corner and then a sharp 90 degree turn. Take the second rectangle and line it up with the first one on the other side of the zipper. Again, hand stitch in place. I planned the zipper to close near the bottom of my luggage. Since I was crazy enough to use a metal zipper, I'm not so sure this was a good idea. Perhaps the side would have been better.
I cut a piece of cardboard to fit into one side of the bag. Another 1/2 inch strip goes around the perimeter. Use a bit of double sided tape to hold it in place.This adds structure to the bag.

Don't worry if the underside of your bag doesn't look so great. You will cover this part with a rectangle of fabric when you add the wheels!. But now let's work on the handles. The side handle (for carrying the bag horizontally) consists of a tiny strip of leather, two bits of wire bent into rings and two smaller bits of leather. Loop each end of the wider strip into the loops, fold over and glue. The fold over and glue the smaller strips. You will glue only the smaller strips to the side of the bag. Add metal stickers for the illusion of brass tacks.
 The longer handle is a piece of bent 16 gauge wire that I poked into the back seam of the bag. I bent the ends under in the interior. I also glued a tiny piece of leather onto the handle. Next the wheels. This is a toothpick and two buttons. After you have adjusted the wheels to the width of the bag, snip off the excess and paint the rest black. Take the axel to the bottom of the bag near the back to hold in place. Then glue another piece of material over to hide the bottom and trap the wheels. Finally, the bag needs to be able to stand up on its own, so you can use a bead or create a peg using Filo clay or wood which is glued to the bottom of the piece you've just added. A detailed photo is shown with the next bag.
ROLLER BAG COUTURE
 
Okay, so my dolls are THRILLED to have designer luggage even with its imperfections. But the more I pondered, the more I realized the multitude of possibilities there are making dolly's own luggage. Why....she can have luggage to match her outfit like the grey wool bag here matching a dolly's Haiden Ackermann inspired pantsuit!!!
 
The pattern (and the steps) are exactly the same as the bag just before. I made my own piping using a strip of shiny vinyl. A string is glued to the center. Fold over and press down near where you feel the string. I basted the piping onto the zipper (folded edge near the teeth).Now stitch on the fabric rectangles catching the piping in between the zipper and the fabric. Both the zipper teeth and smooth folded edge of the piping should face inwards (on the strip).

 Stitch each rectangle to the zipper/piping.

 From the wrong side it will look like this (left). While on the other side it will look like that (right). The piping will overlap a bit near the bottom. You can fix it with hand stitches to look better a bit later. Turn everything to the right side when you have finished.
Make your handle using wire and again, poke it through the top edges of the top seam near the back of the bag. Cut a piece of cardboard to fit one side of the bag and a 1/2-inch strip to place around the sides to give it structure. Bend it in place at the corners. You can use double sided take to hold it in place. Make the wheels using a toothpick and buttons as shown with the previous bag. Then cut a small rectangle of material. Fold over the edges and glue in place. On the four (wide) edges, wrap around the wheel axel and glue or hand stitch to the bottom of the bag.


Add a bead (for balance) and glue to this rectangle. You can also add pockets to the front of the bag.
Don't forget the handle on the side of the bag.
 
Follow us on Twitter: @FashDollStylist
We're also on Pinterest: pinterest.com/FashDollStylist
 
Come join in on the chatter on Tuesdays at TonnerDoll's "Dollchat" (9-10 pm Eastern Time)
 
All photos and images property of Fashion Doll Stylist. Please do not reproduce without prior permission. Thank you.

Sunday, August 17, 2014

Ribbon Dance

Admit it. You, like the rest of us, hoard ribbon. Golden Christmas ribbon with the wire edges, satin ribbon wound around a box of chocolates, or perhaps it's the designer tape wrapped around that special gift of perfume! Okay, so sometimes you do recycle it when offering someone else a gift. But if you're anything like me, somewhere, you have an entire drawer of it. Even if you don't, there is always the ribbon aisle in the local crafts store calling out to you. After all, there are lots of uses for thin, medium or extra wide....ribbon. And it's all so very pretty!!

Last November, I entered a photo of a doll to Doll Observers' monthly challenge. Inasmuch as the theme was based on the color gold, I decided to use Christmas wrapping ribbon to make my red carpet dress for my Barbie. Super simple, this dress consists of two lengths of 2.5 inch ribbon joined at the side seams and a third length of crushed wired ribbon attached to the neckline. Because the ribbon was sheer and my doll more prudish than singer Rihanna, I made a simple skirt out of an opaque gold ribbon. It too, consisted of two lengths of tape (front and back) pinched in over the curves of her butt and opening at the side. Before submitting my photo, I played with the hemline. Like a Victor&Rolf couture dress, you can add as much "movement" as you want, or simply create silhouettes otherwise impossible.

I made a second dress for another doll, this time noting down exactly how simple it is to concoct such a spectacular "couture creation."

Spectacular and spectacularly simple! This dress is handstitched using gold metallic thread.
 I begin by cutting two lengths of ribbon, the length of the doll. Figure in a little extra to turn down the edges for hems. I sew one of the side seams together until about the waist line. I then wrap this around the doll, taping it to her. Overlap the other side seam, pinning in place to the waist.
Pinch in darts under the bust. Then, working from side to side, overlap the side edges so that you end up with a nice sleek fit. Once it fits according to suit your tastes, hand stitch everything. Though you're stitching this on the outside, the gold thread blends in with the ribbon. Anna, the doll modeling this dress, has a pretty full bust line and the ribbon did not wrap completely around her. It's not a problem because the collar will camouflage this and can be used to compensate the gap. I had about 2 feet of ribbon left which I softly pleated then crushed. Pin to the neckline of the dress and tack in place. Be sure to play with the collar. The wire allows you to do almost anything you desire.
One of the most iconic dresses created by Gabrielle Chanel was her ribbon dress. Created in 1924, it consisted of embroidered ribbon which hung freely from a relaxed "garconne" silhouette. It has since been reinterpreted by Karl Lagerfeld in 1984 then again in the 1990's. Each time, Lagerfeld used clipped lengths of ribbon attached to an underdress. Lagerfeld's interpretation inspired my own modern version of this iconic dress, slightly fitted with black satin petals left to unravel. Moreover, it is quite easy to make.
 You begin by creating a basic sheath dress. For the sake of uniquely working with ribbon, I created my sheath dress using 2-inch wide black satin ribbon. That is wide enough for any 12-inch doll's basic pattern. But it will force you to make a dress with a center seam. So you might just want to use regular fabric for your foundation. Finish the edges, but leave the center back seam open.

For the petals, I used 5/8-inch (15.87mm) black satin ribbon cut into 1-1/4 inch strips.

 Pin the dress on the doll and pin the first layer of petals starting at the bottom. Place each petal next to each other from end to end. Remove the dress from the doll (but keep her close by). I've machine stitched this row down. Pin down the next row, staggering it so that the middle of the petal falls in between two petals beneath. Do this until you reach the waist, stopping to check from time to time, how it is looking on the doll. You can stop at any point, but I decided I wanted my petals to rise above her bust line. Once you go higher than the waist, it is wise to hand sew the rows so that you don't distort the fit of the dress.
Once you have added the last row, you will need to finish the top edge of the petals. Here, I've added a horizontal ribbon to cover the top row stitches. Then I've added a tiny bow to one side. To be quite honest, you might consider making a strapless dress which is less complicated. Of course the dress is completely open down the back. Carefully fold back the petals and either hand stitch from the hips down OR you can plan to sew hook and eyes at strategic points (neckline, waist and hips).
The wonderful thing is, the petals completely hide the back closure! Again, make this dress your own. You can do this using the shift pattern which will give you a more 60's look or simply add the petals to the hem. You can make a top using the bodice sloper and add petals so that it can be worn with a skirt. Or you can add petals to a pair of trousers!

One more thing.... you'll notice my petals are unraveling. They are suppose to. But if the fray bothers you, use a fray control product on your petals.

Now we get to real challenges. Proceed at your own risk!!! This project involves using tiny 1/8-in (3mm) ribbon which is basket woven.
1. Cut a length of ribbon long enough to wrap around the doll. It should also be long enough to also fit over her hips! This dress will wrap around her with only one seam. Decide where that should be. In my case, I've decided the opening should be on the side, under Olympia's arm.
2. Decide the length you want the dress to be and cut strips. Glue these strips to the top horizontal ribbon. This keeps them from moving while you work.
3. Cut enough horizontal strips needed to cover the torso. Weave each horizontal strip in and out of the vertical strip. Pin each row to the end vertical strip.
4. Place on the doll to check the fit. The last horizontal strip is likely to be unstable. I glued a strip over it on the back of the garment. It doesn't completely stop it but the strip doesn't move as much.
5. Take a length of 5/8-inch (15 mm) ribbon cut to the length of the back of the dress. Glue base, then stitch it to the side edge up to the top of the loose ribbons. This provides a base to put hook & eyes, snaps or Velcro.
6. Take another piece of 5/8 (15mm) ribbon, cut to the width of the top of the dress. Fold in half and glue baste in place to the top of the basket weave. Fold it over and stitch down. I put a small bow for back interest.

The end result was a bit too straight for my taste, so I carefully bent the ribbons under the bust a little to each side and hand stitched in place. This adds a bit of shape, and if you do this carefully, it is not noticeable.
Though less flamboyant than the others, this dress, made from Hermes gift tape, was the most challenging. Inspired by the Herve Leger bandage dresses, I wanted to make a real dress that looks as though the doll has simply been wrapped in ribbon. It involves cutting a series of strips that fit over the body and sewing them in place. Easier said than done, especially since these strips are not stretch!
As if this wasn't difficult enough, I decided to add a little front interest by crisscrossing the strips over the bust. Should you be crazy enough to try this out, be sure to tape the top strips to the doll's body and to pin the cross point at the back. Again, you much decide where the closing will be. And once again, I've decided it should be on the side.

Cut the length needed to wrap around the body plus a little extra at the opening.
I wanted a bit of a fit between the doll's busts, so I pinched the tape in the front and tacked it in place. Later I added a tiny rose at that point.

From there, it is a question of adding a row of tape which I pin to the row above. As you work, you will need to stop and adjust the tapes for fit. I worked with the dress on the doll. From time to time, stop and check the fit. Adjust the pins until you have arrived at the desired length.

I measured out two vertical strips of tape which are pinned then stitched to either edge. This hides the horizontal rows and provides a finished surface for hook & eyes or snaps.

You can really stop there, but I felt the end result was a bit too simple, so I made a tiny rose which I added to the middle of the bust. Then I took more tape and folded it into loose loops and pinned on the side of the dress near the closure.

Follow us on Twitter: @FashDollStylist
We're also on Pinterest: pinterest.com/FashDollStylist


All images and text, property of Fashion Doll Stylist. 2014. Please do not reproduce without prior permission.

Thursday, August 7, 2014

Capped Off!

With next season's menswear trends focusing on jeanswear, I decided I needed the appropriate accessories for my Ken dolls. Finding sneakers and boots are easy to find on Ebay, but surprisingly, I was not able to locate a decent baseball cap. Eventually I was able to find a mini-tutorial which posted a picture of a pattern. That helped somewhat, however, I wanted to better understand how to actually create the pattern so I could make it for difference sizes of doll heads.

Now for those of you living outside of the U.S, your dolls can probably live without this head gear. But for all of you who are Stateside, you know very well that in addition to his Nikes, American Ken dolls (no matter their lifestyles) need their baseball caps!

Instead of having you measure and do math, I found it easier to use strips of paper to figure out the two basic measurements: the circumference of the doll's head and the height of the crown. And that is how we begin.

1. Cut a strip of paper which is wide enough to wrap around the doll's head from ear to ear and long enough to reach from his eyebrows to the very top of his head. Mark and tape in place.
2. Next, take another strip and place on top of the head at the very center. Mark where this strip meets the top of the other strip. This is the circumference of the width of the head.
3. Take the (longer) strip and fold in half. Then take that half and fold it into equal thirds. Cut one of those squares off the (side cap) strip. Take the top cap (shorter strip) and fold in half.
4. With the box you cut off the side strip, glue down then divide in half and mark.
5. Take the top cap (which you previously folded in half) and place it on top of the box at the midpoint.
6. Create a triangle by making diagonal lines from that top point to the sides of the bottom square. Add 1/8-inch seam allowance to complete this, the top of the cap.
8. Cut six pieces out in the fabric of your choice using this pattern. You can also cut out two more pieces using iron-on interfacing if you want to add a little stiffness to the front of the cap. (I used it for the light blue denim but not for navy blue or beige cap. It all depends on the look you want, but in examining my dad's baseball caps, I discovered all of his has some sort of stiffening in the front.)
9. If you are using the iron on interfacing, adhere it to two of the pieces, but trim away the hem. This will cut down on bulk around the hem of the cap.
10. Put the cap pieces together in pairs. Stitch down one side of each pair. Press the out seams. Then one by one, put the side of each pair together, stopping to press the seams out. Do this right until the last seam. I make one straight, tiny stitch at the very top where all of the triangles intercept. (Note: it is easier to press the seams after stitching each section as opposed to stitching up everything then ironing last.)

11. Turn the hem under and glue in place.
12. Place on the doll's head to check for fit. Now it's time to make the "visor."
13. Place the cap on a sheet of paper.
14. Trace curve of front third of cap, then mark the midpoint.

15. Decide how long you want to make the visor. Mine is 3/4-inch but yours can be longer or more shallow. Draw a line from the midpoint of the cap to the tip of the visor. Draw a horizontal line.
16. Draw straight lines from the endpoints of where the visor will join the cap.
17. Draw in the curved lines of the visor. Then draw seam allowance underneath the lower curve.
18. Trace these curved lines to the other side of the middle line.
19. This is the pattern for the visor. Cut one of these out of Bristol board or some other heavy weight paper.
20. Add seam allowance around the outer edge of visor and cut two of these out of your fabric.
21. Stitch the two pieces together wrong side out. Glue the Bristol board directly to one side of the fabric and use a dry iron to set. Trim one of the seams a little bit. By staggering the layers, your visor will press flatter!
22. Turn everything right side out. Press very well. Stitch around the bottom seam allowance to hold everything together. It will also cut down on fraying.


23. Clip around the curve, then bend the seam allowance back.
24. Glue to the cap.
25. Hand stitch. To finish the inside, I've glued in bias time around the edge.
Finish off with the addition of a brad or sticker at the very top. You can also add tiny badges, ball club initials, or emblems in the front of the cap or on the visor!

These fit my Barbies as well! OR......you can simply make the visor and glue a ribbon or twill tape around it to make a sun visor!