Over the past six weeks, I have been busy. Busy looking at Spring Summer catwalk shows in an effort to find something worth replicating and even busier making up what I found for my divas. I decided to try something a little different this time around. Though there are still dedicated fashion weeks for each major capital, somehow the lines have blurred. Designers don't always feel bound by a particular time frame. They present whenever their collections are finished. So we this time around, we decided to look at everything all at once, have the girls select what they like, then post a "best of" Spring Summer dolly picks report. As a result, we're not presenting trends per se, or even trends by country, but instead, we simply selected all time favorite silhouettes my girls love to wear. On my end of things I selected garments that would challenge my skills. And oh my goodness, I encountered a hefty dose of that which really slowed me down! Each garment was a challenge in some way. But all in all.... I was able to find enough looks worldwide to jump start my creative juices. There are a total of seventeen separate garments here ! Some more complicated than others. But when it was all over....me and the girls were absolutely delighted even with the less successful results. Here's a blow by blow backstage report on how we arrived at these looks.
UNDER THE HOOD
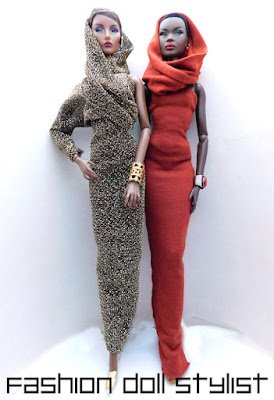
This is a slim, sleek easy to wear look we loved. It consists of a form fitting jersey dress or skirt plus a detachable hood that wraps around the shoulders from the Saint Laurent collection in Paris.
The dress is easy enough. It's our basic jersey dress with a separate hood tossed over the shoulders. The trick to making this work is to choose a jersey knit that is thin enough to achieve the drapery around the head without too much bulk.
I created this 2-piece version in gold stretch Lurex. Under the hood is an asymmetrical, one-shouldered top with dolman sleeve. The hood was draped separately and wraps under the chic on one side and around to the back, gathered into the CB seam. When I got everything just the way I thought it should be, I stitched the hood to top. The dress fastens at the back and there is enough under the back of the hood for the doll to slip out of top.
QUITE A PUZZLEMENT
Did I say I was in search of a challenge?! This group gave me exactly what I was looking for! Only one of these dresses allowed me to use a traditional pattern. And even then....
There was something incredibly fascinating about this dress designed by legendary Yohji Yamamoto. His creations are like Real Jazz. It starts out on one path and over the course of arriving at the crescendo, various rhythms, waves and abstract notes take you on a mesmerizing journey. There is no "figuring things out." But what I loved about this dress was the symphony of asymmetrical layers of various textures, slats and ribbons that contribute to the melody of the overall lookMy aim was not to copy, but simply to capture the spirit. My base.... a simple strapless bustier top and a skirt with a flurry of handkerchief points. I added triangles of sheer fabric to this base. I let the photo of the original dress to guide me as to where to place ribbons and fabric cut into 1/8" strips of fringe. This was fun and I am very happy with the results.
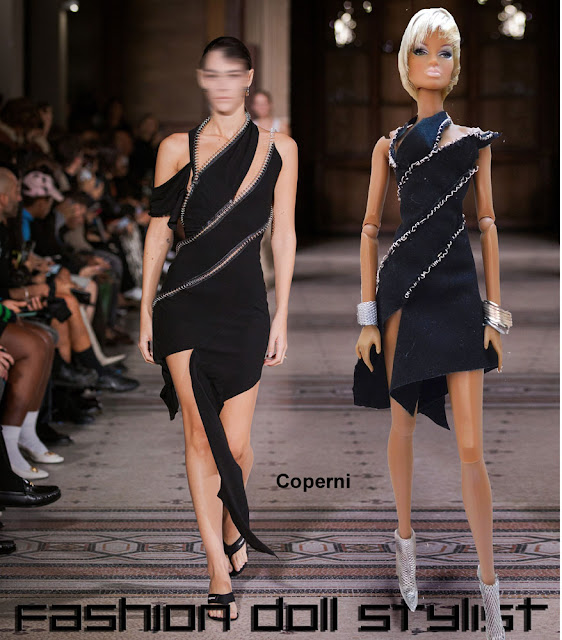
But here is where the real challenge awaited me. At first glance this dress by Coperni looks as if I've simply added diagonal trim to a flared dress. But no.....this dress is comprised of 1-inch diagonal strips. There are no side seams and the fabric is not stretch! It is cotton! I draped and taped diagonal strips to the doll's body to create the pattern. The silver trim (which resembles zippers) is actually thin wire coiled around a hat-pin then sewn onto the dress over the diagonal seams after the dress is finished. I didn't like how the original dress ends, so I changed it to something more graceful . When I finished the dress, I cut the strips into diagonal points around the hemline. The strips meet together at the center back seam. The mistake I made....not putting enough guiding marks on the pattern. After removing the cloth pattern (consisting of individual strips), I had quite the time trying to fit the diagonal slats back together and into the dress! I should point out that after cutting my fabric into strips I sealed the edges with ModPodge to keep the edges from fraying. Nothing is hemmed!
Awhile back, I did a post which payed tribute to the late Paco Rabanne's medallion dresses. So when I saw this dress, I figured it would be easy to construct. I began by cutting a series of triangles then taping them to the doll's body. It should have been as simple as that. I used a material I knew would not fray. In this case a lightweight suede for the top. But when I went to assemble.... oh my.... Nothing would fit the way I wanted. Her nipples kept peaking out and the overall silhouette was less than flattering.. (I finally had to tape the triangles together that cover the breasts!) and the rest of the triangles wouldn't provide a peak of the body underneath. I also couldn't use black thread to join the points together because they couldn't be adjusted and the result looked terrible! I trimmed slivers of the triangles away and I made my own jump rings out of a light weight wire, then hooked them all together. I had wanted something "cleaner" and less 1960's mod. But at the end of the day, I was tired and nearly tempted to trash the whole look. My end result is far from perfect.....

The other headache came in the way of this dress designed by New York City's Christian Siriano. So simple.... such a pain in the butt! The bias cut skirt was cut all in one piece. That was the easiest part. Getting the triangle bodice to fit was another story. This was also cut on the bias and in cotton, everything appeared to fit. But once this was cut from a fabric with body....it was hard to keep the top from shifting. The points wouldn't line up. There are small side darts at the bust, I should mention. I cut another top, this time on the straight of the grain. It had the structure I needed for this "clean" look, but the fit wasn't as smooth over the bodice, in spite of the bust darts. I went back to the bias cut top which I had lined at first. I removed the lining, but by then, the top was completely deformed due to excessive handling! The triangles formed points in the back that made no sense. Finally...to make this work, I created a band around the bust line to which I tacked on the top (cut on the straight grain). I could have stopped there, but decided to tack on the back triangles which some how worked and allowed a decent closure at the center back.
CHIC DESTINATIONS
This group includes interesting silhouettes and fabric treatments and topical fabric treatments. Each one, almost a little work of art.
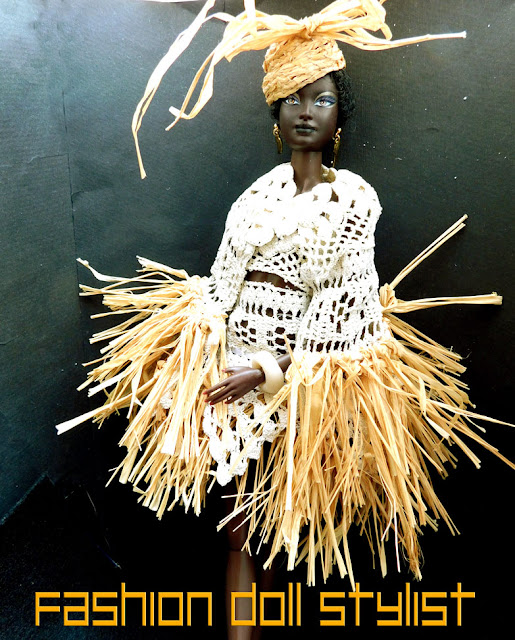
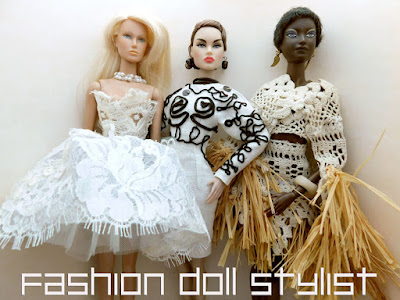
We were all immediately drawn to this garment. Unfortunately I gave away my macrame books ages ago. But even if I had them, this would have taken me a LONG time to make! As you know already, I cannot crochet. So I stitched together rows of vintage cotton lace trim. I had raffia left over from an old straw hat post, which I used to make fringe. The fringe is tacked onto the hem of the cape and the 2-piece dress underneath.
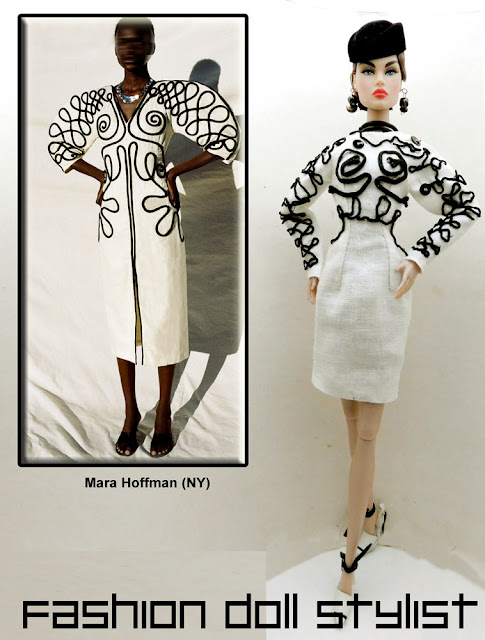
Another dress that caught our eye is from Mara Hoffman. The original dress to my eye had an African"primitive" vibe. My version in white linen seems somehow, to have morphed into something else Mexican. The dress was simple enough. A basic sheath dress with exaggerated raglan sleeves. I used a thin silk cord trim to recreate the squiggles. This took more time that I care to reveal. I assumed the design would be easily adapted to the doll, but soon learned it was too much. So I had to simplify. Note to self: next time sketch out the design then sew along those lines! There are no extra points for improvisation!
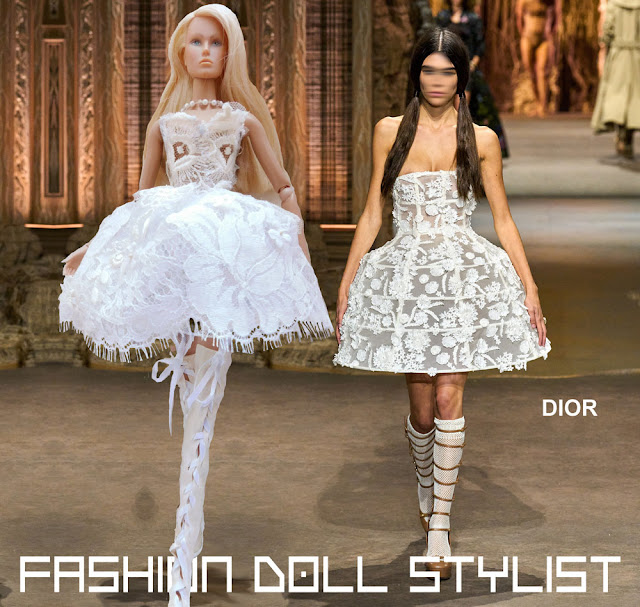
The mini-Marie Antoinette silhouette of this Dior white lace dress, we've done before. So I already had the pattern. Unfortunately I didn't have any heavily starched sheer fabric, so I used what I had on hand: a sheer organza that I covered with lace and dotted with small lace medallions. In order for the skirt to hold its shape, I had to make a little tulle petticoat to be worn underneath. The bodice top is simply two pieces of embroidered lace medallions sewn together at the center front.

SPACE X BARBARELLA
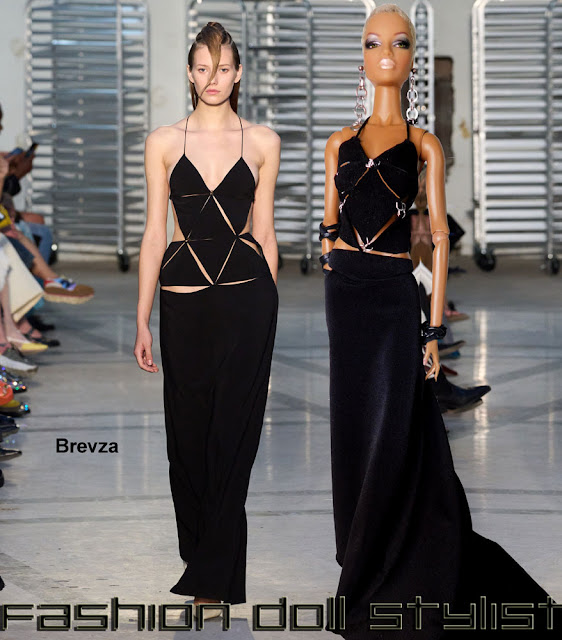
The sleek chic look of black jersey combined with the hardcore sheen of brushed metal.....is this the future of fashion? In any case, we loved these looks by LaQuan Smith and Brevza.
I did not notice until after I put this image together that the bottom part of Brevza's design were trousers! For Iman's version, we did a hip hugging jersey skirt, though either look works. This was a lot of fun. My girl's top was sculpted right on her body using the metal part of a wine bottle!
For this look, we made the tiniest asymmetric top with one long and one short sleeve top that rides over the top of her metal bra. I was quite tempted to use the chrome bustier I bought from Integrity Toys Mothership doll ensemble, But in the spirit of featuring only DIY fashions I make myself, I made this bra out of the metal top of a wine bottle.
Another simple cyber look featuring a simple tube high waist skirt out of black jersey that rides just under another metallic bra. This time I made the bra out of aluminum tape. If these bras are not your doll's taste, you can always substitute some other fancy bra out of a softer material!
RICH AND FAMOUS
These are rich girl looks. Super simple, ultra chic.....bad girls with big budgets! It's fashion just the way we love it.....sleek with notes of luxury.
This was actually where I began when putting together this post. I was thrilled to see a dress that incorporated bling and I immediately thought about Lindsey, the super gorgeous, James Bond bad girl of my collection. But when I finished this look...even she had to blush. "OMG April! I feel....a tad bit..naked!"
The top is a simple bare midriff garment with long sleeves. The skirt-which is "everything" has a rhinestone belt that holds up the skirt in the front, but falls to dangerous depths over her derriere!!!!
Me and the girls really love the sheer simplicity and sleek lines of these night time jersey dresses. Nikki opted for this Givenchy slip dress with the bra peaking out from under. However, we both felt that, as long as you are showing off the bra, it should be something special like the glittery silver one Nikki models here.

There are some dresses that will never look exactly the way they do in full scale. This simple Chanel dress is proof. Again, I was attracted to this look because of the bling (the straps) incorporated into the design. I liked the concept of ropes of rhinestone jewelry, though I'm not a fan of all the mini Chanel products suspended from the chain. As I studied the original dress, I also discovered the body of it had some sort of topical design with the double C logo. Not wild about wearing logos all over the dress, so I reinterpreted the look by using sequinned fabric. The first dress...a simple sheath cut from sequins with straps made of bugle beads...lacked the sleekness of the original. So I made a second dress, this time cut from my usual rayon jersey. At first I tried using some of the rhinestone chain for the straps but they would not stay up on the doll's shoulders. So I used a slightly wider trim which was pretty, but transformed this otherwise simple dress into.... Hollywood!
The bottom line is that our dolls and the materials we used to make garments for them, all have different proportions than those created for humans. I use the fashion on the catwalk as a springboard to help me design something new and special. No matter the source, at the end of the day...whatever you make will be your own "original" design!!!
Like us on Facebook: @FashDollStylist
We're also on Pinterest: @FashDollStylist
And of course, we are on Instagram: @fashiondollstylist
Unless otherwise noted, all images and text of this blog are the copyrighted property of Fashion Doll Stylist 2023. We are independent and not part of any other group or website no matter where this post or its elements appear on the internet or social media. Please request permission before reproducing any parts of this post. And please, always credit us.


