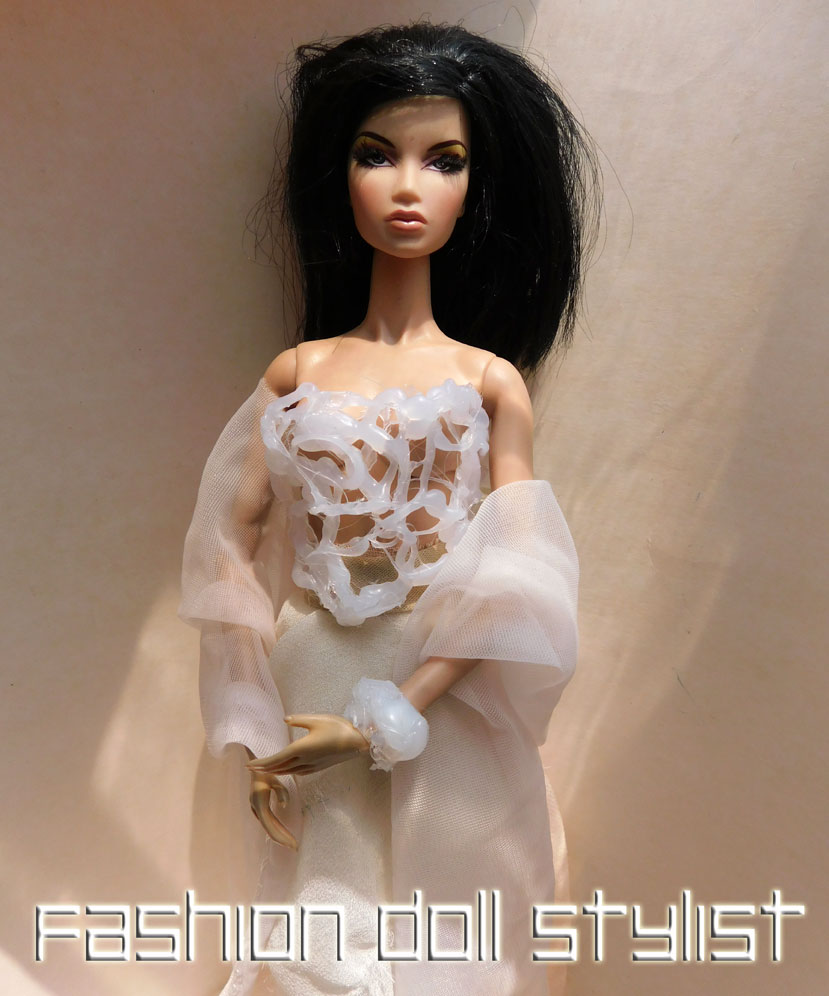
After nearly 10 years of producing content on my blog, it is difficult to create something original and current. For this project, I began by revisiting the corset. But it all seemed deja vu. So I went back to the drawing board and decided it was time to do something more "21st century" with the idea. In my effort to come up with something, my attention was diverted to a photo of a model wearing clear plexiglas jewelry. Unfortunately, the only method to replicate versions of it is by using resin...a highly toxic chemical requiring LOTS of ventilation. I turned to hot glue, thinking that would be a cheap and easy way to get the look..... But no matter what I tried...everything came out with a milky translucence. AND....working with the hot glue gun was not as simple as I though. Very, very messy. I put the glue gun down. But still, there was something that kept me picking it back up. It wasn't until I made the first corset with it. There, in front of my eyes, I had created a 21st century version of a turn of the last century looking Art Nouveau bustier for my doll.
At first, though, it seemed like a one-trick pony. I could make bracelets and necklaces...but at the end of the day....it all had the same look. I felt it still wasn't enough for me to post it as a project. So, just before abandoning this "new medium," I pulled out my pack of foiling papers to see what would happen. Oh my goodness.... I love foiling on various materials as it stands. But when combined with hot glue...it looks just like metal. As you can imagine, I had FUN.
MATERIALS
For this project you will need a low temp hot glue gun, a package of glue sticks and a few sheets of craft foil. You want the low temp glue which is less dangerous should your fingers come in contact with the glue (which it probably will). And besides..this is pretty cheap. When buying glue sticks, just make sure they are the right size. (Probably mini-sticks). The most common ones are a translucent white, though other colors exist. The sheets of craft foil is usually sold in packs and comes in gold, silver and copper, though you might find other colors.
COOL CORSETS
Let's get started....
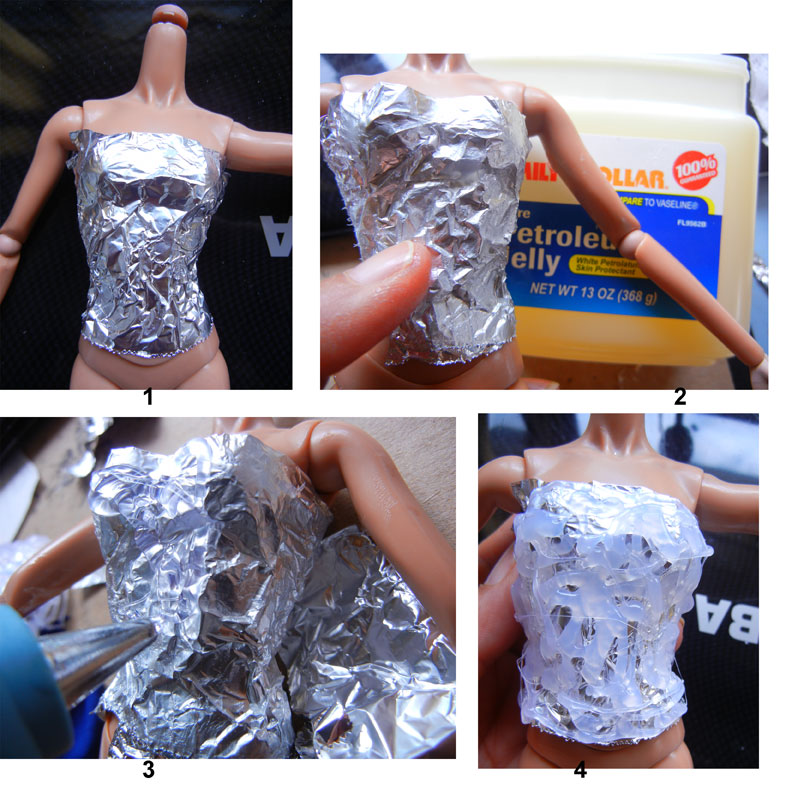
1. I have a separate body which serves as a mannequin, and whether or not you are doing the same thing, you must protect that body (or that of the doll) with aluminum foil
2. Apply a little bit of vaseline or hand lotion so that later, when you need to pull it away from the glue, it will release more easily.
3. After the glue gun is loaded, plugged in and the glue has started to melt, make swirls, globs at random. The reason you are doing this directly on the form is so that, once cool, what you create is in the same curved shape as the doll body.
4. Keep in mind, you will want to leave some holes in your design. It will look more like Art Nouveau AND..in the back, it will allow you to thread some ribbon through to use as a closure.
5. After the glue has cooled, begin peeling away the foil from the back.
6. If it rips in areas, or you discover the holes are too big, you can always come back with the gun and either fill in the gaps or use the side of the nozzle to melt and connect specific areas.
7. And so here is my completed bustier.
8. I used a thin ribbon to thread in the holes at the back.
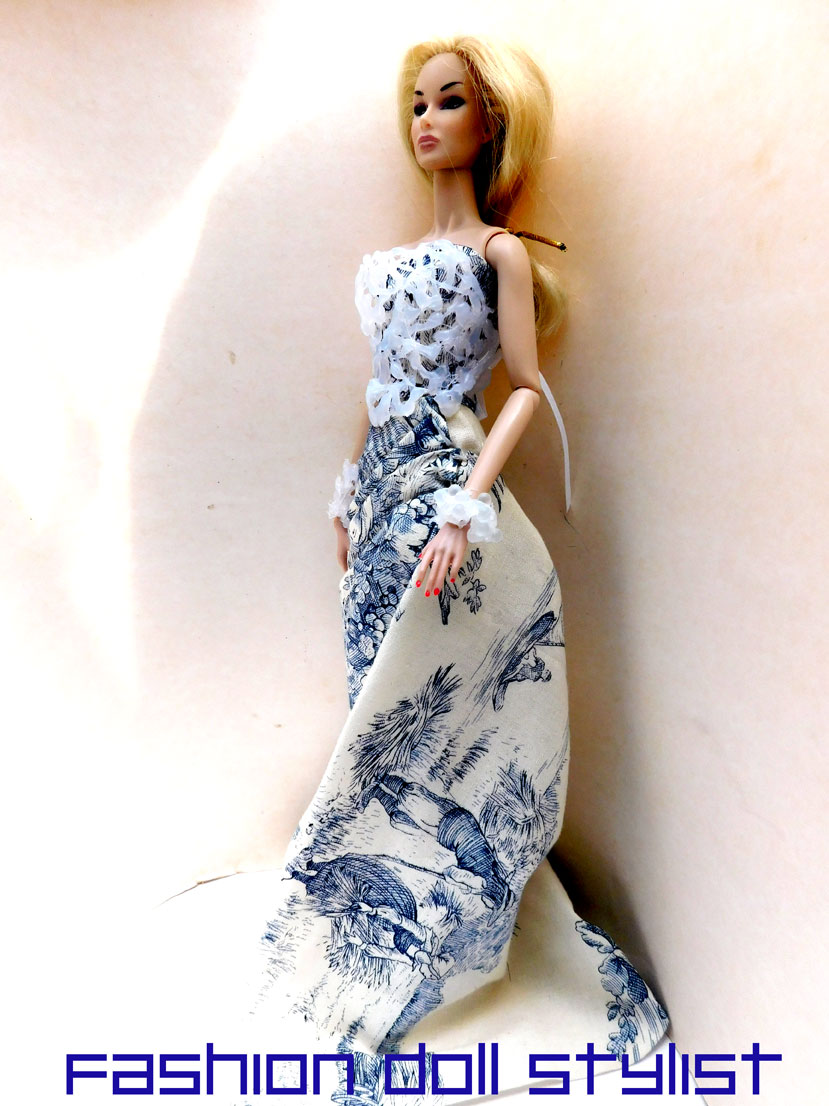
It's not Couturier Iris Van Herpen, but it certain fits in with the modern concept of Haute Couture!
Here, the hot glue corset is layered over the strapless top of this Jouy cloth dress.
The hot glue corset adds another dimension to an existing look. You can also use a colored glue stick instead of the white.
In this version... I created the same corset as the one above. But this time I made a bib out of the hot glue. You proceed the same way as you did for the corset, except you'll need to line the area around the neck of the doll with aluminum foil before applying the glue.
The back of the neck and the center back waist provide points where you can attach a ribbon for closure.
I've used white for my corset and necklace, but feel free to play with colors. What I do not recommend is painting the underside of these accessories. You don't want to stain the doll with paint!
HOT EFFECTS
Hot glue + craft foil equals melted metal effects! Once I figured this out, I decided to make something "Very Versace." Gold on black.
1. First of all, make the corset of your choice. For this I have used a black cotton. But any fabric is fine.
2. The hot glue is applied directly to the fabric. I would recommend cutting the foil into small squares and working in small areas instead of trying to cover too much at the same time. The glue cools down really quickly!
3. As soon as you apply the glue to the garment, lay the square of foil directly on top (dull silver side down onto the glue) and press.
4. The carefully peel the foil away. Top to bottom is mostly best!
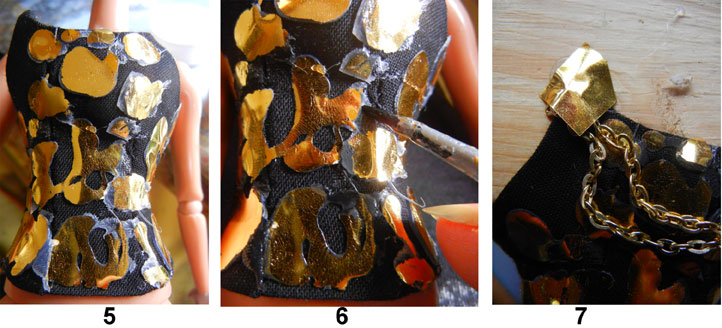
5. Keep going until you have covered the entire bustier.
6. On mine, the glue shows, so I went back with paint. However, the next time I do this, I will use a black glue stick instead of white! Or...there is a metallic filled glue pen that supposedly looks just like shiny metal which should also be interesting to use.
7. In keeping with the spirit of Versace, I attached gold chain which drapes over the bust. After sewing the chain to each side point of the bustier, I hid those points with a little glue and foil!
My finished result...Very Versace!
Then I wondered, what it would look like if I were to do a hot glue foil on a metallic leather....
The result was a shiny areas over a "hammered" metal look.
This was so much fun. You can do this on any material. The blobs of irregular shaped "metal" almost resembles jewelry. On this tweed top, I randomly applied both silver and gold globs
And just as I thought I was finished with this project, the idea came to me....what happens if you apply dots of glue/foil to, say...sequins!
It looks like paillettes mixed in with your sequins. Quite interesting!
Let's Talk Accessories...
Unless it is the bib that you want, the process is simple.
1. Apply the glue directly to the dull silver side of the foil in the pattern of your choice and let dry.
2. Peel the glue away from the foil
3. Wrap one point with a little wire then hang from another bit of wire.
I created the belt the same way. Determine the width of the doll's hips. The create your design with the glue directly onto the surface of the foil.
When cool, peel away from the foil.
I use ribbon to tie the two ends together. Belt can be work with the opening in the front, side or back.
The bracelet is a little more tricky. I did try to do this flat then glue the two edges together. But when it has cooled, the glue doesn't have all that much give. You would have to melt areas of it so that it bends around the doll's arm. Or...
I found a wooden dowel or pencil roughly the same diameter as the doll's arm.
1. Cover the dowel with aluminum foil and rub a little bit of lotion or vaseline onto the surface for quick release when you are finished. Apply the glue all around.
2. Remove from the dowel. If it breaks in areas, don't worry. You can always come back with your gun and melt those broken areas back together or add more globs of hot glue.
3. One more thing... You can always press in beads, rhinestones or whatever while the glue is still warm. On the middle cuff, I pressed in some frosted beads.
And yes...you can always use a little foil to get the look of a metal bracelet!
Like us on Facebook: @FashDollStylist
We're also on Pinterest: @FashDollStylist
And of course, we are on Instagram: @fashiondollstylist
Unless otherwise noted, all images and text of this blog are the copyrighted property of Fashion Doll Stylist 2022. We are independent and not part of any other group or website no matter where this post or its elements appear on the internet or social media. Please request permission before reproducing any parts of this post. And please, always credit us.