Saturday, March 25, 2023

Oscar Buzz 23


This was a most interesting Oscar "Red Carpet" event. First of all the carpet was champagne and not red. The  number of nominees and Oscar winners was, perhaps, the most diversified in the Academy Awards' history. But for my purposes, most of the dresses worn by the celebrities were tasteful and some designs even provided a good dose of inspiration for the one-sixth renditions I would be creating for my divas. For this post, I chose 12 dresses, though there were a few others I wanted to try. My biggest regret...that gorgeous Moschino plum colored chiffon gown worn by actress Angela Bassett. I could get a hold of that fabric in a timely fashion. But for the ones I singled out....I got ambitious. Very ambitious. Some of these dresses were quite simple, however for a few, I had to treat them as pure craft projects. No pattern, I build the dress piece by piece, directly on the doll as I tried to figure it out! All in all, though, the trends from this year's event fell into three main categories: Simple Elegance (column dresses), Cake-Top Ballgowns, and Peek-a-Boo I see you. The color story was very clear..lots of black, lots of white and the occasional burst of bright color.

Lady Gaga is always a standout for my girls. She pushes the envelope with such class and elegance. For the most part, we didn't care too much for the Peek-a-Boo dresses. Though my girls can wear them well, most normal human bodies cannot. And there's always the question of...what happens when the body starts to move under those cage-like structures. But this Versace dress worn by Gaga..we couldn't resist. And here is what I mean by a pure crafts project. I used the netting (taken from the selvage edge of some sequin fabric I had on hand) and constructed a bodysuit. I thought this would be the best way to get the bodice close to the body without seams. On top of this, I stitched on a bra top. I used a stretch jersey inasmuch as the bodysuit was stretch. In hindsight, this was not the best fabric because it didn't lay as flat as it should. The outlines are made of 1/8-inch (3mm) satin ribbon. I would have preferred to use something matte, but yarn was out of the question because I needed something flat and I've never seen 1/8 inch ribbon in velvet. For the skirt (which is separate) I started out with a jersey skirt but it didn't have the structure needed for the stark A-line shape. So I swapped it out for a fabric with more body. The "jewels" on the belt are stickers. Her necklace is the double row of "diamonds" we featured in the previous post.

You know me...I LOVE a good basic black dress! I suppose I love them so much because, not only do they go everywhere, but you can dress them up or down. In this case, this one, worn by actress Andie MacDowell and cut in stretch velvet with its asymmetrical neckline is from the house of Saint Laurent. For this dress I used a basic jersey pattern and simply drew in a similar asymetrical neckline. It serves as the perfect backdrop to help showcase Lindsay's cascading "diamond" necklace.

As soon as we saw Vanessa Hudgens, one of the red carpet greeters on Oscar night, we fell immediately in love with her Chanel gown. Again, very simple, very elegant and 100 percent class! For the version modeled by our lovely model, Belle, I used a stretch velvet trimmed with white satin. I kept her "diamond" necklace simple. It's a single row of rhinestones tied into a single knot in the middle!


The problem with black dresses is that, most often, you cannot distinguish the details. So for me, the Dolce et Gabanna dress worn by Phoege Walker-Bridge appeared to be a column dress with a sheer black lace corset top. For my girl, Helena, I created a black lace corset worn over a sleek black narrow skirt. The look begged for something else. So I tossed a fancy embroidered shawl with silk fringe over her shoulders. Only when I finally saw a larger photo of the original dress did I discover that the skirt is made from dévore (burn-out or acid etched) velvet. Dévore will be the subject of a project I will be presenting in the near future. I have to order the supplies. 

But for the moment, what I would like to bring your attention to is Helena's necklace. It is a 1/6 scale rendition of the diamond version of Elsa Perretti's serpent necklace for Tiffany's. I added a clay head and tail (later dipped in silver glitter) to a length of rhinestones. 

My Barbies were all over award winning film maker Ava DuVernay's shimmering look. Instead of sequins for the shawl and train, I used a dark silver Lurex. I also used a panne velvet for the dress underneath. On the other hand, we did not think she Ms. Duvernay needed the belt which, in our opinion, interrupts the sleek lines of the dress. 
We were very happy to see the first Asian actor win Best Actress. (It's about time, no!!!) Congratulations Michelle Yeoh. We love the soft white gown she wore from the house of Dior. For our girl Yoon's 1/6 rendition, we did not have time to source out the feathers and apply them one by one. So... we cut out the dress and added row after row of a sheer nylon cut into fringe then attached row by row. Around her arms...a whisper of white tulle. (P.S. We tried to get Yoon to smile. But she's bashful and this is her first time on the red carpet and this was her first cover shot. She was very nervous. Sorry about that!) 

Nicole Kidman is another actress we always have our eye on when she arrives on the red carpet. Her dress, from Armani Prive, is a simple, one shouldered black sequin sheath, slit up the thigh and adorned with silver roses. For our girl Karen, we stuck pretty close to the original design, using a micro sequinned fabric decorated with silver Lurex roses planted on one shoulder and the top of the thigh.

Quelle Elegance! Here is Danai Guirira looking positively regal in this gown designed by Jason Wu. It is a very simple but spectacular dress with the strapless bodice topping a full gathered skirt. Our girl Grace wears her version in the same elegant fashion. We got a little fancier with the bodice, opting to use flattened drapes over the torso. And please note.... we were able to recreate a similar mile-high hairdo! 

Here's another "cake-top," fit and flair scarlet dress designed by Elie Saab and worn by Cara Delevigne. It is an one-shouldered gown with a bodice draped close to the torso and lots of volume in the skirt. We recreated the same look for our girl, Yvette...right down to the giant rose on one shoulder to the thigh high slit in the front.

And while we're on the subject of big dresses..... We really wish the stylist for Florence Pugh had chosen a simpler dress for her. While we saw so much potential in this dress, we felt it overwhelmed the wearer. The black hot pants and platform shoes underneath did nothing for the overall look. Moreover, Ms. Pugh came across as looking as if she had gathered up all of her bed linens around her just before appearing on the red carpet. That said... we did like the spirit of the dress and was motivated to select our fresh face model Ingrid for our 1/6th version. I chose an oyster white taffeta...a fabric with enough body to carry off such a spectacular look. Initially I began with a bra top, but ended up with a more simple empire waist bodice (which I pinched in the middle)  instead. It was just easier to suspend the skirt from a simpler structure. The skirt is gathered then attached to the bodice. I will be honest...this resulted in a dress that was way too heavy to stay up. So....I used small strips of clear vinyl to create straps which are nearly invisible in my photos! The dress by itself was nice, but I felt it could be taken to the next (more avant-garde) level with another skirt underneath. The sleeves, both in my version and the original version, are separate. This is a large tube with gathers on both ends. We tacked the excess together in a variety of spots across the back. The end result is abstract yet elegant at the same time. In some ways, it almost recalls the creations of architect Franck Ghery .

Another cake top dress....
Normally I loathe this sort of fishtail gown, here, worn by India's Bollywood superstar, Deepika Padukone. (Please note, Ms. Padukone was misidentified by the Hollywood press as Camillia Alves.)  But Veronica (who is modeling our dress) reminded me how this look really smacks of old Hollywood in its glory days. As simple as it is, this dress taught me a few lessons. There is a reason why you rarely, if ever, see doll dresses in velvet. Other than a simple tube dress, the fabric is too thick for most 1/6 scale garments. I began with a small empire waist bodice that I pinched in the middle to create the sweetheart neckline. The skirt part of the dress is attached to this bodice. A gathered piece of fabric is attached to the hemline. I made the decision not to go as wide as with the original dress because I felt it made the dress appear a little too kitsch. In the original dress, there are pieces gathered into the dress draping down from the shoulders over matching gloves. When I tried this, those pieces did not drape well; they appeared to be wings. So.....I made the decision to create instead, matching velvet gloves with poufs on the top. This gives us the option to wear the dress without the gloves and under a coat, for example.
 

I've saved this one for the last because, other than the fact there is a silver dress in both looks....there is no relation between the two. I chose this dress because I do like the notion of silver combined with another color. Ms. Bingbing's dress is lovely, but I thought it could be so much more interesting than that standard beaded column dress with deep decollete that we know so well. I'm also not fond of the color of the "duster coat" nor of its overpowering winged sleeves. For Anna's dress, I chose some sparkly wired Christmas ribbon and had a little fun with how it unraveled at the edges. Instead of a big bulky coat, Anna chose a pleated silk wrap in teal. Softer, more contemporary. 


Like us on Facebook: @FashDollStylist
We're also on Pinterest: @FashDollStylist
And of course, we are on Instagram: @fashiondollstylist


Unless otherwise noted, all images and text of this blog are the copyrighted property of Fashion Doll Stylist 2023. We are independent and not part of any other group or website no matter where this post or its elements appear on the internet or social media. Please request permission before reproducing any parts of this post. And please, always credit us. 

Friday, March 10, 2023

Diamond Life


For awhile now, I've been wanting more estate jewelry for my girls. But for reasons of time, cost and current geopolitical issues, I have not wanted to order from abroad. I have seen ropes of rhinestones, but never knew how to work with it. Recently I found what's called "rhinestone chain" at a nearby bead and crafts store (though you can order from Amazon if you know what you're looking for). And eventually I discovered a DIY site that explained the various things you can do with it and finish off the ends. You can use glue instead of solder and you can even wire the chain to another surface. To my surprise, it was amazingly easy. And so....the post which I had hoped would go up on Valentine's Day is here, just as my girls are setting their sights on Oscars night at the red carpet!  

For this project you will need:
Rhinestone Chain (3mm)
Rhinestone Cup Chain Ends (for chains 3mm)
Jump rings
Wire to make S hooks 
Strong glue
Jewelry pliers

At first when I set out, I had visions of grandeur! You know, Queen Elizabeth style baubles. But then I took the time to research trends from high fashion jewelry houses.

It should come as no surprise that given current lifestyles, simplicity reigns supreme! In any case for us, it is a good place to start. I had fun with this project, so trust me, as I find more stuff that can be used for jewelry making, I will be coming back to this subject in the near future!!! For my first attempt at creating "fine jewelry," I focused on the basics in my efforts to keep things fast and easy.


Anna's first jewels! What could be sweeter than a single row of diamonds! Making this choker is simple. A piece a string around her neck will give you an idea as to the amount of chain to cut. Add another 2 links to allow a bit of ease. 


This is so easy, The rhinestone chain is a series of crystals embedded in minuscule, clawed cups, linked together by a bridge which runs throughout the length of the chain. The metal is very soft. So you can cut it with a pair of ordinary scissors. Then there is the chain cup ending, a small claw link with a tab on one side and prongs to hold down the jeweled end of the chain on the other. Hold the chain cup by its tab and place the end of the rhinestone chain inside (a single crystal). If you look carefully, you will notice there are two prongs standing upright. Using a pair of jewelry pliers, carefully press each one towards the stone. You don't need to press too hard as the metal is quite soft. 

You will also notice that the tab has a small hole to which you attach a jump ring or a closure. You can use anything you want. However, these necklaces are quite tiny and getting them on the doll can be a real pain. If you plan to sell your creations, go ahead and use the standard jewelry clasps. But if this is for yourself, you might want to make your own S rings with an extended hook! Note: for instructions on making your own jump rings or S-rings, see "Pearls of Wisdom."


With this single strand of "diamonds" you can create a lot of different looks simply by hooking on a small pendant-- perhaps something out of your own jewelry box. Those pendants which I wore in my teens and early 20's make for impressive estate jewelry on the doll! All you need do is to create a small hook out of a bit of soft wire which can be attached to the front of the necklace (as opposed to threading through the chain)! 


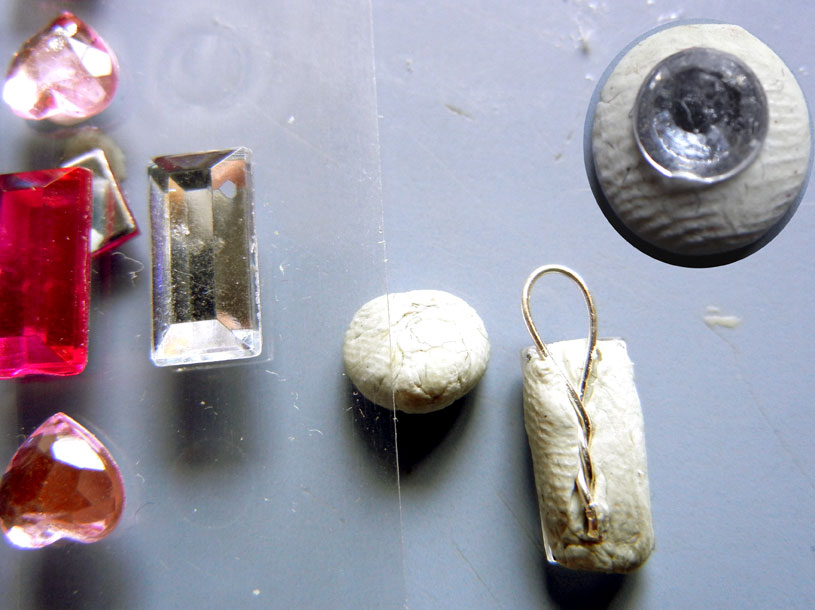
Most pendants fall vertically from a chain. However, I found a pendant and added a loop of wire around the lower end so that I could connect it to rhinestone chain on both sides, thus creating a very glamorous "diamond" choker. 


And even if you don't own pendants, feel free to create your own using rhinestone stickers! 

Use a tiny bit of air dry clay and press the jewel onto one side. Make a loop with some thin wire, then twist and press into the clay to completely cover. At the top right, I started out with a round stone in the center of a small ball of clay. Then I added a row of rhinestones from the chain around the perimeter. You'll see the result in the photo below.

You can also use a longer single chain to wrap around the doll's neck, thus giving the illusion of a double chain. For the one below, I added a S-ring only on one end of my "rope."

While we're on the subject, let's talk about a double row of diamonds. You can cut two lengths of chain and put jump rings on both ends. Then join those ends together with a single ring before adding your closure. 

Dolly can wear it as is or..... Atoia is modeling a double strand to which we added a that mega-baguette diamond we created earlier! But you can also create double strand choker that is....shall we say....very Van Cleef & Arpels!


Normally the two strands are soldered together, but a good clear glue works just as well!


After measuring your doll's neck to determine the amount of chain to cut, you will measure out another length that is 2 stones shorter. Turn one length of chain on its side and, using a toothpick add a line of glue. (This gets tricky, but keep on going.) Next, line up the two rows of chain close together gem side down, then liberally apply glue to the back.  Press the two rows together using your pliers. Allow to dry and add a second coat. 


While researching,  I came across the Van Cleef "A Cheval" necklace....an extraordinary piece of jewelry valued at about $700 Million dollars! My dolly's version didn't cost nearly that much, but don't tell that to Dorian who felt like a billion dollar babe in hers!
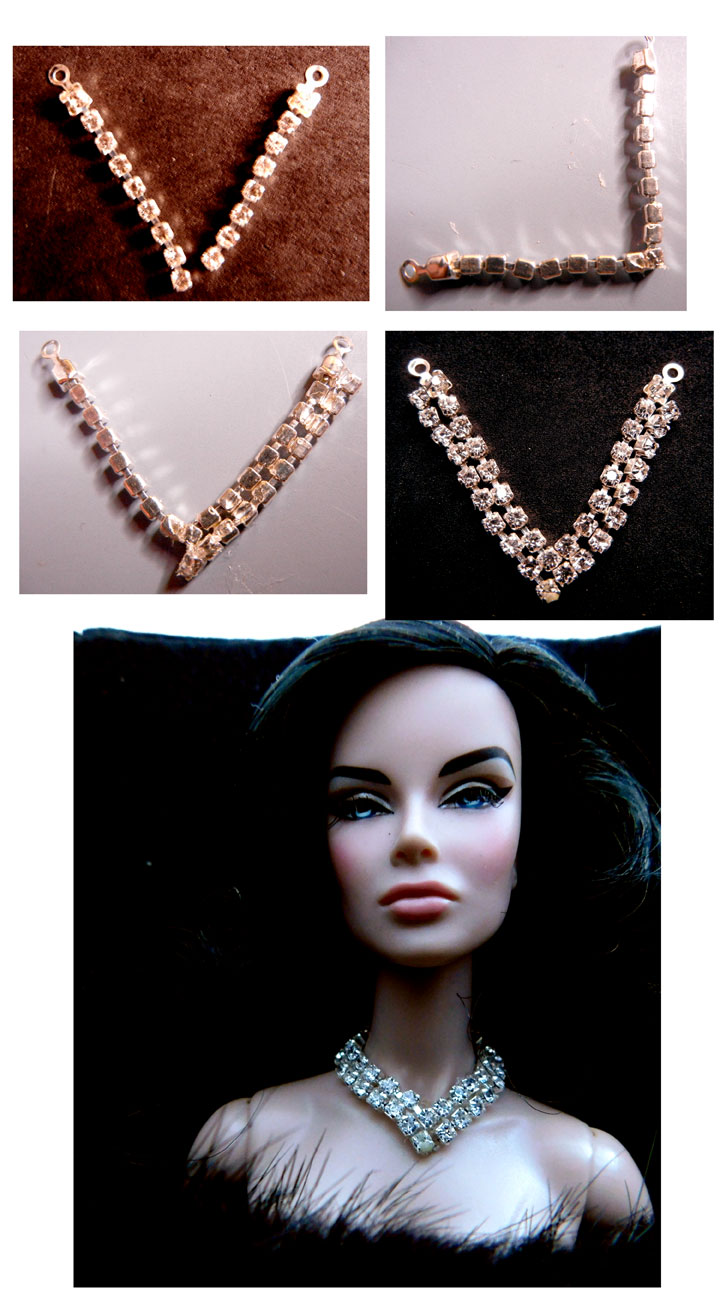
After deciding where on the doll's neck I wanted the necklace to fall, I cut two lengths of chain. One will be one stone shorter than the other. Glue the two together on the side at a 90 degree angle as shown. Then carefully add some glue to the side of the send row and press together. Repeat on the other side, being sure to meet at the center. When all has lined up, turn the necklace over on its back and apply glue. Let dry. Add a second coat of glue.


This method of gluing (which replaces soldering) allows you do have a little fun with the design of your necklace. I'm sure many of you have seen some version of Iman's necklace. This is a very contemporary design and super easy to replicate.


 I started out by measuring the chain around the doll's neck then deciding how far down I wanted the diamonds to drop. You can end with something symmetrical or make one side longer than the other. I decided where I wanted the chain to meet in the front and tied a bit of wire to keep it in place while I found the center point in the back. Cut the chain at the center point and add the chain cups and closures.
then turn the necklace over so the back is facing you. Add a drop of glue to two links where the necklace will join in the front. Let dry, add another drop of glue.


Or.... you can simply glue on extensions at right angles to the basic choker. 

This is where this project would have ended had I not gone back to the store.... I discovered some "novelty" chain on sale. But, unlike the rhinestone chain, this one is made of plastic, rhinestones and thread. I assume it was really designed to be sewn onto a garment, but since it was the closest I could find to the Cartier necklace that inspired me, I decided I would work with it a bit.

It isn't as heavy as the rhinestone chain so it wouldn't lay flat around Catherine's neck. (Metal is always better for this sort of project.) So after carefully pondering the situation, I decided to add a bit of thin wire to "tame" it. 


I threaded the wire through the double rows of thread running throughout the length of trim. Instead of threading, you can also tightly wrap the wire around these rows. I left enough wire to create a loop on one end and an S-link on the other. 

And true to form...I was able to shape the necklace to better fit the necklace to the doll.


My goodness, this was a lot of fun. All my divas are now all singing "Diamonds are a doll's best friend!" Believe me when I tell you..... This.Is.Not.Over!!!!!

Looking for more fine jewelry ideas? Check out "Pearls of Wisdom."


Like us on Facebook: @FashDollStylist
We're also on Pinterest: @FashDollStylist
And of course, we are on Instagram: @fashiondollstylist


Unless otherwise noted, all images and text of this blog are the copyrighted property of Fashion Doll Stylist 2023. We are independent and not part of any other group or website no matter where this post or its elements appear on the internet or social media. Please request permission before reproducing any parts of this post. And please, always credit us.