Tuesday, April 30, 2013

Bag Ladies


The girls have been very busy shopping. Today, they explored the "Passage Jouffrey," (next door to Paris' wax museum (Musee Grevin).


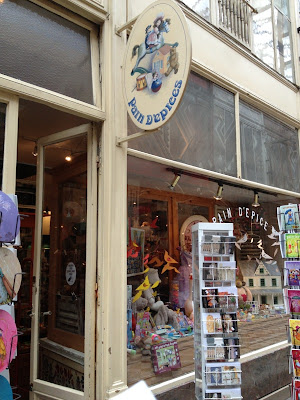
The covered "passages" are the predecessors of the modern shopping mall. Very popular at the turn of the last century, they were veritable bazars, each one with its own personality and specificity. There are not many left, however this one houses two stores specializing in miniatures: Pain d'Epices and Boîte à Joujoux--the latter is where we found the shopping bags.


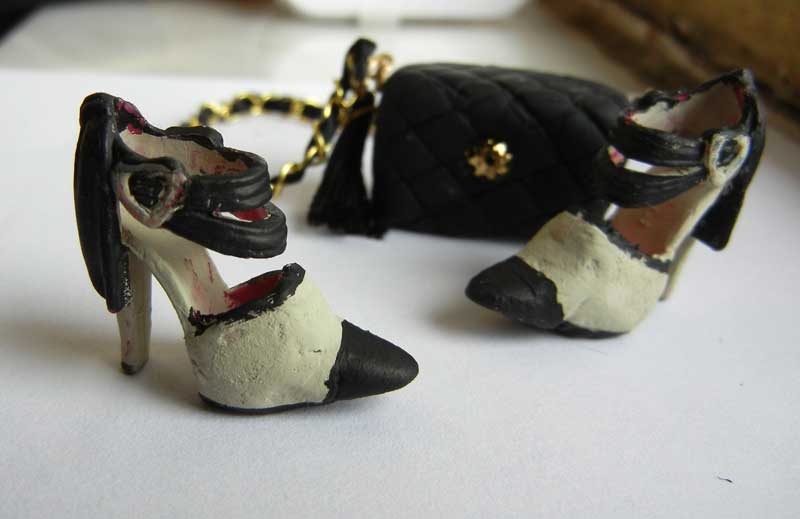
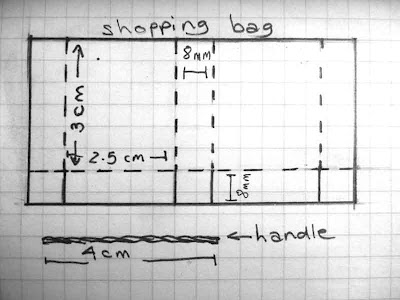
You can easily make your own using a scanner and any shopping bags from your local stores. The important thing is to shrink all logos and designs to size then print them out allowing enough space to cut out the rest of the bag. The dimensions in my diagram were taken from the "Chanel" bag, though you can make yours slightly larger. The handle is made using embroidery yarn.


The other items featured today includes the dolls' berets. This is quite simple. Cut 2 circles of the same size out of felt and stitch together. Cut a small circle out of one (no larger than 1/2 inch diameter). Then gently stretch the hole to fit the doll's head. Turn inside out. Press. I've added a tiny ribbon and bow on one.
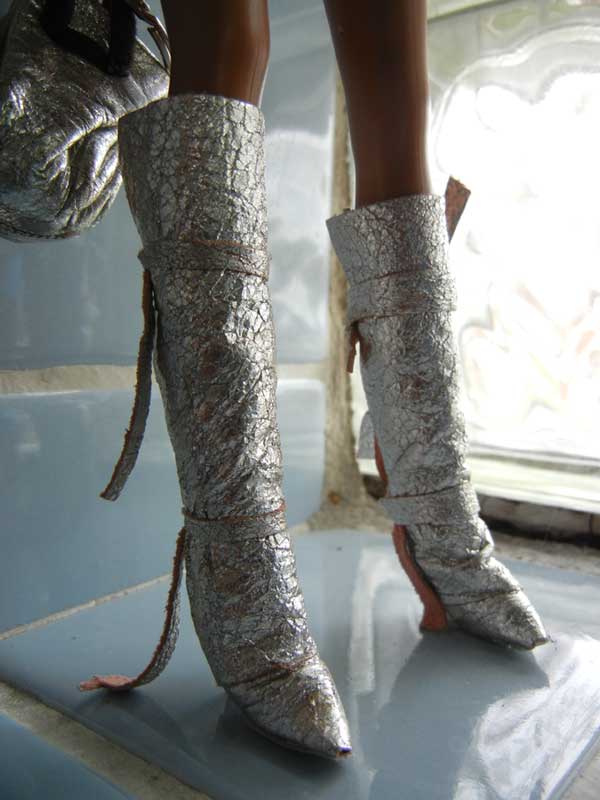
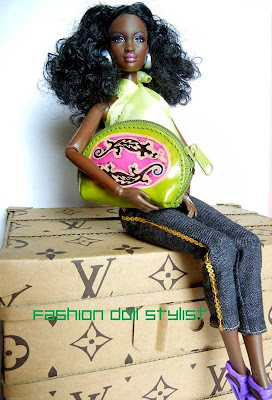
And finally, tiny coin purses make wonderful handbags for the doll. The one in the arms of "Sissilie" was found at an exotic store called "Tcha Tcha" situated in the same covered passage.


By the way...Sissilie is sitting on a real Louis Vuitton trunk. This one is made of corrugated cardboard and was offered as gifts to the press to mark the opening of their store on Avenue Montaigne back in 1989. This store was later moved to a newer space on the Champs Élysées.

As you can see, the girls have laid claim to my perfume collection.... Alas!!!!


Next stop: Marché St. Pierre for fabrics and trims!!!!

Follow us on Twitter: @FashDollStylist


All text & images property of © Fashion Doll Stylist. 2013. Please do not reproduce without prior permission.


- Posted using BlogPress from my iPhone

Tuesday, April 23, 2013

Lace it up!!!

Lace camisole worn with a dramatic drape of washed lace.
One of my favorite materials to work with is lace. Dating back to the 15th-16th century, the concept of its design was to give the impression of flowers suspended in space. With a beautiful piece of lace draped around the doll, you really need little else for high fashion drama. The lace items featured in this post, were built directly on the doll.

The one-piece camisole is easy to make and perfectly showcases the beauty of the pattern. I begin by wrapping a length of lace around the doll, carefully placing the motifs exactly how I want them to fall over the body. Pin at the back. Next, I pinch the lace under each bust, creating a "tuck" (allowing the fabric to release above and below the pin). Turn the doll over and make two more tucks on either side of the doll. Make sure the volume of the camisole is well distributed. Adjust each tuck until the garment is well balanced. Now, hand stitch the tucks in place. Turn the cut edges under at the back and add a hook & eye for the closure. In this case, I have added straps using another lace trim.
Steps 1-2

Step 3
The above doll is from Tonner. However I used the same lace for the 11 1/2" Barbie repeating the same exercise. It falls lower on this doll, however, on her, I've decided to create a dress. I drape the camisole exactly the same way as featured above. The skirt is formed directly on her body by wrapping another piece of lace around her waist, making four tiny pleats to pull the silhouette close to her body.


Steps a-b-c
And finally.....lace pantyhose. While lace stockings tends to be a trendy item in America, it is a staple in the French women's wardrobe. The lace has a two-way stretch. I begin by wrapping a piece around the doll's waist and pinning at the back over the hips.

Steps d-e-f
Stretch the lace front to back of each leg as you pin down the inner seam (a). Clip and repeat for the other leg (b). Trim the excess (c). Remove from the doll. Hand stitch each leg closed and stitch down the seam at the back (d). If there is a little space at the point of the crotch, be sure to close it shut. Turn the pantyhose outside in (e). Then put the stockings back on the doll. Measure a small piece of elastic to fit tightly around the waist. Carefully stitch this in place (f).

Lace stockings worn with the stretch lace bodysuit.

Next stop....the girls head to Paris. Join us for a fun filled doll's guide to the City of Lights!!!!

Catch us on Twitter: @FashDollStylist.

All text and photos property of © Fashion Doll Stylist. 2013. Please do not reproduce without prior permission.

Saturday, April 20, 2013

If the shoe fits....

One of the most difficult things to add to the 11.5" dolls' wardrobe is shoes and especially boots. Yes, you can order generic shoes from Ebay or Amazon, and yes, you can even find a few WONDERFUL shoes scaled down for the foot-tall diva from AngelicDreamz.com, but, for the most part, the lack of a proper assortment of shoes and boots are the weak point of my dolls wardrobe.

I will tell you straight away, making teeny-weeny doll shoes is NOT one of my strengths. (I will recommend, however, fellow blogger: FashionDollShoes here at Blogspot.) Nonetheless, the point of this posting is to show you how to modify existing Barbie shoes with paint and air-dried modeling clay.

I cannot understand how Barbie, this so-called fashion icon, could be happy with so many pairs of pink footwear. But I can tell you this. The dolls who come to my house wearing pink shoes, immediately remove them, look up at me, and plead for ANYTHING else!

The easiest thing is simply to give the shoes a new coat of paint, as recommended mentioned in my Tipster post. However, there are times when you either have more than one of the same pair of shoes or you simply don't have shoes that adapt to your fashion sense. This calls for more drastic measures.


You can change the shape of the toe or completely cover them using air-dried clay. (You cannot use oven bake polymer clay because the shoes will melt.) If you are filling in open areas including the toe, roll a bit of coated paper (like the paper backing from adhesive labels, for example) and place it inside of the shoe. I would not build the shoe directly on the doll because you could harm the finish of her vinyl feet or worse, the shoe could stick to the doll's foot! Take your time while you are modeling the clay and try to get as close as you can to the desired new shape. Keep the two shoes together as you work so that they end up the same size. Cut away the excess using a small knife. Remember, too, after the clay has dried, you can sand it further down. Once dry, you can paint your shoe. Try it on the doll. If it's too thick, sand it further down and repaint. To paraphrase a friend of mine, "It's not furniture, but it's not bad."


I had an extra pair of pink, open-toed boots. Again, I stuffed the toe with coated paper so that I could change the toe. What is important to remember when modifying boots is to respect the back slit (which enables the doll's foot to get in and out). You can add air dried clay to redesign the toe or foot or even change the texture of the boot, but keep the clay away from of the back vent. In the case of the beige boot, I modified the toe then gave the whole thing a coat of paint and added a chain. You can add beads, tiny charms or, like my second variation,  I wrapped then glued rows of sequins around the shaft of the boot.


For my silver boot, I covered the toe with a triangle of silver leather and folded the excess under the sole, which I covered with tape. The shaft of the boot consists of a rectangle of leather which I wrapped around the boot and glued down, again leaving the back slit in tact. I used ties to keep everything in place while the glue was drying, but decided I liked the way it looked as a design detail and left them in place.


Dip your shoes or boots in glitter. Cover with lace. Wrap with ribbon, The possibilities are limitless!


Find us on Twitter @ FashDollStylist

All text and photos property of  © Fashion Doll Stylist. 2013. Please do not reproduce without prior permission.


Wednesday, April 17, 2013

Dolly's got a brand new bag...

The dolls have been in my closet...AGAIN!!! Though I've always seen to it that they should have the proper purse for any outfit....they've somehow developed an appetite for classic designer bags...like the Chanel quilted bag, the Hermes Kelly bag.... As a result they ganged up and insisted I find a way to come up with the goods.

This is an exercise involving crafts. Simple envelope bags are pretty easy...fold fabric, glue, add straps. But I accepted the challenge to be inspired by fashion's quintessential "it-bags." As in the case of its knock-off counterparts, what is important in recreating miniature interpretations of these coveted items, is to figure out what which details are important to "providing the illusion." It is not important for the handbag to open and close (unless your doll has special powers that mine do not possess). On the contrary, you must pay special attention to the bag's most popular silhouette, its straps, closures and any other detail like tassels or bag jewelry.

 The easiest way to create these bags is to begin with a base. And for this base I use either polymer clay or air-dried paper clay. The first comes in a plethora of colors and hardens in the oven within 30 minutes, while the paper clay dries in a few hours and has the advantage of being super light weight.

In the case of the Chanel and the Dior inspired bags, I modeled the clay into simple, rectangular loafs. Using a razor or knife, I drew in the "quilted" patterns. I used a large safety pin to bore a hole to later pass through a wire which hooks onto the chain strap. And, as in the case of Chanel bags, I threaded the chain (used for the strap) with 1/8" (3mm) ribbon, gluing the edges down at each end. For the "Dior" bag, I cut up the plastic jewelry delivered with one of my dolls to make the handle. To that I attached two tiny objects to a wire loop. (The identifying details of this type of bag is that something dangles from the handle)

 
The clay base also serves as the perfect base for making leather handbags. I cut out separate panels for the side and glue directly to the sides of my form. Next, I trace the front and back silhouette of the bag directly onto the skin. Cut out and glue onto the form, making sure there are no gaps where it meets the side panels. In the case of the lizard skin which is rigid, I used a razor to lightly score the skin on the outside so that it will break where it needs to bend. (Just be careful you don't cut through the skin.) When you have finished covering the form with the leather, trim away the excess. If you have matching paint, you can paint the cut edges.

For the tassels, I used a few loops of embroidery thread, tied and cut to scale. You can wrap the base of the tassel with lightweight wire to hold in place.


This doll's carrying a REAL Dior. (Surprise. It's a Dior keychain!!)

Find us on Twitter @ FashDollStylist !!!!

All text & photos property of © Fashion Doll Stylist. 2013. Please do not reproduce without prior permission.

Sunday, April 14, 2013

Oh me, oh my, oh Maillot!

While cleaning out the basement, a few days ago, I came across an old undergarment belonging to my mother made of stretch lace. My first inclination was to make another item of lingerie (which I did), but the idea was to create a bodysuit that could be slipped on without the need for Velcro, snaps or other closures. This led me to the "maillot."

In layman's terms, a maillot is a one-piece bathing suit / bodysuit. This tiny garment requires very little fabric. My original idea, in fact, was to create the garment directly on the doll. But then I realized this is such a useful basic garment, I'd probably want to cut more than one and using different types of stretch fabrics. So I sacrificed an extra bit of lace to drape the garment and then used a fresh bit of lace for the final bodysuit. In addition, I used the foot of a man's sock for the navy blue bathing suit.

The lace in this garment (which you can also find in the stores) has 2-way stretch, but you'll need to figure out which direction has less stretch to determine the "straight grain of the fabric." In other words, you'll want everything to stretch more horizontally than vertically.


Steps a, b, c, d
As with the drapes for the slopers, I place the fabric over the doll and tape it to her chest and back to hold it in place (a). I stretch the lace a bit, pinning it in place at the sides (b). Then I cut away fabric over her thighs and pin the front to the back lace panels at the doll's crotch (c). Once that's done, I can cut a better shape over the thighs of the doll (d).
Steps e - f

Cut away the excess at each side (e). Use a soft piece of chalk or pencil to mark the seams where the pins are (f). Remove the pattern from the doll (g) then trace the markings onto tissue paper (h). Fold the front tissue paper pattern in half (i), making slight corrections to the one side so that the pattern will fall symmetrically on the body. Then trace off to the other side. Be sure to check to make sure the side seams of the front and back line up. If not, adjust so that they line up. Also, check to make sure the bottom seams match up as well.

Steps g - h
Next, I have given you two options. You can join the two patterns at the crotch (bottom) so that you cut the bathing suit in one piece. OR...You can leave them separate, adding seam allowance to the crotch and eventually adding a bit of Velcro to "snap" it shut. The more things you add at the top of the maillot (straps or other decorative details), the more you will need the pattern with the crotch closure.

Step i

You could sew this by hand. However if you decide to machine sew lace or any other delicate fabric, you will need tissue paper to keep the machine from gobbling up your maillot. Place enough tissue paper under the fabric to line the entire seam, then stitch. Simply tear away the tissue paper and you're finished. I turned the edges over and hand stitched. However, if you have stretch lace or elastic, pin it in place while stretching slightly and hand stitch it in place.


You can use non-stretch lace over the legs but not at the top because it will no longer stretch over the doll's hips. You can add straps at the top and fasten them to the inside of the back using dots of Velcro.

In short, this is a very basic garment that can be worn under jeans, a sarong OR as the foundation for limitless creativity!


Find us on Twitter @FashDollStylist !!!
 
All text and photos property of © Fashion Doll Stylist. 2013. Please do not reproduce without prior permission.