Tuesday, April 21, 2015

For Whom the Bell Tolls...

Next Fall promises to be an exciting time for fashion trends. There were lots of great new looks....particularly in terms of pant silhouettes. I love skinny jeans but frankly they've been with us for over a decade. It's time for something different and Fall trends really deliver when it comes to offering a variety of shapes.

One of those new looks: bell bottom pants---is something we haven't seen in quite awhile. First introduced at the onset of the Carnaby Street Mod era with pants where the hemlines flared out like trumpets over the ankles, it became a signature look of the 1970's with an assortment of flared styles ranging from sexy calypso pants to elegant palazzos. For this project, you will need to pull out your basic pant sloper. Don't have one? You can find it HERE.


You should first decide on the look you'd like to achieve. This tutorial gives you the basics. From there you're invited to make changes and do your own thing!

THE CLASSIC BELL BOTTOM PANT
Before we get started, lay the doll next to the pant sloper and mark where you want to introduce the flare. All the area above this line will be fitted to the hips or legs but flared below. I've marked my sloper at the top of the hips as well as just above the knees because I will be making bell bottoms which will flare out from either of these two points.


1. Decide how much flare you want and mark to one side of the pant leg. Whatever amount of flare you put here, you will need to add to the other side as well as to each side of the back sloper.
2.. Using a compass, I place the needle where I want to introduce the flare and stretch it so that the pencil touches the hemline on the front pant sloper. My mark will create a 45 degree angle from the leg---or a half circle around the ankles when the leg is completed.
3. I draw a curved line to the mark I just made. The end of your line will be above that mark.
4. Draw a line from the side of the pant to the end point of the curve.
5. Repeat on the other side.
6. Remember to add the identical amount of flare to each side.
7. Add seam allowance to create the pattern.
8. Apply steps 2-6 (using the same amount of flare) to the back pant sloper.
9. Add seam allowance. You can add a waistband or fold and stitch down the fabric at the waist.


A variation of the above draft, the flare is 90 degree angle from the pant leg, (a half circle at the end of the pant leg) or a full circle around the ankles in the completed garment.
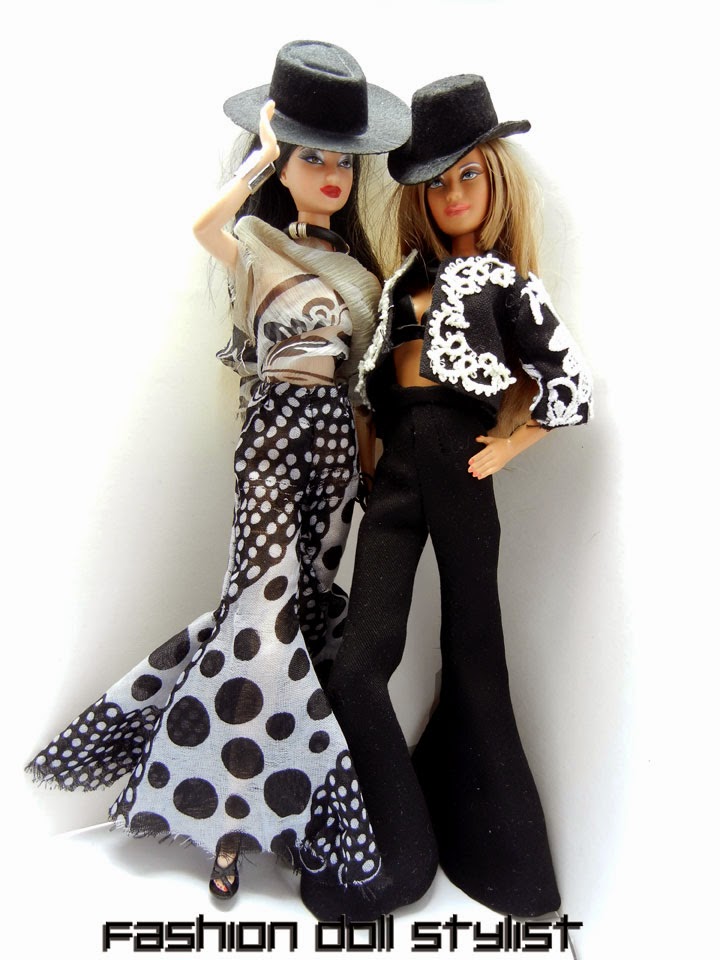
TRUMPET BELLS
The procedure is identical to the classic bell bottoms, however I've simply started my flare further down.

PALAZZO PANTS
There are two ways to make this look, depending on the effect (and the fabric) you want. By maintaining the darts in your pattern (left), the pants will hug the hips and flare out under the hip line. On the right, we've pivoted the fullness of the darts out and into the legs. The hipline is less fitted. However, it is a look best suited for knits and soft or silky fabrics.

Palazzos with darts.

 The draft is identical to that of the classic bell, with the exception of my introducing the flare at the top of the hips instead of the knees.

The end result will hug the doll's hips then flare to the hemline. With this method we can also control how much flare we want which is important if you want a conservative silhouette. But for a full flare, we can make a dartless palazzo pant.

1. Again start with the basic pant sloper. Trace the sloper onto paper. Make a vertical line down from the apex of the waist dart to the hemline.
2. Cut along that line. Fold and tape shut the dart. Trace onto another sheet of paper.
3. Repeat steps 1-2 on the back sloper.
 4. Measure the width of each pant leg at the hem. Note the difference then divide this number in half.For example, my front pant pattern measurs 2.5 inches. The back sloper measures 3.5 inches. That means there is a one inch difference between the front and the back. You will add that measurement to the smaller pattern (the front in this case). My front sloper now measures 3 inches at the hemline.
5. You will deduct that measurement from the wider pattern (the back in my case). My back pant pattern now measures 3-inches as well.

WEDGIES
If all of this is really too much for you there is a super simple way to get your girls in bells. It's a look borrowed from the college kids of the 1970's.
 1. Start out with a pair of ready-made Barbie pants.
2. With your compass, measure where you'd like to insert a wedge.
3. With the compass set at the angle of choice, mark a center point and make a full circle.
4. Cut a wedge as full or narrow as you'd like and hem.
4b. Open the side seam of the pants to the desired height.
5. Sew or glue into the seams. You can stop there....or...
6. Add a second wedge to the other side of the pants.
Voila. Instant bells!!!

All images and text property of Fashion Doll Stylist. 2015.

Follow us on Twitter: @FashDollStylist
We're also on Pinterest: www.pinterest.com/FashDollStylist
We're now on Facebook. (Feel free to post your doll photos there!) www.facebook.com/FashDollStylist

Monday, April 13, 2015

Little Stuff....

I like to group my tutorials by theme, as you know by now. But throughout the year, I get little snippets of ideas that, by themselves, don't warrant an entire post. Some are super simple like my fingerless gloves. Others are ideas I've been playing around with for awhile. Some of these you might have seen before as accessories in my fashion report pix.

Baring Arms
I love opera length gloves when it comes to accessories. I use simple tubes of fabric which I make directly on the doll. As a rule, they have no fingers because the traditional Barbie gloves are really mittens and no one wears mittens to a formal ball. Making these are super simple and you can use anything you want: lace, cotton, silk, nylon stocking.... But if you want them to be form-fitted, you'll need a stretch fabric. Rayon/lycra stretch fabric is perfect!!
For the gloves pictured here, I used lace hem tape. Wide hem tape is perfect because you only need to cut two, but if, somehow, you don't have access to this size, then the regular 5/8" (2cm) tape is okay too. You'll just need to (1) stitch two pieces of tape together first. (2) Measure the length of the doll's arm plus enough to fold over at the top and bottom. (3) Wrap the lace, lengthwise, around the doll's arm then lay the front edge over the back and stitch in place.
Here, to the same lace glove, I've embellished it with beads at the top. Having problems getting the doll's fingers from getting caught in the lace. Simple. Put tape around her hands before feeding them through the gloves!

Some of you might still insist on gloves which cover the hands. So just for you, I made the classic Barbie glove.
 (1) Trace around the doll's hand. (2) Trace along both sides of her arm for the length you want to make. This is indicated by the red line. (3) Add 1/8-inch (2mm) to the top of the fingers as well as the thumb (blue line). Then add 1/8-inch (2mm) seam allowance. (4) Hand stitch using tiny backstitches. When completed, be sure to slash the margin the fingers and thumb (tiny red line). Now for the hard part...turn the glove right side out. Use a pin to carefully pull out the thumb.

Jewelry to go...
I'm not a jewelry designer. But that doesn't stop me from affording my dolls exquisite bracelets. Take stamped metal medallions, for example. Whether squares, rectangles or circles, they make fancy bracelets for my girls, simply by bending them around a pencil. You can leave them as is, or decorate them with tiny press on gems.


One evening while window shopping on Ebay, I saw necklaces that made me think of.....earrings. These elaborate "necklaces" worn by these three models are vintage earrings where I removed the findings, added an eye ring, then suspended from either chain or a metal hoop. Nothing could be easier!

Remember that post, "Wired?" I used wide twist ties to make bracelets which I decorated with rhinestones. Well....I started covering them with bits of leather, faux reptile and even added a stone. This a quick and easy way to make a stack of cuff bracelets that are cutting edge! Just remember to use a strong glue. And just in case you don't have access to those types of twist ties, cut off a small square of aluminum from a disposable pie pan. On Carla, I started off with a bit of aluminum and lined it with self adhesive Mylar (from a bumper sticker). The result is a sleek "chrome" bracelet. You can also glue on leather and other materials!

 The tiniest of charms is just perfect to make dolly her own charm bracelet!

Aren't mirrored sunglasses super cool!!! I took another piece of Mylar and transformed an ordinary pair of Barbie glasses into a cool new look for Pat.
 
 
The top photo shows the before and after pictures of my glasses.
1. I started out by peeling off the adhesive backing then laying it over the lens of the glasses. Use a sharp object to "feel" and press the Mylar into the seams of the glasses' lens.
2. You can either carefully peel it away from the lens and cut along the indications. Or take a very sharp blade and cut along the lines you've made along the lens' seams.
Mod Squad
I've been trying to make glasses for my girls for a very long time. I've looked all over YouTube, but frankly, I was not happy with cardboard templates decorated with sparkle glue. I did find something for American Girl dolls which I have modified into something we can use as a fashion accessory for Barbie. With the 1970's retro fashion all over the runways, I thought "Granny Specs" would be an appropriate way to accessorize my girls new look.
 
1. Cut off about 6 inches of 20 gauge wire. Slightly bend one end so that it can hook over the ear of the doll.
2. Bend the wire a little bit away from the front of the face on the side.
3. Mark the inner corner of the eye.
4. Then wrap the wire around a round nose pliers to make a look big enough to frame the eye and then over.
5. Mark the inner eye on the other side of the face.
6. Again, bend the wire around and over the second eye. Adjust so that the loops are fairly even in shape and size. Then bend the wire back to the other side of the head. Curve over the ear and cut away the excess. You can stop right there for the granny specs. Or, with the addition of a small wire bar, we now have spectator wire glasses.
Make a tiny circle to one side of the horizontal bar. Hook onto one of the eye loops on the glasses. Repeat for the other side. With the pliers, press each loop into the glasses.

 
Follow us on Twitter: @FashDollStylist
We're also on Pinterest: www.pinterest.com/FashDollStylist
And we're now on Facebook: www.facebook/FashDollStylist
 
All images and text property of Fashion Doll Stylist. 2015.
 

Sunday, April 5, 2015

Belle du Jour Easter Bonnet

When it comes to wide brimmed picture hats, you won't find trends on catwalks, red carpets or Vogue magazine. Instead, you'll need to view, "Gone With the Wind" DVD, locate the nearest Baptist church or lookup the next"Concours d'Elegance" in your area for ideas.

I grew up within a very conservative Catholic congregation. And though my mother and I dressed up, there was no "style show" at our church on Easter morning. So, mom and I staked out the nearest Baptist church so we could enjoy a mighty fine parade of fancy head gear. Once, we even dared venture to New York City to participate in the Easter parade, but to our disappointment, it was a far cry from what we had seen in the 1948 film, "Easter Parade" with Judy Garland and Fred Astaire. Much later, however, I had the pleasure of being invited to my first Prix de Diane, a "Concours d'Elegance" marrying haute couture, high style millinery and luxury vintage automobiles!

For this Easter, I had planned to do a tutorial on straw hats. Unfortunately I didn't plan my project in time to send off for the proper doll sized materials, so I decided to make my own straw out of raffia. The result was a hat more appropriate for the beach than church, which I will share with you at a later date. So instead, I decided to make something light and very girly.

The Hat Form
For this project (as well as the straw hat we'll make in the future), you'll need a basic hat form. Don't worry, we'll make our own. Actually, I made two. One is made from paper clay (so I could stick pins in it for the straw hats) and the other from oven back clay (to mold hats on). The hat form represents the shape of the hat you're going to make. Will your crown be high or low? Will it be round or square? You decide.

1. To keep things simple, I used a twist tie and wrapped it around the doll's head at the point where the hat will sit on the head. Twist it shut to that it really fits and forms a ring. Now remove it.
2. I formed a small ball of clay, then I put the clay inside of the ring. The clay should fit the ring. Not enough? Add more. Too much? Shave it down. Keep the twist tie on this part of the form until the very end so.
3. Decide how high you want the crown to rise off the top of the head.
4. Add enough clay to match the height of the crown.
5. Now make another ball and flatten out like a pancake. Make it as wide as you think you'll want your brim. (Although, if you decide you want the brim wider later on, you can always tape a round of cardboard to the existing form.)
6. Place the crown on the brim and smooth out the seam where the two match. You can add more clay if necessary. Bake the form (low heat for about 30 min).

La Capeline
 
Now it's time to make our hat. I wanted something sheer but let me tell you this. A light toned lace works best because we have to make a glue solution and that will turn shiny when dry. The glue will show up on light or dark tulle. With fabric, the clue leaves a not so nice looking residue on one side. All of this said, you can still use tulle or a sheer, but you will need to embellish them to hide the residue!

Let's get started.
1. To stiffen the lace you need a solution of 1 part craft glue to 1 part water. Stir until well mixed.
2. Cover your hat form with plastic.Cut out one, two (or more) circles. (They don't have to be perfect because you can trimmed this down later.) Dip in the glue solution and lay it over the hat form.
3. Stretch a (non-colored) rubber band around the crown of the form ad let everything dry.
When dry, very carefully remove the plastic from the underside. Carefully remove the rubber bank.
Trim if you need to. Embellish if you so desire. For this hat, I pinned a tuft of the soft scraps to one side. If the hat doesn't fit perfectly, use a hat pin (worked through the hair NOT the doll's head) to hold it in place.
Note: You can make a hat pin with a small bead glued to a straight pin!

Embellish, embellish, embellish!!!!
Unfortunately, the glue residue shows on the underside of the black tulle hat. In order to selvage the original hat, I added a big, fluffy black lace ruffle!
I cut off about 29-inches (73cm) of black lace and used a running stitch to get this very full ruffle, which is then hand stitched around the crown. Because the underside of the brim is still going to show when the doll wears it, I painted a few dabs of black acrylic paint (which dries matte) to hide the residue. I don't know if this works for other colors, but it does work for black!

What started out as an ivory tulle hat, turned into another one embellished with lace. This hat was made with two layers of tulle.
I cut away medallions of lace from a strip then hand sewed them on the underside of the brim..again in an effort to camouflage the residue.

Finally, I had the notion to experiment with paper. The steps are the same, but be warned, paper is VERY fragile. The good news is, if holes appear, you can repair them by adding tiny strips of paper! Instead of using rubber bands to hold it to the crown, use twist ties or wire and be very careful when removing them! It will still be shiny on the underside, but it doesn't detract from the look of the hat and that's what counts.

Looking for more ideas? Click here to see last year's hats.

And on that note, me and the gang would like to wish everyone a very HAPPY EASTER!!!

All text and images property of Fashion Doll Stylist. 2015.

Follow us on Twitter: @FashDollStylist
We're also on Pinterest: www.pinterest.com/FashDollStylist
NEW! We're now on Facebook: www.facebook.com/FashDollStylist. If you'd like to show off your versions of our projects, that's the place to go!!!