Tuesday, June 30, 2015

Ken's Eye View: Spring/Summer 2016 Trends Pt. 1

The guys are back!!!! In this the first of a two part trend report, Ken and friends focus on all the latest styles to come out of London and Milan forecasted for next summer.

As usual, London was one hot mess with lots of "experiments" and (non-wearable) creative expressions!!! The Brits can always rely on the sober lines of Bestoke (made to order) suits and gentlemen classics, but was passes for menswear trends was one wild and crazy ride. While most of it doesn't translate well into 1/6 scale for our vinyl hunks, there were a few fun ideas that actually work for a young, hip hop look!

The designers in Milan, on the other hand, know how to temper this young, nervous energy into something that can actually be worn on the street. In addition, there are classic looks with a new twist, showing off the Italian designers savoir-faire when it comes to dressing men.

SHORT SUMMER
Whether worn with sweaters, shirts or jackets, this trend which began this season, will continue on through next summer. Notice the range of fruity colors!!!  Included in this group: shorts suits!

RED, HOT CHILI PEPPERS
The story here is about hot, vibrant color splashed over the simplest of wardrobe favorites: jackets, jeans or trousers. Be daring, be bold....all the best dress Ken dolls in our lives will be dressed in flaming red for the hottest summer ever!!!

DESSIN ANIME
The digital age is here in the form of video games and also parkas and jackets in playful prints. Again, the story here is color....this time carved up in coloring book style prints and patterns. For Sean's jacket I cut away a colorful decal from a T-shirt then used a basic coat pattern. Normally the cotton knit of the T-shirt would be too soft, however, the decal was comprised of a thick puffy paint which yields quite a bit of body to the limp fabric. After cutting out the coat, I took the scraps of what was left of the decal and glued them onto the tank top worn underneath.The result: a bright, refreshing contemporary look!!!

ETCHINGS ON MY WALL
Newspaper prints, etchings, simple embroidery or applique, the profusion of line print and pop-art makes for fresh a new take on urban style. The lesson here is not to be afraid to mix or match bold black and white patterns and etched prints.

TRASH TALK

To be honest, I have never warmed up to ripped jeans and the whole "destroy" movement. But I must admit, it is a look that has been with us since the 1990's and has no intention of going anywhere. You might even say, it has become a new modern day fashion staple. In Italy, menswear designers have embraced the look of destroyed jeans and ripped Tshirts by transforming them into a high fashion with the addition of a classic jacket.

MR. GREY
"Grey" is the newest addition to the "Fifty Shades" novel series. It tells Mr. Grey's side of the story much like this palette highlights the suave and timeless style of the famed character. Look for tone on tone looks in clean silhouettes, textured grey fabrics cut in layers. Note: the safari jacket will be a must-have garment next summer!

SAINT JAMES CLUB
At the end of the day, nothing beats a man dressed in a classy suit. You can update the look by cutting the trousers a bit large to be worn under a fitted blazer, or making a long waistcoat buttoned high, or even the simplicity of a car coat length jacket that wraps around the body worn over satin pants.
 
The boys have already taken the train to Paris for part II of our menswear report. They'll be back in a few days with a wrap up of the best looks from the capital of fashion!!! Stay tuned!!!
 
Follow us on Twitter: @FashDollStylist
Like us on Facebook: www.facebook.com/FashDollStylist
We're also on Pinterest! www.pinterest.com/FashDollStylist
 

Tuesday, June 23, 2015

Lend Me a Hand

For any of you who have Integrity Toy's Fashion Royalty dolls, you are already familiar with the "handspeak" models. Most of the dolls created from 2009 on come with hands that can be removed to facilitate getting clothes on and off. This also allows the doll to wear cuff bracelets designed in an uninterupted single piece. Often these dolls are delivered with extra hands, which can also be used to create gloves with fingers! From time to time, you can find FR "gloved hands" on eBay.

I was so impressed with the idea of gloves with fingers, I began looking around the internet for more ideas. I stumbled across a blog, "Emilia Couture," who offered a short tutorial on painting gloves on spare hands (which you can also find on eBay).

But one thing still bothered me. What about my Barbies? Their hands cannot be swapped. As you know already, I do not like opera length mittens. While I'm happy enough with the fingerless gloves I featured on "Little Stuff" a couple months ago, I really wanted to create the illusion of gloves with fingers! And so the idea hit me.....temporary paint-on/peel off gloves with extensions or cuffs.

For this I needed some sort of masking agent that wouldn't harm vinyl dolls. Acid free rubber cement was the first thing that came to mind. One of its uses is to mask out dyes while working with silk screen printing. For this you must work in a well ventilated room away from flames.  I also decided to play with a peel-away facial mask. The latter is my favorite because it is non-toxic and it usually dries faster than rubber cement. Both work, however, to create a barrier between the doll's "skin" and the paint. For paint, I tried both artist's acrylic paint (some of which dries matte), and nail lacquer (which always dries shiny). Personally I like the nail lacquer because it goes on smoother and has a better finish when dry. When you have finished playing or photographing your doll in her fancy gloves, simply rub the paint off with your finger and wash the doll's hands with soap and water. Her hands are clean once again and there is no damage to her. Out of precaution however, treat this technique as you would dark garments. Don't leave this on for too long a time. Also be careful when getting the doll in and out of the garment, because the "glove" is fragile and might well off in the process.

Preparing Barbie's Hands
1. Begin by applying a thick layer of peel-away facial mask to the doll hands. Don't worry if it globs in between the fingers or forms drips. When dry, you can slide a sheet a paper between the fingers or carefully cut away the glob. Go beyond the area you intent paint to avoid getting paint on the doll. Allow to completely dry.
2. If you will be using acid free rubber cement, use a cotton swab to brush on one layer. Allow to dry and then apply a second coat. Again, paint a little beyond where you intend to paint. Allow to completely dry
3. Now apply paint or nail lacquer. Depending on the coverage, you might have to let dry and apply a second coat.
4. When completely dry, add your cuff or tube.
5. When you are finished playing, simply rub the "glove" away from her fingers. Wash with soap and water.

Designing Your Extension.

The cuffs simply slide on and are held closed with a tiny pin. If you will be using these often, you can always use a little Velco or hook & eye to close your cuff.
For this post, I have created glove extensions that work for both FRs and the Barbies. The initial concept is the same--a painted hand with a cuff added to the wrist. The possibilities are limitless. And though I've used mostly black, feel free to experiment with a mix or match of color and painted patterns.

Barbie painted hand and the tube extensions: leather crushed over wrist (l), cotton pinched at wrist (c); black cotton with beaded stickers (r)
 Handcuffed!!!
FR "gloved" hands with a tiny tube of trim fashioned over the wrists


Barbie painted hands. Tiny leather mini-belt (top); the same velvet & tulle cuff we used for the FR glove


Fur trim cuffs

Ruffled cuff

1. Begin by pleating a length of satin ribbon.
2. Pin a straight piece of ribbon over the pleated piece then stitch in place.
3. Fold the end pieces over and glue down. Wrap around the doll's hand and hold in place with a snap or tiny piece of Velcro.

 This cuff is a small length of lace hem tape that I have gathered along the middle into a ruffle. It's simply pinned into place to make my "wedding" gloves.

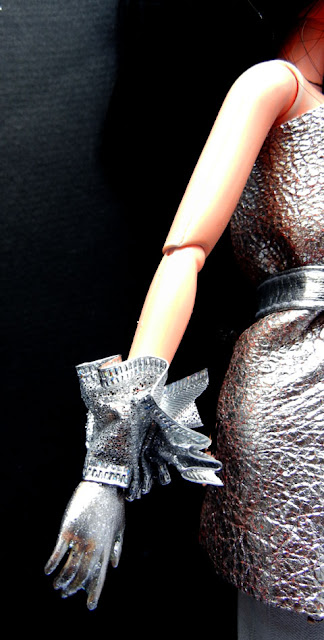
A similar glove, but in silver. I've used wired ribbon. Again, I pleated the ribbon first. I wrapped it around the doll's wrist then squeezed it in place. A few hand stitches helps keep it pinched in. The wire keeps the ruffles in place without sewing. I used a tiny pin to hold it shut in the back.


 My fringed cuff is easy. This is simply a small strip of leather with fringes cut on both sides.
I put this around the doll's wrist and mark where it should pinch shut. I make a tiny hole on one side and add a "brad" (attaches parisienes) face up on the wrong side of the leather. I make a tiny slit on the other side so that my cuff can be buttoned over the wrist.
 
Oh yeah, we're full of surprises this summer!
 
Follow us on Twitter: @FashDollStylist
We're also on Pinterest: www.pinterest.com/FashDollStylist
We have our own Facebook page, too! www.facebook.com/FashDollStylist

Sunday, June 21, 2015

(Pause) World Doll Day Tag


Dolls all make us smile!!!!
I'm all for dolls and any special day devoted to them. So, having been tagged by Billa, I am making this quick post which asks that I list:
3 favorite dolls from last year's purchases,
3 dolls on my wish list
   and that I tag 5 other bloggers.

Folks, I have a LOT of dolls looking over my shoulder with fixed stares as I write this, so I'd better be REALLY careful!!!! It's hard to narrow my list down to just 3. So I will begin by stating that this is only for the year 2014!  I cannot narrow this down to just three without starting cat fights throughout the house, so please forgive me as I compromise with them by doing 3x3. (And even at that, this post will still cost me in bribes of shoes and new items of apparel for those dolls not making the list!)

Monica (FR Veronique Perrin)
 

Renaud (Barbie Basics Ken)
 
Lamar (FR Hommes: Back to Brooklyn Remi)


Tamron (Barbie Collector: Halle Berry)

Anna (FR Kyori Sato)
Estelle (Barbie Herve Leger)
Even though I don't use my Tonner dolls for this blog, I must mention my super photogenic faves for my Fashion Doll Art photoblog. Otherwise they will frown and stick their tongues out at me.
Stella (Tonner Antoinette Spice)
Gunilla (Tonner Antoinette Chilled)

Isabela (Tonner Precarious Wild Bird)


My wish list is pretty small and only consists of two (must-have) dolls:

FR Hommes: Takeo
 I see this doll from time to time, but he's never within my budget.

This is an EXTREMELY rare doll. She's Tonner's Onyx Mannequin and as such, she is a repaint. Even without the face painted in, I have NEVER come across. The doll pictured here, belongs to a collector, Ellis Jones who posted this on Tonner's Doll Duels.

And so with that, I tag the following:
Marta (All4Barbie)
KMQ
Sarah (Sarah Plays Dolls)
Smaller Places
BarbieFantasies

We'll be back in about 24 hours with a most unusual post I think you'll enjoy. Stay tuned!!!!

Monday, June 15, 2015

Paris Street Style: On the Fringe


There are styles that appeal to the adult in me. And then there are those trends that speak to the teenager buried deep within. Such is the case with fringe. I love how it adds movement to the wearer. I love how it makes the body shimmy when the wearer moves. And I especially love how such a simple concept makes an incredibly sophisticated fashion statement on my dolls.
Courtesy of Zara.com/fr
Throughout our trip to Paris, not a day has gone by without spotting fringe on an item in the store or on a handbag or jacket of someone on the street. On this page...I bring to you lots of ideas for bringing this street style to life for your favorite vinyl diva.
 
Straight up I will tell you that getting the look is as easy as cutting a length of fringe and attaching it to the edge of anything your doll already has in her wardrobe. For most of the looks on this page I have used some form of leather or suede (real or faux), which when thin enough, will give you just the look and effect you want. (For tips on making leather clothes for dolls, click here.) Though you can cut the fringe with scissors, a single edge razor or Exacto-knife and a metal ruler will ensure straighter edges.
Kimora saw this poster in the Paris Metro and decided she just had to have the look. In addition to the "Daisy Duke" short-shorts (a short version of our jeans pattern), and a kimono (click here) cut from sheer silk chiffon, Kimora wears a black knit stretch top trimmed with cut fringe.
 1. Start with a strip of knit that stretches around the doll's bust plus 1/2" (1 cm) to allow for a back seam. My strip here is roughly 5" wide by 1" long.
2. Cut a second strip that will go from underarm to underarm in width. The length should be 50% longer than the length of #1. Here, my strip is 1 1/2" (4cm). You can always make this longer if you want.
3. Create your fringe by making vertical cuts to within 1/4" (6mm) of the top edge
4. On the backside of strip #1, lay your fringe along the top edge as shown. Stitch the two together.
5. Let the fringe fall over the front of the strip #1.
I turned this stop inside out and stitched the seam down the center back seam. It is a typical stretch top that slips over her body. As with most stretch tops, you need not hem anything as the knit will not fray.
Notice Kimora's matching footwear. It's as simple as cutting a small width of fringe and adding it to an already existing pair of boots!

 
 Best Fringes

Again, anything you make can be easily converted to this style. This is the basic jacket pattern made with chamois cloth I bought at the hardware store. (Chamois is thick and working with it is tricky, but you can learn to work with it when nothing else is available.) After laying the front jacket pattern against the doll, I decided how deep I wanted the fringe. Sew the garment together, then turn it inside out. Use a ruler to draw in the fringe on the wrong side. Then cut the fringe into the hem of the garment.
Remember this (2-pc) dress? It was a fringed wrap dress featured in Jean Paul Gaultier's Spring/Summer 2014 collection. The skirt is our wrap skirt with a width of cut-fringe sewn or glued around the outer edge of the skirt.

For the top, I used a basic (knit) shell then cut away one shoulder. There will only be one sleeve. The opening is on the side.
 The end pattern looks like this.  And I've added a simple tie belt.
Here's another look where the fringe is cut directly into the garment.
 Again, I'm using a chamois cloth for the top and skirt. The handbag (featured in a previous post) was cut from ultrasuede.
The skirt is simple. Decide on the overall length of the skirt you want. Use the 1 pc skirt pattern which is perfect for working with leather. Draw the fringe, then cut using a blade. Glue the skirt up the back to the hips. I use Velcro as a fastener at the waist.
 The top is also equal. I cut a flat-nose triangle for the top.
1. For Barbie or similar sized dolls, draw a horizontal line 5" (13 cm) wide. At the midpoint, draw a perpendicular line 3 3/4" (7 cm) high. Then draw another horizontal line at the top which is 1/2" (8 mm) on either side of this vertical line. Finally, connect the points at the top and the bottom with diagonal lines.
2. Wrap around the doll.
3. Overlap at the back and tape in place for the moment.

1. Tape the top to the doll in the front. You will notice the top bulging away from the doll over the busts. Make a tiny slash on either side.
2. Glue the top flap over the bottom.
3. Add straps from the top edge, over the shoulder and glue to the back of the top.
4. Add a square of Velcro to close.
You could stop there (l). OR.....you could make a series of horizontal slashes over the bodice for added texture and interest.

You can also add a fringe bib to the front of the smooth version.

Add a shawl. Click here for ideas on ponchos & stoles with fringe.
And don't forget to add embellishments to the shoes!!!!

Accessory to the fact
Bags by Zara

Bags by Saint Laurent

Even if you don't make a fringed garment for your doll, you will definitely want to make a fringed handbag--a hot trend we saw all over the streets of Paris! You can start by taking a peek at the first fringed bag we did not long ago. Click here for basic handbag patterns.
Take any of the bags from our most recent post on handbags. Here, we made a simple bag we made from leather (recuperated from an old belt). We then cut and glued three layers of fringe onto the bag then added straps. The "buckle" over the front flap, is a small piece of wire we hammered flat and glued in place. By the way, Latoya's jacket was made from an old glove. Click here to see how we did it.
A spotted leather variation of a Zara bag, Billie wears it as a shoulder bag.
For this style, I used a really thin (printed) leather! 
1. Start out with a rectangle which you will fold in half at the bottom.
2. Stitch down the sides and turn outside in.
3. Add fringe which is longer than the length of the purse to the sides and the bottom.
Punch a hole at one of the corners. Add a wire loop then add a shoulder or wrist strap.


Here's a version in white, using Ultrasuede. For this version, I've kept it a clutch bag with a wrist strap.
Though I used the same pattern, the ultrasuede reacts differently than the thin leather. The fringe doesn't drape quite as well.
But dolly is NOT complaining! Au contraire!!!


Alas, all good things must come to an end. The girls have just arrived back home for summer where they plan to have fun with textiles! Stay tuned!!!
 
 
Follow us on Twitter: @FashDollStylist
We're also on Pinterest: www.pinterest.com/FashDollStylist
And we even have a Facebook page: www.facebook.com/FashDollStylist
 
 
Unless otherwise indicated, all images and text property of Fashion Doll Stylist.