Showing posts with label doll jewelry. Show all posts

Friday, March 10, 2023

Diamond Life


For awhile now, I've been wanting more estate jewelry for my girls. But for reasons of time, cost and current geopolitical issues, I have not wanted to order from abroad. I have seen ropes of rhinestones, but never knew how to work with it. Recently I found what's called "rhinestone chain" at a nearby bead and crafts store (though you can order from Amazon if you know what you're looking for). And eventually I discovered a DIY site that explained the various things you can do with it and finish off the ends. You can use glue instead of solder and you can even wire the chain to another surface. To my surprise, it was amazingly easy. And so....the post which I had hoped would go up on Valentine's Day is here, just as my girls are setting their sights on Oscars night at the red carpet!  

For this project you will need:
Rhinestone Chain (3mm)
Rhinestone Cup Chain Ends (for chains 3mm)
Jump rings
Wire to make S hooks 
Strong glue
Jewelry pliers

At first when I set out, I had visions of grandeur! You know, Queen Elizabeth style baubles. But then I took the time to research trends from high fashion jewelry houses.

It should come as no surprise that given current lifestyles, simplicity reigns supreme! In any case for us, it is a good place to start. I had fun with this project, so trust me, as I find more stuff that can be used for jewelry making, I will be coming back to this subject in the near future!!! For my first attempt at creating "fine jewelry," I focused on the basics in my efforts to keep things fast and easy.


Anna's first jewels! What could be sweeter than a single row of diamonds! Making this choker is simple. A piece a string around her neck will give you an idea as to the amount of chain to cut. Add another 2 links to allow a bit of ease. 


This is so easy, The rhinestone chain is a series of crystals embedded in minuscule, clawed cups, linked together by a bridge which runs throughout the length of the chain. The metal is very soft. So you can cut it with a pair of ordinary scissors. Then there is the chain cup ending, a small claw link with a tab on one side and prongs to hold down the jeweled end of the chain on the other. Hold the chain cup by its tab and place the end of the rhinestone chain inside (a single crystal). If you look carefully, you will notice there are two prongs standing upright. Using a pair of jewelry pliers, carefully press each one towards the stone. You don't need to press too hard as the metal is quite soft. 

You will also notice that the tab has a small hole to which you attach a jump ring or a closure. You can use anything you want. However, these necklaces are quite tiny and getting them on the doll can be a real pain. If you plan to sell your creations, go ahead and use the standard jewelry clasps. But if this is for yourself, you might want to make your own S rings with an extended hook! Note: for instructions on making your own jump rings or S-rings, see "Pearls of Wisdom."


With this single strand of "diamonds" you can create a lot of different looks simply by hooking on a small pendant-- perhaps something out of your own jewelry box. Those pendants which I wore in my teens and early 20's make for impressive estate jewelry on the doll! All you need do is to create a small hook out of a bit of soft wire which can be attached to the front of the necklace (as opposed to threading through the chain)! 


Most pendants fall vertically from a chain. However, I found a pendant and added a loop of wire around the lower end so that I could connect it to rhinestone chain on both sides, thus creating a very glamorous "diamond" choker. 


And even if you don't own pendants, feel free to create your own using rhinestone stickers! 
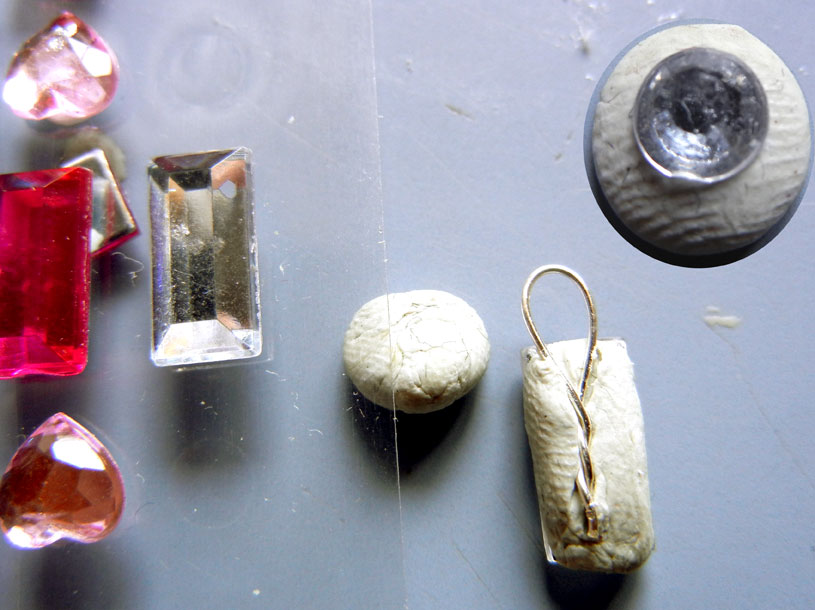
Use a tiny bit of air dry clay and press the jewel onto one side. Make a loop with some thin wire, then twist and press into the clay to completely cover. At the top right, I started out with a round stone in the center of a small ball of clay. Then I added a row of rhinestones from the chain around the perimeter. You'll see the result in the photo below.

You can also use a longer single chain to wrap around the doll's neck, thus giving the illusion of a double chain. For the one below, I added a S-ring only on one end of my "rope."

While we're on the subject, let's talk about a double row of diamonds. You can cut two lengths of chain and put jump rings on both ends. Then join those ends together with a single ring before adding your closure. 

Dolly can wear it as is or..... Atoia is modeling a double strand to which we added a that mega-baguette diamond we created earlier! But you can also create double strand choker that is....shall we say....very Van Cleef & Arpels!


Normally the two strands are soldered together, but a good clear glue works just as well!


After measuring your doll's neck to determine the amount of chain to cut, you will measure out another length that is 2 stones shorter. Turn one length of chain on its side and, using a toothpick add a line of glue. (This gets tricky, but keep on going.) Next, line up the two rows of chain close together gem side down, then liberally apply glue to the back.  Press the two rows together using your pliers. Allow to dry and add a second coat. 


While researching,  I came across the Van Cleef "A Cheval" necklace....an extraordinary piece of jewelry valued at about $700 Million dollars! My dolly's version didn't cost nearly that much, but don't tell that to Dorian who felt like a billion dollar babe in hers!
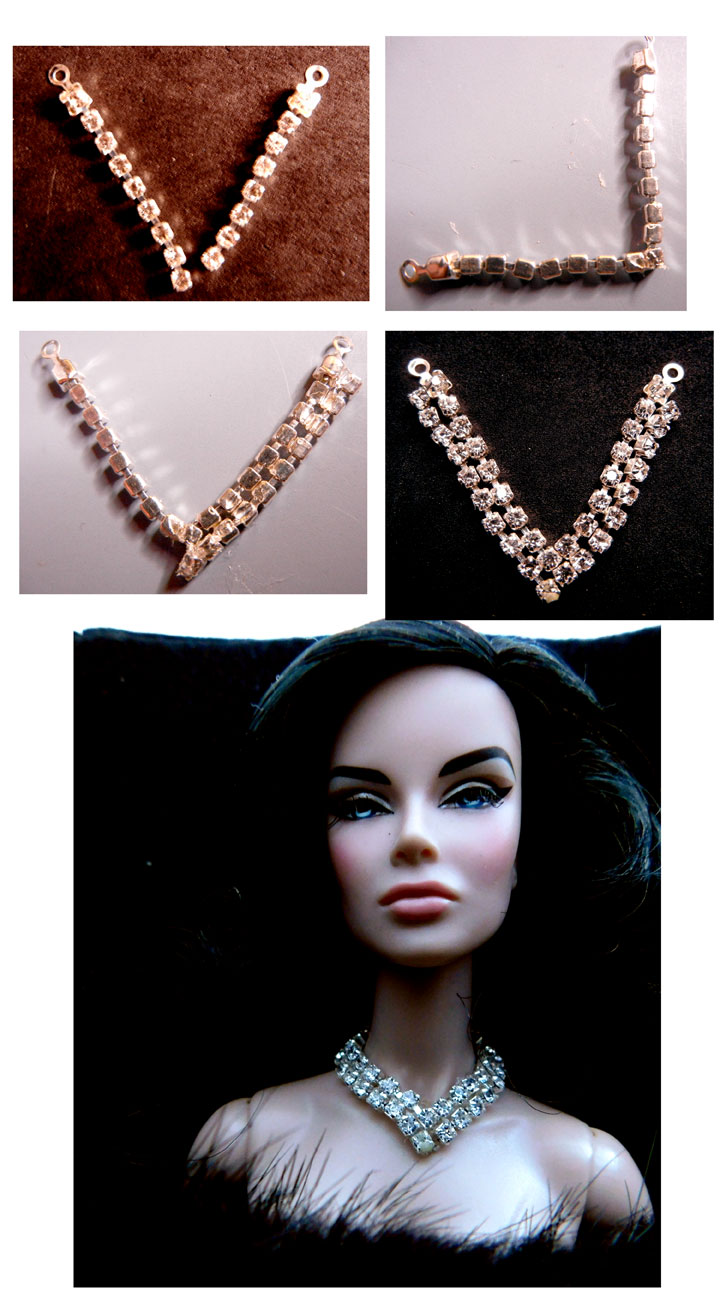
After deciding where on the doll's neck I wanted the necklace to fall, I cut two lengths of chain. One will be one stone shorter than the other. Glue the two together on the side at a 90 degree angle as shown. Then carefully add some glue to the side of the send row and press together. Repeat on the other side, being sure to meet at the center. When all has lined up, turn the necklace over on its back and apply glue. Let dry. Add a second coat of glue.


This method of gluing (which replaces soldering) allows you do have a little fun with the design of your necklace. I'm sure many of you have seen some version of Iman's necklace. This is a very contemporary design and super easy to replicate.


 I started out by measuring the chain around the doll's neck then deciding how far down I wanted the diamonds to drop. You can end with something symmetrical or make one side longer than the other. I decided where I wanted the chain to meet in the front and tied a bit of wire to keep it in place while I found the center point in the back. Cut the chain at the center point and add the chain cups and closures.
then turn the necklace over so the back is facing you. Add a drop of glue to two links where the necklace will join in the front. Let dry, add another drop of glue.


Or.... you can simply glue on extensions at right angles to the basic choker. 

This is where this project would have ended had I not gone back to the store.... I discovered some "novelty" chain on sale. But, unlike the rhinestone chain, this one is made of plastic, rhinestones and thread. I assume it was really designed to be sewn onto a garment, but since it was the closest I could find to the Cartier necklace that inspired me, I decided I would work with it a bit.

It isn't as heavy as the rhinestone chain so it wouldn't lay flat around Catherine's neck. (Metal is always better for this sort of project.) So after carefully pondering the situation, I decided to add a bit of thin wire to "tame" it. 


I threaded the wire through the double rows of thread running throughout the length of trim. Instead of threading, you can also tightly wrap the wire around these rows. I left enough wire to create a loop on one end and an S-link on the other. 

And true to form...I was able to shape the necklace to better fit the necklace to the doll.


My goodness, this was a lot of fun. All my divas are now all singing "Diamonds are a doll's best friend!" Believe me when I tell you..... This.Is.Not.Over!!!!!

Looking for more fine jewelry ideas? Check out "Pearls of Wisdom."


Like us on Facebook: @FashDollStylist
We're also on Pinterest: @FashDollStylist
And of course, we are on Instagram: @fashiondollstylist


Unless otherwise noted, all images and text of this blog are the copyrighted property of Fashion Doll Stylist 2023. We are independent and not part of any other group or website no matter where this post or its elements appear on the internet or social media. Please request permission before reproducing any parts of this post. And please, always credit us. 


Saturday, September 17, 2022

Hot Glue Cool Corsets

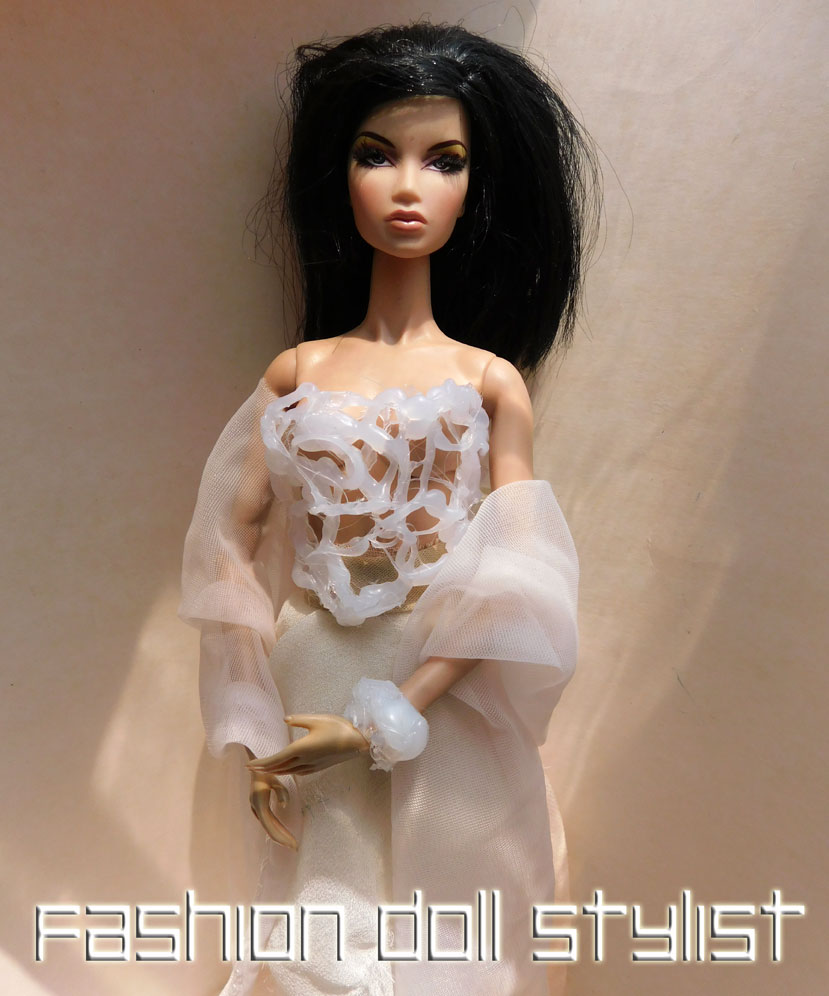
After nearly 10 years of producing content on my blog, it is difficult to create something original and current. For this project, I began by revisiting the corset. But it all seemed deja vu. So I went back to the drawing board and decided it was time to do something more "21st century" with the idea. In my effort to come up with something, my attention was diverted to a photo of a model wearing clear plexiglas jewelry. Unfortunately, the only method to replicate versions of it is by using resin...a highly toxic chemical requiring LOTS of ventilation. I turned to hot glue, thinking that would be a cheap and easy way to get the look..... But no matter what I tried...everything came out with a milky translucence. AND....working with the hot glue gun was not as simple as I though. Very, very messy. I put the glue gun down. But still, there was something that kept me picking it back up. It wasn't until I made the first corset with it. There, in front of my eyes, I had created a 21st century version of a turn of the last century looking Art Nouveau bustier for my doll. 

At first, though, it seemed like a one-trick pony. I could make bracelets and necklaces...but at the end of the day....it all had the same look. I felt it still wasn't enough for me to post it as a project. So, just before abandoning this "new medium," I pulled out my pack of foiling papers to see what would happen. Oh my goodness.... I love foiling on various materials as it stands. But when combined with hot glue...it looks just like metal. As you can imagine, I had FUN. 

MATERIALS


For this project you will need a low temp hot glue gun, a package of glue sticks and a few sheets of craft foil. You want the low temp glue which is less dangerous should your fingers come in contact with the glue (which it probably will). And besides..this is pretty cheap. When buying glue sticks, just make sure they are the right size. (Probably mini-sticks).  The most common ones are a translucent white, though other colors exist. The sheets of craft foil is usually sold in packs and comes in gold, silver and copper, though you might find other colors. 

COOL CORSETS

Let's get started....

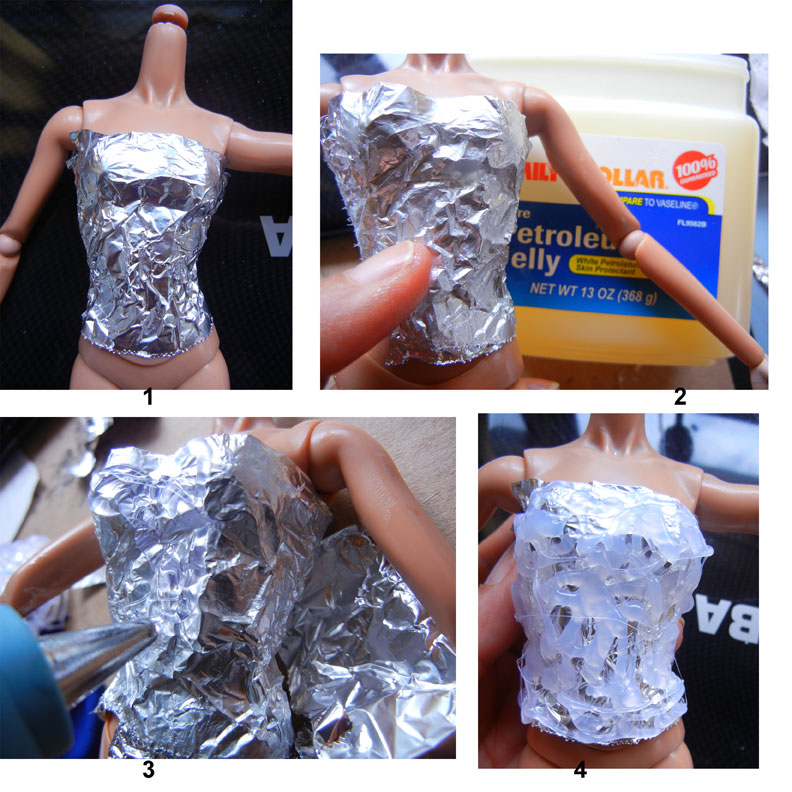
1. I have a separate body which serves as a mannequin, and whether or not you are doing the same thing, you must protect that body (or that of the doll) with aluminum foil
2. Apply a little bit of vaseline or hand lotion so that later, when you need to pull it away from the glue, it will release more easily.
3. After the glue gun is loaded, plugged in and the  glue has started to melt, make swirls, globs at random. The reason you are doing this directly on the form is so that, once cool, what you create is in the same curved shape as the doll body.
4. Keep in mind, you will want to leave some holes in your design. It will look more like Art Nouveau AND..in the back, it will allow you to thread some ribbon through to use as a closure.
5. After the glue has cooled, begin peeling away the foil from the back.
6. If it rips in areas, or you discover the holes are too big, you can always come back with the gun and either fill in the gaps or use the side of the nozzle to melt and connect specific areas.
7. And so here is my completed bustier.
8. I used a thin ribbon to thread in the holes at the back.
It's not Couturier Iris Van Herpen, but it certain fits in with the modern concept of Haute Couture!
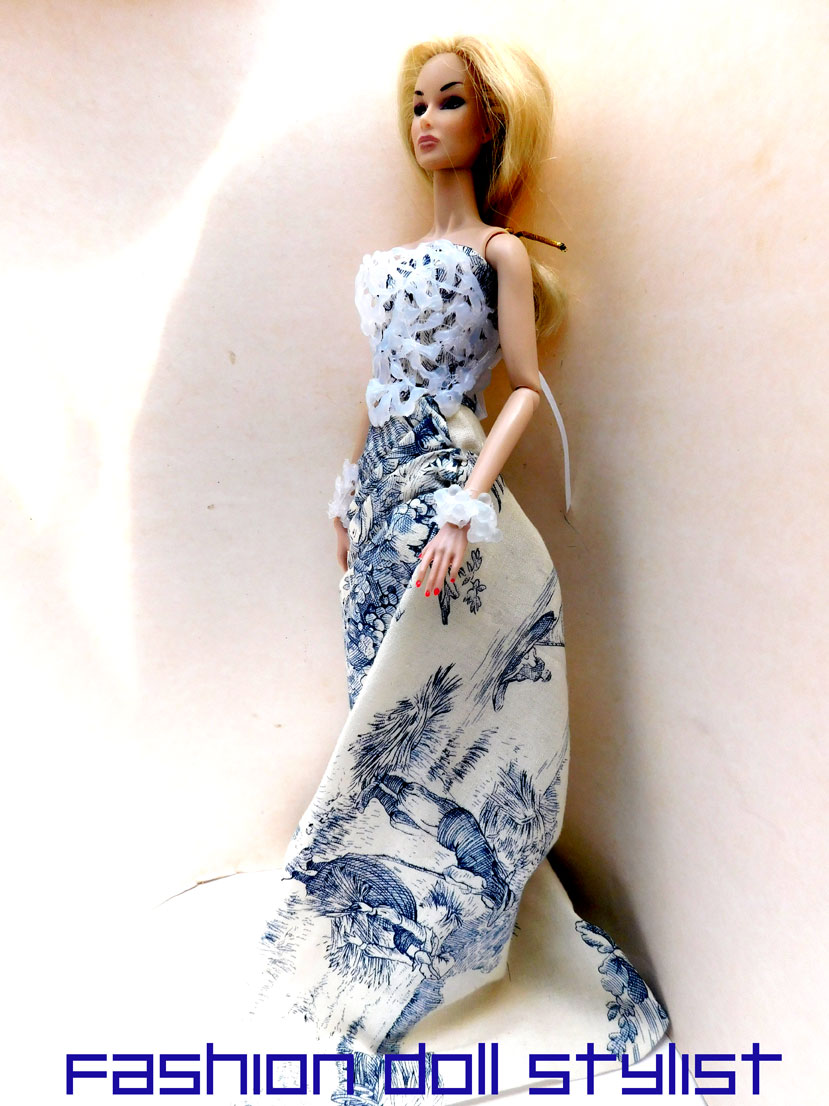
Here, the hot glue corset is layered over the strapless top of this Jouy cloth dress.

The hot glue corset adds another dimension to an existing look. You can also use a colored glue stick instead of the white.


In this version... I created the same corset as the one above. But this time I made a bib out of the hot glue. You proceed the same way as you did for the corset, except you'll need to line the area around the neck of the doll with aluminum foil before applying the glue. 
The back of the neck and the center back waist provide points where you can attach a ribbon for closure.
I've used white for my corset and necklace, but feel free to play with colors. What I do not recommend is painting the underside of these accessories. You don't want to stain the doll with paint!

HOT EFFECTS
Hot glue + craft foil equals melted metal effects! Once I figured this out, I decided to make something "Very Versace." Gold on black. 
1. First of all, make the corset of your choice. For this I have used a black cotton. But any fabric is fine.
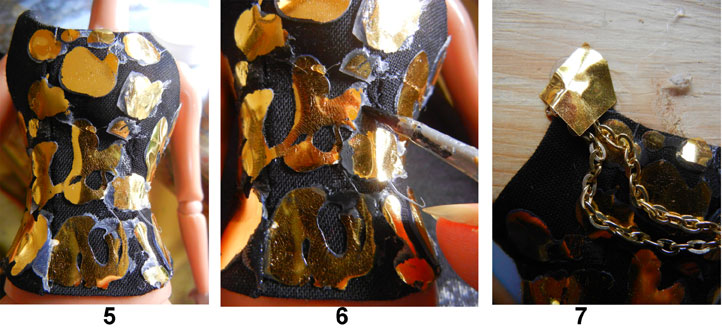
2. The hot glue is applied directly to the fabric. I would recommend cutting the foil into small squares and working in small areas instead of trying to cover too much at the same time. The glue cools down really quickly!
3. As soon as you apply the glue to the garment, lay the square of foil directly on top (dull silver side down onto the glue) and press.
4. The carefully peel the foil away. Top to bottom is mostly best!
5. Keep going until you have covered the entire bustier. 
6. On mine, the glue shows, so I went back with paint. However, the next time I do this, I will use a black glue stick instead of white! Or...there is a metallic filled glue pen  that supposedly looks just like shiny metal which should also be interesting to use.
7. In keeping with the spirit of Versace, I attached gold chain which drapes over the bust. After sewing the chain to each side point of the bustier, I hid those points with a little glue and foil!
My finished result...Very Versace! 


Then I wondered, what it would look like if I were to do a hot glue foil on a metallic leather....

The result was a shiny areas over a "hammered" metal look.

This was so much fun. You can do this on any material. The blobs of irregular shaped "metal" almost resembles jewelry. On this tweed top, I randomly applied both silver and gold globs


And just as I thought I was finished with this project, the idea came to me....what happens if you apply dots of glue/foil to, say...sequins!

It looks like paillettes mixed in with your sequins. Quite interesting!


Let's Talk Accessories...

Unless it is the bib that you want, the process is simple. 
1. Apply the glue directly to the dull silver side of the foil in the pattern of your choice and let dry.
2. Peel the glue away from the foil
3. Wrap one point with a little wire then hang from another bit of wire.

I created the belt the same way. Determine the width of the doll's hips. The create your design with the glue directly onto the surface of the foil.
When cool, peel away from the foil. 

I use ribbon to tie the two ends together. Belt can be work with the opening in the front, side or back.

The bracelet is a little more tricky. I did try to do this flat then glue the two edges together. But when it has cooled, the glue doesn't have all that much give. You would have to melt areas of it so that it bends around the doll's arm. Or...


I found a wooden dowel or pencil roughly the same diameter as the doll's arm. 
1. Cover the dowel with aluminum foil and rub a little bit of lotion or vaseline onto the surface for quick release when you are finished. Apply the glue all around.
2. Remove from the dowel. If it breaks in areas, don't worry. You can always come back with your gun and melt those broken areas back together or add more globs of hot glue.
3. One more thing... You can always press in beads, rhinestones or whatever while the glue is still warm. On the middle cuff, I pressed in some frosted beads.

And yes...you can always use a little foil to get the look of a metal bracelet!


Like us on Facebook: @FashDollStylist
We're also on Pinterest: @FashDollStylist
And of course, we are on Instagram: @fashiondollstylist


Unless otherwise noted, all images and text of this blog are the copyrighted property of Fashion Doll Stylist 2022. We are independent and not part of any other group or website no matter where this post or its elements appear on the internet or social media. Please request permission before reproducing any parts of this post. And please, always credit us.