Summer is here and my girls have quite a few warm weather galas ahead. But for awhile now I've been in a creative desert so I really had to look far and wide for inspiration. While putting together the report on the Spring/Summer Paris Couture collections, a gown by Jean-Paul Gaultier caught my eye. It was a peach silk gown with lots of puckered pleats worked in at the bottom half of the dress.. Jada Pinkett Smith later wore a evergreen version of it at the Oscars. At that same red carpet event, another dress caught my eye. It was worn by Kirsten Durtz and designed by Christian Lacroix employing the same puckered surface treatment..
 |
| Photo: Vogue Runway |
 |
| Photo: Vogue Runway |


1. For the permanent puckers, you can use almost any shape so long as is made of something not likely to melt in the oven: dried beans or peas, clay, metal or glass beads, marbles, coins. You get the picture. I cut a small strip of the organza and tied each pea with heavy duty thread.
2. When finished, wrap in aluminum foil and place on a pan in a preheated oven set at 325-350F degrees for about 15 minutes. You want to set the shapes without melting the fabric.

4. For the skirt, I folded a wider, longer piece of organza and folded it back and forth, pinning it until I finished the whole length. Then with needle and thread, I made a series horizontal stitches to 15 the pleats in place. Finally, I took one more length of heavy duty thread (or string) and wound it around my pleated organza from top to bottom. Place in foil and pop in the oven for about 15 minutes.
5. Allow to cool down. Remove from foil and this is the result!

7. I make a running stitch along one edge of the pleated organza, then carefully spread it over the hemline of the bodice. Pin in place and hand stitch. I placed the pleats on the outside, using thread that comes as close to the color of fabric as possible.
8. When finished, it looks like this.
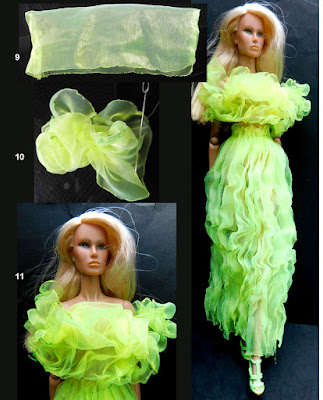 9. For the top, I made a rectangle slightly bigger than the circumference of the doll.

10. I made random running stitches over both layers, drawing up the fabric as I went along with heavy thread. When finished, cover with foil and place in the oven.
11. After you have removed from the oven, remove the stitches and gently spread enough to cover her top. Tack down on the top with random stitches. The piece of fabric with the "bubbles" is cut in half and used to create little puff sleeves, tacked down in the front and back of the body.
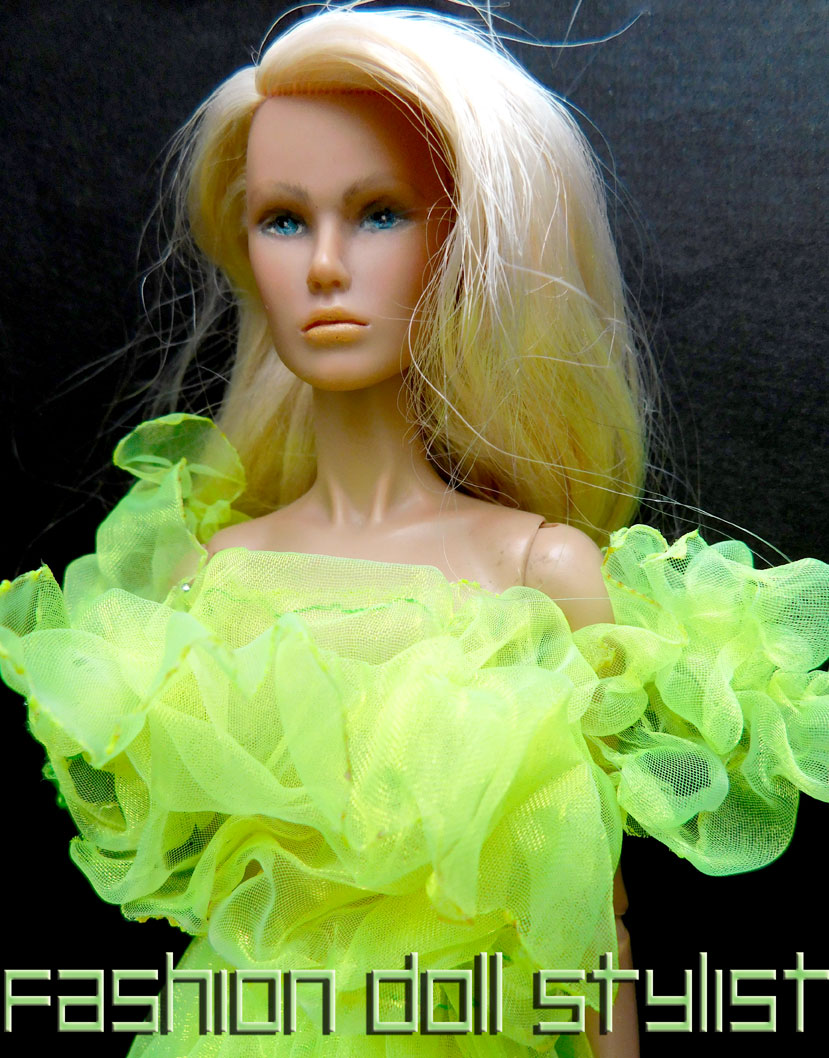
And here is our end result!


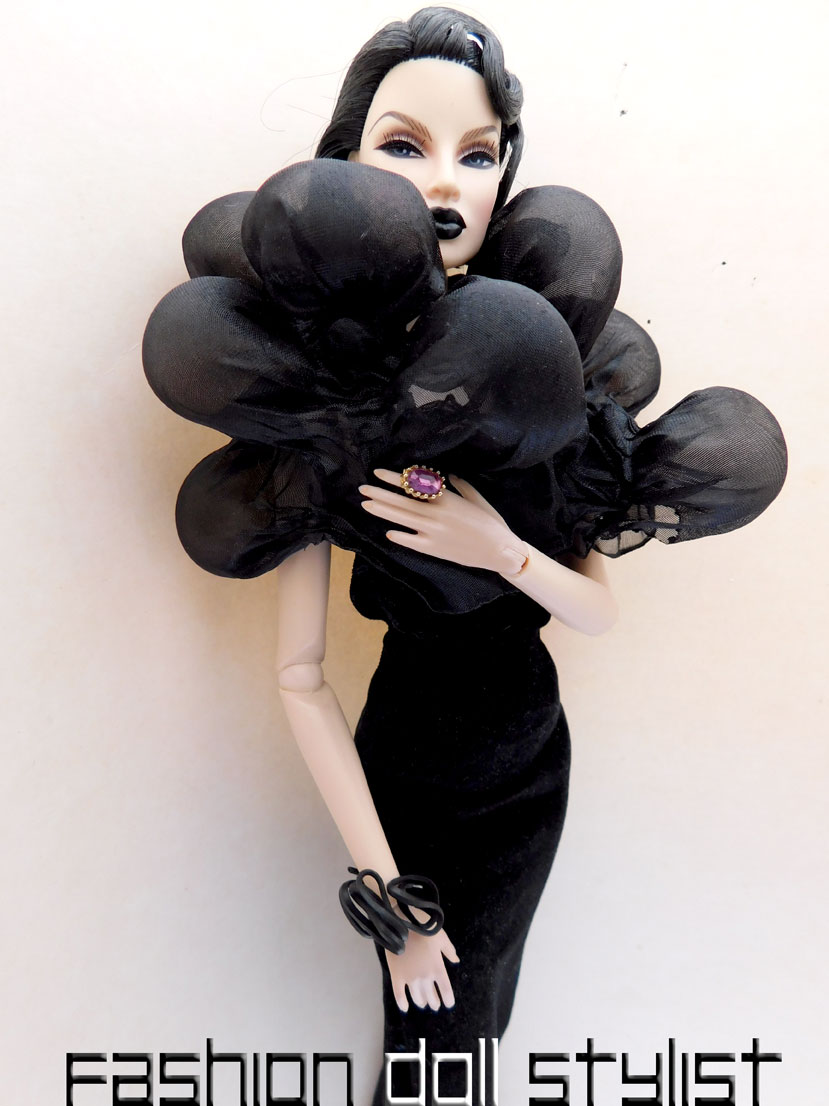
I really love the look of the little bubbles. Here is another way I used them. The dress is a 2-piece dress. A simple top and a simple slim evening length skirt made from the same iridescent polyester organza.


I love the contrast between the surface treated parts of the dress and the smooth sheen of the untreated areas. Again, the iridescent nature of the fabric adds to the three-dimensional aspect of the design.


 You can use your treated fabric as is. Or you can pin in places to control the volume in certain areas. And feel free to team up the crinkled areas with a garment that is totally different in nature, like this silk brocade bustier. In this case, I began with a length of fabric I had pleated before. The original pleats were "soft" and I decide I wanted the "tighter." So I simply bunch it up into a ball, tied string around the ball and popped it into the oven. Out came a more tightly pleated rectangle.
 You can begin by making a straight or A-line skirt on which you can tack the pleated material. But here, I simply wrapped the mass around the dolls waist (opening in the back). I tacked the fabric up to itself in certain areas to create asymmetrical volumes around the hips. On top...a very simple form fitted bustier made from embroidered silk.

Using the same technique I took a rectangle of polyester organza and ran random running stitches throughout the length, gathering the fabric as I progressed. Afterwards, I gathered the mass into a ball and tied string around it before popping it into the oven. In this case, this look starts with a strapless, A-line dress I made from a cheap nylon fabric. When my organza is ready, I carefully stretched it out then tacked it onto the dress beneath, carefully seeing to it that all areas were covered. Hint: This is actually two pieces of crinkled fabric. The top covering the bodice (much tighter, smaller pleats) and the bottom, larger pleats.


 You don't have to use this technique for an overall look. You can take pleated pieces to enhance the design.
 On the left side is the original dress. I decided to incorporate a bit of the crinkled pleats into the design at one side. I made a small crinkled piece and tacked it onto the side and at the back of the dress.


This technique only works with synthetics. But you can get the same look using natural fabrics like this silk satin. You will need to start with wetting the fabric first with water and then twisting it. Allow to dry.


Here, I entrapped glass beads in a small rectangle of the organza. Afterwards, it was a question of tacking the morceau of fabric to the dress. I did the same for the skirt part of the dress, with a sample where I used slightly bigger beads. This time around, however, I didn't flame seal the edges of the sample, I left the edges frayed for a more "organic" look we often see employed by Dutch designers.


The golden rule in dolly fashion design is to always use quality fabrics. There is a lot of work involved that goes to waste because the end result will never merit your effect. Well....I broke this rule not to long ago. I couldn't get to a fabric store, so I bought a cheap scarf from a dollar store because I needed purple satin. Though the design of the dress was good, I was very unhappy with the end result which looked....cheap. So while preparing this project, my question to myself was....what happens when you take a cheap fabric and "treat" it. The answer: Much better than I expected.

This was a cheap polyester satin that I twisted and popped in the oven. The pleats came out pretty tight and wrapped around the doll beautifully into a basic shift dress! But I wanted it to have a bit more shape, so I pinned down the pleats to themselves over the stomach and at the sides. You don't want to do this everywhere otherwise you lose the "stretch" aspect of your newly created fabric.

The opening is at the back. I've twisted the dress a bit to give it a more asymmetrical vibe. The way the dress reflects the light...it is like a piece of jewelry!


Here it is front to back. The permanent pleated piece brings the design up a notch.

Like us on Facebook: @FashDollStylist
We're also on Pinterest: @FashDollStylist
And of course, we are on Instagram: @fashiondollstylist
Unless otherwise noted, all images and text of this blog are the copyrighted property of Fashion Doll Stylist 2022. We are independent and not part of any other group or website no matter where this post or its elements appear on the internet or social media. Please request permission before reproducing any parts of this post. And please, always credit us.
Hi April! I don't know what happened, but this post did not appear on my reading list. I have your blog on my sidebar, and I still missed it. I guess blogger is doing some shenanigans again.
ReplyDeleteAs always, I like reading your tutorials, I feel I can learn a lot. I love learning about how to work with different kinds of fabrics, specially those that I might not be very familiar with. I would have never thought of putting fabric inside the oven! I think all of your designs turned out great. I love the bright lime green /chartreuse color, and also the purple and blue iridescent one.
Wish you a lovely rest of the week.
Hi MC. I had turned off the RSS feed and didn't realize it shut off the feeds to the individual blogs. This kept me from getting scraped but I lost reader in the meantime. So I've turned it back on. Thank you for you lovely comment. Fabric treatments are really a lot of fun and bring so much to an otherwise boring design. I've been suffering from a serious design block, leaving me absolutely empty. So returning back to a former textile tutorial that perhaps is new for anyone who wasn't around back in 2014, was just the thing to revived my creative juices. You too, have a wonderful week ahead.
DeleteWOW WOW WOW! What fantastic ideas.
ReplyDeleteBeautiful dresses.
ReplyDeleteThank you so much and thank you for your visit.
DeleteHello April, thank you for this new post full of tips and tricks. It's beautiful, now we have to take action by applying them. I was very impressed by the result you got by wrapping in aluminum foil and putting in the oven. I would never have thought of doing it. The results leave me breathless.
ReplyDeleteThank you so much for your lovely comment. And yes...I had forgotten how simple and how much fun this project is. I only wish I had more colors of the iridescent organza. But I'm still pretty happy with the results. Happy to know you enjoyed this post.
DeleteYou created again so beautiful dresses and found the way to make them so original. I love them all.
ReplyDeleteAya, thank you so much. Inspiration has not been coming easy. But once I get an idea, I can really go a long way with it.
DeleteThat is an amazing post dear April. Two first dresses are my absolutely favourites - just wow!
ReplyDeleteThank you so much my dear Kamelia. Coming from you, that is a real compliment because you too are sooooo good at your dolly fashions!
DeleteStunning! I do look forward to your posts. It’s hard to choose a favourite dress they are all so lovely.
ReplyDeleteThank you. It is interesting to revisit my early tutorials. Now that I am further down the road, I've noticed how much more details or I can put into each design. Thank you for your visit.
DeleteHi Linda. Thank you so much. Sorry to take so long to respond to your comment but it is always appreciated. I'm having a bit of a difficult time finding inspiration right now. But revisiting former projects has succeeded in recharging my batteries. This project reminded me how much fun the textile manipulations can be.
ReplyDelete