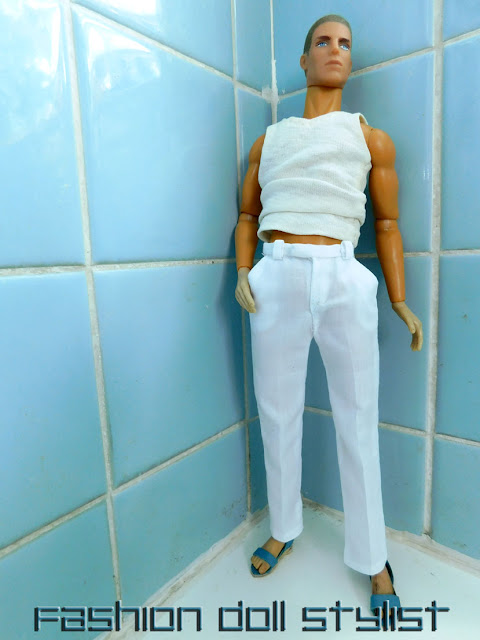
When I started out in this hobby, my only reference to male doll clothes were the ones delivered with Ken. Of course, the construction was super simple. Ken had no real articulation and couldn't put his hands in his pockets. Consequently he didn't care if his fly didn't really opened and that his pants opened in the back! His sole purpose was to serve as a male prop for Barbie, so his needs were pretty simple. Initially, this blog's objective was to help you create "fast fashion," quick and easy recreation of current trends. However, over the course of a decade, Integrity Toys and other companies have come center stage and a variety of more interesting, more realistic male fashion dolls. It has become very clear that today's dude doll and his human parents want more realistic fashions that resemble their full size counterparts.

This is a very long post! For some of you who are interested in this tutorial, you may want to bookmark this page and return when you have time. On the other hand, many of you will regard this post as much ado about very little. For those who want something faster and easier to construct, I have left in place my original male doll pants tutorial:
"Good Foundations: The Pants Sloper for Ken". This post, however, is really for those of you with a little more advanced sewing skills. The long length of this tutorial is due to the step-by-step instructions I offer for creating a miniature recreation of the classic, full scale men's trousers. I hand hold you throughout the entire process: from developing the basic trouser block straight through to the details of the back pockets and the construction of the final garment. Take your time and try to get as perfect fit as possible. Once you achieve this, your pattern will serve you for the life of the doll because,--though the pant legs may grow narrower or wider, whether they fall to ankle or break over the top of the shoe...the basic form of the classic trouser never really changes.
Anatomy of Men's Pants
For the most part, men's trousers fall slightly under the waistline, are usually flat over the stomach but darted over the buttocks in the back.In some cases the waistband can meet at the center front, but usually there is a bit of an overlap,a tab ending slightly off center. There is always a fly front, almost like a tiny shield that covers the front even when the pants front is left open. Men's pants always have front pockets allowing the hands to glide into them from the side seam or via a diagonal cut. And lastly, there are always welt pockets in the back.
The Basic Trouser Block
In the world of tailoring, a man's measurements are taken and used to create a basic pattern...and sometimes directly on the final fabric. This involves a bit of mathematics (which is not my strong point). I started out that way but then decided, as I had done before, to create the basic pattern (a toile) by draping fabric on the doll, then making a pattern from that drape. Let's get started.
1. Take two pieces of cotton fabric and cut them into a large enough rectangles to cover the front and back of one leg from inseam to side plus extra seam allowance. It should be long enough to cover the doll from the waist to his feet. Draw a vertical line to match the vertical grain (threads of the fabric) of the fabric. This serves as a guide to help you keep the pattern straight.
2. Draw a perpendicular horizontal line at the bottom.
3. From his heel to his crotch, measure the doll, then place a dot on the fabric that corresponds to that measurement.
4. Place the fabric so that the vertical line runs along the center front of the doll.
5. Scoop out a bit of fabric from that dot you made to the top. This is so that you can more easily pin the fabric in between the doll's legs.
6. Do this for second piece of fabric which will become the back pant leg.
7. Sandwich the doll's leg between the two pieces of fabric, keeping the vertical lines straight. Tape the top of the trouser area to the doll's stomach in the front and to the back to keep it shifting as you work.
8. Pin along the contour of the doll: down the outer side and down the inseam. Keep everything as straight as possible. The pins on the side should really match the side of the doll.
9. Turn the doll to his back. Keep the fabric straight. Pinch the fabric at the top to create a dart. It should be about half way between the side and the center back.
10. With a pencil, mark the placement of the pins, front and back.

11. Adjust the dart so that the center of it runs vertical to the body.
12. The dart should be about midpoint between the center back and side of the doll. Mark the placement of the pins.
13. Once everything is well marked (front and back), unpin and lay flat. Connect all of the markings with a smooth line. Where the lines appear a bit crooked, straighten out those lines. There should be no lumps and bumps.
14. Pin the front to the back and place back on the doll, taping it to the doll's stomach once again.
15. Check for fit, making any corrections.
16. Turn the doll around and to the same thing on the back. Also check to see that the amount of fabric in the front is pretty equal to that of the back as it covers the leg. In other words, you are looking for a good balance of volume. (The front shouldn't be skimpy and the back fuller. There should be an equal distribution of volume over the pant legs.) Also, mark the waistline about 1/4" (6mm) under the smallest part of the doll's waist.
17. From the side view, make sure the side seam is running straight, along the side of the leg.
18. Unpin and check your pattern making sure the volume is well balanced. If there is a little too much in the back, for example, remove half of the volume and add that to the front at the hemline. (See red marks). Make sure the pant leg is not curving to the left or right, but instead, falling straight down.
19. Transfer to create a paper pattern then make a full "toile" out of the cotton fabric. Check for fit. If it is too loose, take equal amounts from side to side. If it is too tight in the waist, let it out equally at the center seam and adjust your paper pattern to reflect the changes you made.
Fly Front
All men's trousers have a fly front. On the right, the incorporated "fly" shape folds back onto itself, while the right side lays flat against the body and is lined using the separate fly front lining. With a pencil and tracing paper, draw a slim rectangle using the center front line as a guide then bend the line back towards the body. After creating this shape, flip and add the shape to the center front of the trousers at the waist on your pattern (see photo below). You will also need this separate "fly" shape as a lining.
20. Now, draw the pocket line. This will be about 3/8" in from the side seam at the waist. Mark with a dot. The length of the pocket line should end about 1-1/4" down on the side from the waist. Mark with a dot. Connect the two dots with a diagonal line. Add seam allowance to transform into a pattern. I keep this basic pattern with all of these markings on hand to use as a basic form to use in the creation of pants with modifications.
Note: I have saved this "toile" alongside of the paper pattern I created. I use it, not only for reference, but also to see it my pattern will fit future male dolls coming into the house.
Back Pockets
As I stated earlier, men's trousers always have two back "welt" (or buttonhole) pockets. Because our 1/6 scale pants are so tiny, I have prepared two options for creating them: a simplified welt pocket and a mock pocket. For this pocket you need a strip of the same fabric as your pants, a sharp blade or cutter and fabric or stick glue.
1. Cut a small strip of fabric and fold both edges to the center. Glue down and press. The end result should be the width of the pocket (1/2" or 1cm).
2. Cut the strip into smaller pieces, roughly 1" (2cm) long.
3. Fold that piece in half. Make two of them.
So that you can see what I am doing, I have marked everything in red running stitches. (You don't have to do this unless it helps out.)
4. First of all, make some sort of mark to indicate the width and placement of each pocket hole. The midpoint should be on equal sides of the apex of the back dart.
5. With a cutter, make a good clean horizontal cut.
6-7. On each side of this horizontal line, make a tiny cut (about 1/16" or 2mm) down from that line.
8. On the wrong side, put a little glue just under the slit and fold down.
9. Press. Your pocket hole should look like this. If your fabric has a tendency to fray, use fray check or a bit of white craft glue on the edges.
10. On the wrong side: slide the folded tab through the pocket hole.
11. Turn over to the right side and adjust so that the pocket is no more than 1/8" (3mm).
12. On the wrong side, trim and glue down the remaining part of the tab to the pants at the bottom. Add a touch of glue to the top to hold in place. Then whip stitch the welt to the top of the slit so that it doesn't reopen.
13. Press well. Honestly, this is my preferred welt pocket, not only for back pockets but also for use as a chest pocket on a jacket or buttonhole pockets further down on a coat or jacket.
But, if this is a bit too much or you want something cleaner looking on the inside, you can cheat with this mock version.
It starts off the same as the one above. Cut a strip of the same fabric as your pants. Fold the sides into the middle so that the width is 1/2" and cut off two pieces, roughly 1/2" long. But do not fold.
1. Place this piece flat, right side of the strip to right side of the pants. Stitch in place.
2. Fold the bottom edge to meet the stitch line and press.
3. Fold once again and press well. Hand stitch to secure in place. It is much easier than the first proposed pocket. However, I have not been able to get the finished pocket fine enough and there is the added bulk from the fabric being folded three-fold.
Note: It is best to make your pockets while the pattern pieces are still flat!
Front Pockets
1. Let's go back to our Front Pants block. Trace off, including all markings.
2. Cut along that diagonal pocket line. Slide that small piece to the side.
3. Place tracing paper over the top edge of the pants. Trace along that diagonal line then draw the (inner) pocket. It's a shape that looks like this. It should begin and end on either side of that diagonal pocket line. You will eventually cut 4 of these out of a lightweight fabric. Place to the side.
4. Gather the main pant leg and the tiny side front piece you cut away from the pocket placement line. Add seam allowance to everything including the separate fly lining to create the definitive pattern. Below, here is a detail of the side front+pocket and how it works with the front pant pattern.
1. I pinned together the paper pattern so that it's clear. The side front gets one of those inner pocket pattern pieces. On the left is the back (stitching) view. On the right is what it looks like on the right side.
2. You can see this in fabric. After the side front is sewn to the inner pocket and pressed flat. Then it is pinned to the inner pocket that you have sewn to the body of the front pants.
3. Here's what it looks like on the other side. We're looking at the wrong side of the front pant which has a inner pocket sewn along the diagonal pocket line.
4. When the whole thing is turned right side up, this is what the front pant leg resembles. (Together, this will be sewn to the back pant leg.)
As a side note....
When you place all of the pattern pieces on the main pant pattern you can clearly see the structure of the trousers and how everything fits together.
The Waistband
1. That leaves the waistband. You want to be careful not to make that waistband too thick. The finished waistband when folded width-wide here is only 1/4" (excluding seam allowance).
2. I created it by pinning a narrow strip of fabric along top waistline of the trousers. Mark where the center back, side seams and front. The right side is extended an additional 1/4" over the right edge of the waistline.
And don't forget....where menswear is concerned, the right side is folded over the left side! (It's the opposite of womenswear.)
For my FR Hommes doll, my final waistband (including seam allowance) measured 9 1/2" (236 mm) wide by 7/8" (22 mm) tall.
3. Add seam allowance to all pattern pieces including that tiny little side piece at the top edge of the pant leg, the inner pockets and even on one side of the fly front.
Here's a close-up of what your final pattern should resemble.
Putting It Together
Before we get started, men's trousers are NOT lined! I mention this because the trousers that come with Integrity Toy's Homme Dolls are all lined! But in real life they are not. Choose your fabric well. The fabric should be thin enough so that it falls well over the doll's legs. Don't overlook lightweight cottons, wool, even silk! Remember these are 1/6 scale rendition of full scale garments and the fabric should be as close to scale as well!
1. I like to begin with the back. Close and sew the darts. Create your "welt" pockets and press flat.
2. Cut 4 inner pockets. Sew two of inner pockets to the vertical line on the two trouser fronts.
3. Press the pocket to the inside.
4. Sew the remaining two inner pockets to the two side fronts. Press flat. Line up the inner pockets front pant with side front. Pin together.
5. Sew along the seam allowance line.
6. When you turn the front pant legs to the front, everything should line up. Make a few basting stitches at both points of the pocket to hold in place while you finish the trousers. Also, sew the fly lining to the left pant fly. Turn and press.
1. Lay the back pant leg over the front and pin both the outside seam together only. Press, then turn up the pants at the hemline. Pin the trousers legs along the inseam, stitch and press. Do this for both legs.
2-3. Turn one of the pant legs right side out, then slide it into the other so that it is lined up with the (outer pant leg). It should be right side to right side with the wrong side facing you.
4. Turn the inner pant leg so that the top of the two legs line up along the middle center line of the trouser. Sew from about 1/8" from the bottom of the fly down and up to the top of the back waistline. Turn the trousers legs right side up. Press the fly on the right pant leg down onto itself. Top stitch the fly front.
Waistband
1. You might want to make a tiny mark to indicate the placement of the waistband onto the trousers.
2. Sew the two side seams: one is straight, the other requires you to create a tiny tab for the right side of the pants. Clip the seam just under where the tab ends (about 1/8" from the seam). Trim the excess seam allowing. Clip diagonally near the point.
3. Turn the waistband right side out and press. Using a narrow slightly pointed stick, carefully push out the tab. Be careful not to poke a hole in it or pull out threads. You may need to use a pin to help pull out the remainder of the shape.

4. Pin the waistband onto the top of the pants. Remember the tab extend out from the right side of the front trousers. Stitch in place. Then fold the waistband up and over to the back of the trousers. Let the inside edges lay flat. Again, if there is a problem with fraying you can put a small bit of white craft glue around the edge with a toothpick or apply fray check. Pin the waistband down. Basted in place.
5. Press the waistband, then carefully, stitch along the bottom of the waistband where it joins with the trousers. I used hook and eye to close the tab on the pants.
Pant Loops
This is one last detail but, in this era of belt-less trousers, this one is optional. However, if you plan to use a belt with your guy doll's pants, then you will need to add the pant loops.
1. You will need to make a very tiny sliver of rolled fabric. Here the width is only about 1/4". I've rolled each side towards the middle and glued everything in place, then pressed it well.
2. Though the average man's trousers has more loops than this, I limited the number to 3: one over the center back seam, the other two on either side of the front pant leg.
3. Pin a section of it to the bottom of the waistband (right side of the loop to right side of the pants-the wrong side will be facing up). Hand stitch in place.
4. Loop the sliver over enough so that it doesn't over extend the band. fold downward and cut. Be careful when you sew the top down so you are only catching the waistband and the underside of the loop. You don't want to sew the loop closed.
Okay, so now let's look at our finished pants.
I've given them a good pressing (I'll show you how a little further down). And look....from front to back...real men's trousers with working front pockets my doll, Loic can actually get his hands into!
Pleated Trousers Modification
Quickly now....with trends favoring wider trousers for men, let me show you how to modify this pattern into pleated pants. The pant block is the same. All we need do is to introduce more volume in the front.
1. Take the front pattern you used to create the trousers above. Measure from center seam to side seam and mark the middle.
2. Draw a vertical line down the center of the trouser pattern.
3. Cut the pattern down that middle line.
4. Take a sheet of graph paper and draw a vertical line. Lay the pattern pieces on either side of that line of equal spacing. For the pleated trousers shown here, I added 1/4" to each side of the line, totally an additional 1/2". You can add as much or as little volume according to the desired style. Glue down and complete your pants construction as shown above.
Trace the pleat line onto the fabric. The center line is the fold line and the two outer lines are brought together. You can either put a few stitches at the top before adding the waistband, or you can sew the pleat down by about 1/4" or slightly more. The stitch down pleat conforms to the body before releasing the fabric, while the stitching the pleat directly into the waistband provides a fully look near the waist.
Here, Shemar's pants are pleated directly into the waistband.
If you look closely, you will notice that Pierre's pants are stitched down near the waist.
Here, I've used the mock welt pockets for the back of Pierre's trousers.
The pleated trouser pattern, when shortened, works perfectly for Bermuda shorts, as well!
Pressing
Not all men's pants are creased. The ones that are pressed flat down the center are usually found in casual wear. But for dress slacks, classic trousers worn with suit or sports jackets, trousers will have a creases ironed in. After completing your trousers, fold them by turning them to one side and lining up the side seams as shown on the left. Press the pants from about the level of the crotch down. For the pleated pants, fold the pants from the pleat down and press. The back is pressed from the level of the crotch down.
And voila! Male doll trousers that look like the real thing! Once I made these trousers with all the little details, I was amazed at how they really looked like a real pair of men's pants as opposed to something generic.
I have two more masterclasses planned down the road: the man's classic shirt and the classic sports jacket. By the way, for the jean's tutorial, check out our tutorial by clicking
HERE. All text and photos property of Fashion Doll Stylist. Please do not reproduce without prior permission. And please be sure to credit us. All we want is to be recognized for the work we do. Our blog is produced without funding.
Like us on Facebook: @FashDollStylist
We're also on Pinterest: @FashDollStylist
And of course, we are on Instagram: @fashiondollstylist