Happy Belated New Year to you all. Sometimes real life gets in the way of doll play.....
I have been working on the dress shirt tutorial for the male doll for a very VERY long time. Too long!!! In fact, I had hoped to finish this before Christmas. Alas, it did not happen. Aside from the CoVid fatigue most of us are feeling, I experienced some problems with the details. And it is details that "make" this shirt!
At first glance, the shirt is pretty simple. A man's dress shirt, however, is distinguished by the collar and stand, the back yoke, the sleeves and cuff. And because you cannot include buttons for the 1/6 version, I had to figure out a suitable method to close the shirt.
In real life, a Dior shirt for men costs about 900 USD. They are made from a fine grade of cotton and are precision cut to glide over the body effortlessly. They are remarkable only by their discreet yet impeccable detailing of the collars and cuffs. For the most part, the basic shirt I created years ago for my Ken dolls is sufficient for the vast majority of my menswear projects. However, as in the case of my masterclass men's trouser tutorial, I set out to create a "perfect" shirt for my guys. This proved to be way more difficult that I anticipated. But after a good number of shirts and umpteen collars...I finally arrived at a fairly decent (though not entirely perfect) dress shirt.
Disclaimer--In tailoring, the body is meticulously measured and the garments, mathematically calculated and drafted on paper. But in creating 1/6 versions of the shirt and mathematics not being my strength, I approached this garment in the same manner as I do with the female doll patterns. The basic block was draped not drafted.
Warning---this is a L-O-N-G tutorial. And parts of it are challenging! For that reason, I decided to leave my original post on the Ken doll shirt in place.
The Basic Block
1. As with all other of my slopers, this project begins with two pieces of cotton fabric--long and wide enough to cover the front and then the back of the doll. Mark each piece with a vertical line (to tape to the center front and center back of the doll.
2. Cut out a curved notch at one corner for the neck. Line up the vertical line with the center front of the doll.
3. Repeat for the back.
4. Pin together the two pieces of cloth along the doll's shoulder and down along his side. You want the side to glide along his side, not overly fitted. Be sure to mark around the arm. The top of your armhole should be at the tip of the shoulder point and the bottom of the armhole should be at the bottom of the chest plate or underneath the armpit parallel to the the bottom of the chest.
5. With a pencil, mark the placement of the pins on front and back side of the pinned fabric.
6. Remove pins and connect the dashes to smooth out the lines.

7. Trace your lines to paper.
8. Cut each side out and place the front over the back along the shoulder and armhole.
9. Especially over the hips note the difference between the two. We are going to balance our pattern so that the back and front meet.
10. To do this you want to measure the difference between the front and back.
11. Half of that difference you will add to the smaller side (in my case the front).
12. The other half of that difference will be subtracted from the larger side (in my case the back). When you finish, the front and back will line up
13. My front and back block (sans the seam allowance).
Shirt Body
Used as is, this is a pattern for a semi-fitted shirt. If you want something boxier, you can always change the lines along the side seams into something straighter after you have made your basic block.
1. This step is very simple. Line up the blocks along the shoulder line. Mark about 1/4" (6mm) down from the shoulder of the front block.
2. That will be added to the back and subtracted from the front. It really isn't enough to be considered a "front yoke." But it is an area that you can take liberties.
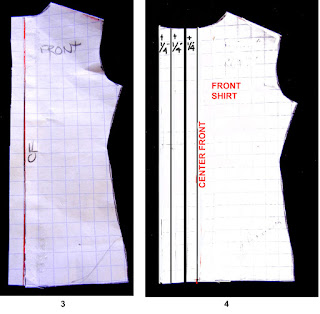
3. On the front block, mark a line 1/4" (6mm) over from the center front.
4. Add another line 1/4" from the first line and another 1/4" from that line. These are center front fold lines.
5. Let's look at the back. Draw a horizontal line perpendicular from the center back, approximately 1/2" (1 cm) from the tip of the neck.
6. Cut along that line to form a back yoke. Make a mark about midpoint or a little beyond on both the yoke and the back body of the shirt.
7. Not all shirts have these little tucks, so this step is optional. However, upon observing my dad's dress shirts, it seems that the tucks are there to allow additional ease. Draw a vertical line down to the bottom. Cut and spread about 1/4" (1cm).
8. Note how when you join this back to the notch, it will line up with the mark on the back yoke.
Sleeve
Here again, I have devised my own formula for creating the sleeves based on draping methods borrowed from womenswear. Take the cloth block you created above, pin together and place on the doll. (Tape in place, front and back.)
1. Take a piece of cotton fabric, roughly 3-1/2"x 4-3/4" (12x9 cm)
2. Fold into thirds
3. Scoop out a bit of fabric over the folded part of one side.
4. Fold under slightly the edge and pin the middle of the smooth side onto the tip of the mid shoulder point
5. Pin along the armhole until you get to about 1/4 length away from the armhole arc at the bottom. Mark the center of the sleeve
6. Take your time and fold one side of the sleeve then pin to the other side. You want the seam of this "tube" to line up with the side seam of the basic top. Be sure to mark the hem of the sleeve.
7. When you have everything well lined up, mark with a pencil on both sides of the pins.
8. Once finished, unpin. Trace off to paper.
9-10. The sleeve (like the rest of our shirt drafts) will have seam allowance to create the finished pattern. To plan for the cuff, it will be as wide as the bottom of the sleeve. I determine its length and how long I want the sleeves and what type of cuff I want. Take a piece of cotton and wrap at the wrist to determine this. For a button down cuff, you may have to shorten the sleeve pattern by 1/4". But if you want to do cuffs that fold back over the bottom of the sleeve and closed with cuff links, simply start at the bottom of the sleeve and figure the length down from that (as you see above). This measurement for the cuff must be doubled because it will folded in half before being attached to the hem of the sleeve. My sleeve is 1/2" (1cm) over the wrist of the doll. Thus, the cuff pattern is 1" (2cm) long plus seam allowance.
The Collar
Now comes the hard part! All quality dress shirts have a collar with a stand. There is a way to combine the two into a single element, but those are usually found in cheaper shirts. If you chose to make this shirt, you are spending a LOT of time and effort. You've come this far...you may as well spend the additional time and give your shirt a "quality collar." But this may not come easy.
When measuring the neck to construct the collar, I found it easier to take a small length of paper and wrap around the doll's neck. The mistake a made for quite awhile, was measuring too tightly and not allowing for ease. If measured too close to the doll's neck, by the time you have finished the collar stand and attach it to the shirt....nothing will fit! So when measuring, I allowed about 1/8" or slightly more on either side. For an average weight cotton fabric, this is about right. If your fabric is a super lightweight sheer, it will be big. But better a little too big than too small.
Wrap the paper around the doll's neck, allowing for ease on both sides and mark. Then fold in half and proceed with the draft below.
1. A to C= 1/2 of the doll's neck, center front to center back. A to B= 1/2 of A-C
2. A to 1= the length of the stand. For FR Homme and Ken dolls, this should be about 1/4" (6mm). For a little larger doll, this might be 3/8"
3. 1-2= A-B. From B-C, draw a curved line upwards by 1/4".
4. 2-3=Draw a curved line upwards by 1/4". This will be parallel to B-C. Draw a vertical line from C-3
5. From C3, extend line out and upwards by 1/4." Curve a line from the tip of 3 down to the extended line.
Collar Blade
6. Extend A-1 line vertically. Decide how deep the back of the collar blade width and mark with D. From D, draw a horizontal line the same width as the collar stand. (The end of that line will be marked E.) Make a point down from D (on the center back), the length of the blade. For my shirt, this is 3/8".
7. From A-B the line is the same as the one of the stand. From B-C curve downwards to C.
8. E-C, connect the points. This produces the blade that meets at the center front.
9. Trace to new paper and add seam allowance.
For the stand, add seam allowance all over.
For the Blade, I have simplified this pattern piece. The top edge will be cut on the fold of the fabric to cut down on bulk. Add seam allowance on the sides and neckline seam.
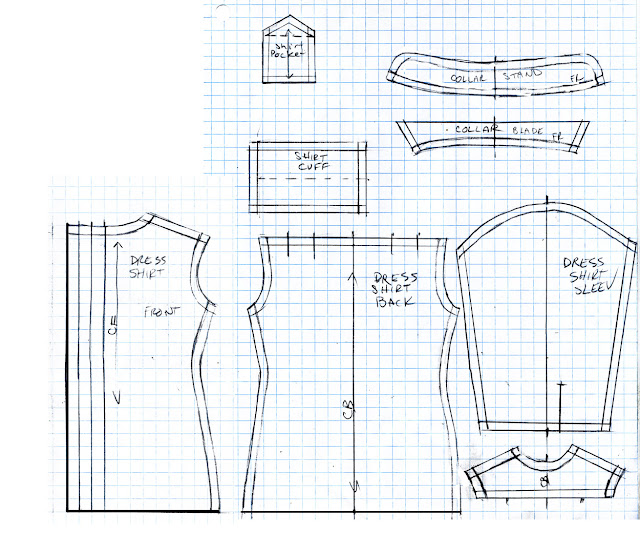 |
| Complete dress shirt pattern |
Assembly-Front
1. Men's shirts, jackets and coats close right over left when facing us. Mark the fold lines
2. Fold over and press.
3. Fold over again and press.
4. For the left side, repeat, but fold under to the wrong side twice. Press and topstitch.
5. At this point, feel free to top stitch.
Back
1. On the back, join the marks together to create tucks. Tack down. Attach the yoke to the back, matching up the tuck marks with those on the yoke.
2. Stitch together. Top stitch if desired.
Sleeve
1. Take your sleeve patter and draw a 3/4" (2cm) vertical line perpendicular to the hem.
2. Transfer this to your sleeve. Cut along that line.
Placket

3. Cut a 1" rectangular strip of fabric (the same as your shirt). Pin the short side to the hem of the sleeve where you have made that slit.
4. Spread the slit as far as you can. It will make a shallow V shape. Pin the strip along the slit, allowing for the apex to fall as close to the edge as possible without creating any pleat.
5. Note where the apex falls. You will create a stitching line that lines up with that point but remains equal distance from the edge.
6. As you can see the stitches align with the edge of the strip, but slit will slope to the apex. Try to ignore the V-shape and follow the line of the strip (shown here in pink)
7. When you get to the apex point, place a tiny stitch and carefully pivot.
8.Continue sewing to the opposite edge.
9. If you are doing this right, your stitches should be parallel to the edge of the strip like this.
10. On the right side, this looks like this.
11. Press inward.
12. Fold over and tack to the seam.
13. When folded over properly, the placket is hidden on the exterior but visible when the sleeve opening is visible.
14. The sleeve is closed by laying the top of the lined slit over the exposed placket of the other slit.
15. On the backside, it looks like that with the placket folding over itself.
16. In the front, both ends of the lined slit meet together. You can topstitch the topside of the placket.
17. When left open, you an see how this is constructed. But for the moment, do not attach the cuff just yet.
18-19. Assemble the shirt in the normal fashion. Attach at the shoulders and set in the sleeve while flat. Fold over and sew down the side seams of the sleeves and the sides of the shirt. Press all seams and turn right side out.
Cuff

20. Fold the cuff and stitch both sides.
21. Turn right side out and carefully push out the corners with a dowel or, use a pin to pull out the corners and press well.
22. Right side to right side, pin one side of cuff to the right side of the sleeve from one opening to the other. Sew.
23. Hand sew the cuff in place.
24. Fold the top of the remaining side over the seam and slip stitch it in place. This provides a clean finish to the inside of the cuff. Press well.
Collar
1. Lay out and cut the collar stand and collar blade. Note: the top of the blade should be cut on the fold.
2. Fold the collar blade horizontally and sew the side seams. Turn right side out.
3. Use a sharpened dowel to push out the points or use a pin to carefully pick out the points. Press well.
4. Lay the bottom (raw edge) of the blade along the top edge of the collar stand and place the second layer of the collar stand in place. Please line up these three layers by their center back points. Sew
5. Turn right side out and press well.
6. Right side against right side, pin one side of the collar+stand to the neckline of the shirt. Sew.
7. On the inside of the shirt, turn the raw edge of the inside of the collar down and sew over the neck seam. This presents a clean finish on the interior.
PocketFrankly, I did this by sight. You can simply draw a square, but I liked this special little detail I saw on my dad's shirt. This is a simple square with a diamond shaped head. All of the outer seam allowance has been turned down and press. Then, fold so that the pointed top is inside of the pocket. Attach to the shirt and top stitch or hand stitch in place.
Closures-Hooks
After I finished my beautiful shirt, the next challenge was to figure out how to close it. You cannot make buttonholes small enough to be usable. Integrity Toys uses hook and eyes.
Space your hook and eyes evenly. I found it useful to figure out the spacing on a small piece of paper placed next to the edge of the shirt. The hook part of the closure is placed facing the outer edge. Begin by stitching down the back of the hook using a blanket stitch along both loops then add a few stitches to the front end to make it stay in place.
On the other side, I created self "eyes." (See below.) If you make a number of these shirts for your guys, you will quickly realize how many of these closures you will need. They are number 0. But you can also make them yourself.
DIY Hooks..
1. For a size 0 hook, cut a 1-1/2" length of wire
2. Bend in half
3a.Using round nose jewelry pliers, form a loop on each end.
3. The result should look like this.
3b.Place the pliers at midpoint on the tail.
3c. Bend the tail.
4. The end result.
..& Eyes
You could use or make metal eyes. However, if you take a little time, the crochet eyes using thread that matches the color of the shirt is better.
1. Begin by tying the end of a threaded needle. Push the needle through the back to front.
2. Create 2 or three stitches. They should be about 1/4"
3. With the needle in the front, slide the needle under the stitches.
4. Wrap the the thread from left to right behind the needle to form the first knot.
5. Repeat. Wrap the thread from left to right behind the needle and gently pull to form the knot.
6. Don't pull too hard. The know should be moderately loose.
7. Continue. It takes about 5 or 6 knots.
8. Push the needle from front to the back and make a small knot in the back. Cut the thread.
Here's a side view of Leon's shirt. You see how this sort of closure keeps the shirt shut close to his body.
Closures-velcro
Most collectors don't like velcro however..... If you can find a thin velcro, this is another (easier) option. Just remember that even if the velcro has an adhesive backing, you will still need to sew it in place.
Buttons
Placement of the outside buttons is the same as when planning for the closures. I do the planning with a small sheet of paper held close to the edge of the shirt. On the left, I've used "brads" (found in the scrapbooking section of your crafts store). On the right, I used buttons I made myself. The holes don't go through so they must be glued to the shirt. This is not an idea solution. I would recommend, instead, ordering 3mm doll size buttons. Of course you will need a superfine embroidery needle to sew them onto the shirt.
Or....Let's just call this "hidden buttons." A fashion statement!
Here's my first shirt, front and back. Though I opted for a "fitted shirt" which can be worn tucked into his trousers, you can always straightened the lines along the side seams straight for a looser silhouette.
I wanted to test out this tutorial by adopting my techniques to create a shirt for a more muscular doll with different proportions. The construction remains the same. I only changed the proportions of the collar by adding an additional 1/8" to the collar. His sleeves are longer, ending in cuffs that turn up and, in theory, are suitable for cuff links.
All photos and text property of Fashion Doll Stylist 2022.
Like us on Facebook: @FashDollStylist
We're also on Pinterest: @FashDollStylist
And of course, we are on Instagram: @fashiondollstylist


