
As much as I love the sophistication of discreet design, it's the child in me who continues to be attracted to things that sparkle and shine. At long last, this child decided to explore those packages of shiny foil that have caught my eye in craft stores for years. This project looks at foiling on fabric and I will tell you straight away, I had TOO MUCH FUN!!!! Moreover...I have lots of photos to prove it!

Foiling is a process whereby you apply tacky glue to a surface, allow it to dry, press a bit of colored foil over the design, then rip away to delight in the results. In an instant you can add a bit of glamour to any garment. What is absolutely incredible with this process is that even when you mess up (and I did many times), everything still looks fabulous! I started off small. Went to something big. And before I knew it, I wanted to gild EVERYTHING.

Start Small
Foil is sold in either small packs of sheets or rolls and comes in a small variety of metallic colors. It differs from gold leaf in that it is simpler to use, does not require a topcoat and is more stable for use on fabric. For the T-shirts I found it more convenient to cut off small squares, however you don't really need to cut small squares because you can use the sheet over and over until all of the foil has been rubbed or ironed off the sheet. For glue, I used Mod Podge and tried glitter glue (which did not work well for me). But admittedly I'd like to try other types of glue because each fabric reacts differently. Nevertheless, I was pretty happy with the results obtained.


2. Use an Xacto blade or smaller cutter with break of points to cut out your design.
3. Place the stencil on the fabric. You can do this on the flat unassembled pattern piece or an existing garment. For the latter, be sure to place a small piece of cardboard in between the layers to keep from gluing them together.

5. Apply a light layer of glue onto the design.
6. Immediately and carefully, remove the stencil (while the glue is still wet). Allow glue to dry. (The design will be clear not milky white.)
7. Foil has two sides: a shiny color sideup and a dull, pearly silver side down.

9. Press with the iron for about 30 seconds. If your fabric is thick, you might also want to press the underside of the fabric. Let cool a bit.
10. Rip off the film. If there are spots or it didn't completely cover, you can lay a fresh spot over the design and iron again. Here, my star came out perfectly.
11. You don't have to use a stencil. You can also write or draw a design freehand directly with the glue. Allow to dry then repeat steps 8-10.

Simple & Sophisticated

Instead of fancy designs or stencils, sometimes a simple brush stroke is all that's needed to make a strong statement.


Stamped for Approval

This was not my most successful effort, though I still loved the result. I decided to try a rubber stamp (dragon design).

1. First, I plotted the design. I cut out my dress (a sheath with kimono sleeves) then pinned it on the doll. I cut out circles of aluminum foil and played around with them to see how I wanted to pattern to repeat. I pinned them where I wanted them to fall.
2. I unpinned the garment then laid it out flat. One by one, I unpinned each circle and pressed the glue moistened stamp onto my garment.

3. This did not come out exactly how I envisioned it because... You should use either a roller or a sponge to apply the glue to the stamp. But in my first attempt on another scrap of fabric, the result was a tad too light and I couldn't see my design. So this time around, I added much more glue---too much--which filled the crevices around the design of the stamp, resulting in circular blobs. I was still happy, but decided to re-foil the empty spots using a contrasting color of foil (copper) for a two toned effect. Hey, I'm happy, Helena's happy and that's all that counts!
 |
| My stamped pattern wraps around the neck and one sleeve. |
Over Print

Here I began with a silk chiffon print shirt I had made for another project. I cut a rose stencil then flattened out the shirt. I painted on the glue and applied silver foil.
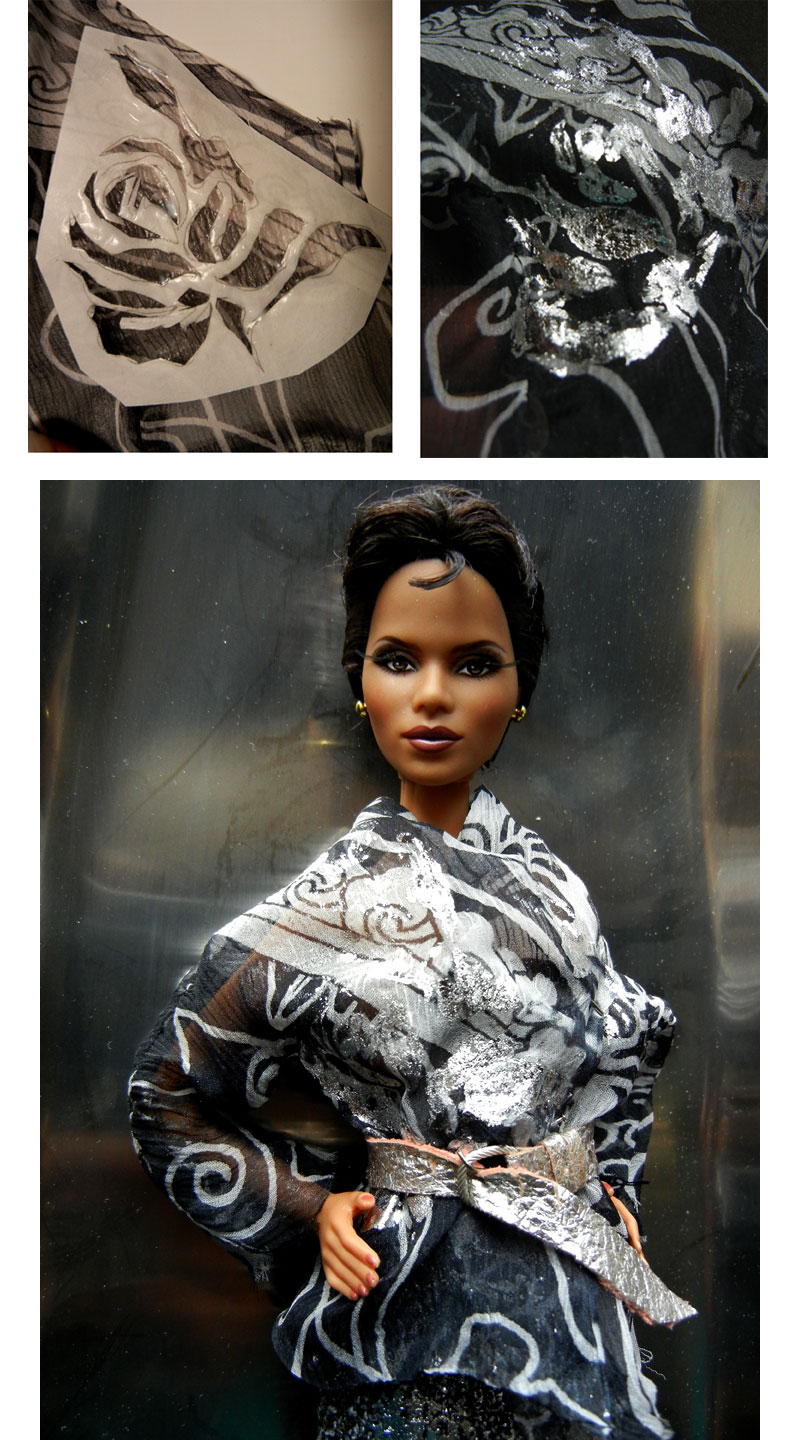
I didn't stop there. I made a simple straight skirt out of a grey tweed. I simply made a few broad brush strokes to one side of the skirt.


Uptown Girl

I could not stop. For my last garment, I made a couture gown out of copper toned silk organza. Then using my rose stencil, I foiled part of the dress.

Final Notes:
You can foil most any material including leather and rubber. You can also add foil to the tips of an existing textile patterned fabric and thus make it your own!
Though the instructions on the packet of foil tells you to burnish the foil with a hard edge instrument or a credit card, it is largely a technique best for non-textile surfaces. Heat is better for permanently bonding the foil the fabric.
If you're very careful, the stencil can be reused, though you will need to put a layer of parchment paper on top to keep the iron from sticking to the build-up of glue.
 |
| Reuse the foil until all the metallic is gone. |
Create stripes or polka dots by using strips of double stick tape or glue spots.
You can keep reusing the sheets until all of the specks of foil have been pulled away from the cellophane.
When it comes to fine silks I would suggest making a small test before committing to the entire garment.
Finally, be warned....no matter how unskilled you think you are....foiling stirs the creative beast that lies deep within and provides an immediate and immense sense of satisfaction!!!!!

All images and text property of Fashion Doll Stylist.
Follow us on Twitter: @FashDollStylist
Like us on Facebook: www.facebook.com/FashDollStylist
We're also on Pinterest: www.pinterest.com/FashDollStylist
Wow, great technique. I think my favorites are the one with the simple brush stroke and the one Halle Berry is wearing.
ReplyDeleteThank you Phyllis. I agree with your choices. But of course, like a kid, when I first set out I went absolutely crazy with the foil before eventually doing something more refined. LOL!!!
DeleteGreat idea April, all the dresses looks faboulous. You know I love Helena, she's such a gorgeous doll and this style really befits her!
ReplyDeleteSoon I'll have to start making some t-shirts for the guys, I should try to stencil something on them using your tips...we shall see.
Thanks for sharing and for the super detailed tutorial!
Kisses Billa
Thank you, Billa. I too, love Helena. Good luck with those T-shirts.
Deletesuper helpful tut! thanks for posting!
ReplyDeleteHappy to know you enjoyed this post, Teva.
DeleteAnother great idea, and gorgeous designs! I would love to try everything from your last posts, it looks like so much fun! And you used beautiful backgrounds, perfect for the subject! xxx
ReplyDeleteThank you, Linda. This was a lot of fun and something tells me, I have not seen the end of foiling in particular!!!!
DeleteWow, such a great ideal! I will have to try this technique in the future.
ReplyDeleteThank you, Brini. Yes, do try this because it is so much fun and looks great!
DeleteFun technique AND glamorous results. I'm pinning it for a future project ;-)
ReplyDelete...And highly addictive!!!!! (Glad I bought 2 packs of foil sheets--I'll be using them!)
DeleteWspaniały efekt! Bardzo mi się podobają te ubrania!
ReplyDeletePozdrawiam bardzo serdecznie!
Olla123 wrote: Great result ! I really like these clothes ! Yours very sincerely !
DeleteThank you, Olla. Glad you enjoyed this post.
Hello from Spain: nice idea, and awesome designs. Great looks. Keep in touch
ReplyDeleteThank you, Marta. See you soon!
ReplyDeleteYou have a lot of good ideas. I have to try them. thank you so much to share them with us.
ReplyDeleteAnd thank you, Shasarignis, for your visit. A bientot!
ReplyDelete