Showing posts with label dolly textiles. Show all posts

Wednesday, June 29, 2022

Frou Frou!!!!


In the absence of any real inspiration, we once again, retreated to our dolly textile archives and revisited another fun technique: frayed edges. We combined with an earlier theme: denim to come up with something we thought would be fun for summer. So get your dollies ready for some south of the border fun! One-two-cha cha cha!!!!

You can fray almost everything, but I love recycling old garments so once again, I cut up an old pair of my dad's jeans. The denim is thick but after years of washing, the fabric is now soft and supple. Normally you need a holding stitch to stop the fray, but denim doesn't unravel so much, especially the way we intend to use it. 

Caught Up In the Fray!

The garments we use as a base are very simple, very basic. Again, the embellishments here is the real story! This is time intensive, so pick a lazy day when you have lots of free time on your hands to create your trims and embellishments. 

Before you begin....With denim, there are two colors of threads in the weave. My light blue remnant has blue running vertically (aka: the warp) and white running horizontally (aka: the weft). You will need to chose which color you want for your fringe.
1. Start by measuring and cutting even strips of denim. In this case each strip is !-1/4" (3cm) wide. 
2.Cut as many strips as you will need depending on how many rows of fringe you will need.
3. Begin fraying each side of the strip you have just cut. Though optional (you can use a pin) a seam ripper is helpful in pulling away the cross threads. 
4. Once the cross threads are pulled up, I remove them by pulling them away with my fingers.
5. You will do this on both sides of the strip. I then fold the strip over so that the fringe at the bottom of one edge meets the top of the fringe on the opposite.


6. Make your basic garment. Pictured here is the basic straight skirt. 
7. Begin in the back at the bottom, pinning the middle (or fold line) in place. Then stitch by hand. Let the center of each strip overlap in the back. With so much going on, texture wise, those frayed edges adds to the movement. 
8. Fold over and press.
9. Repeat until you have just the look you want. 
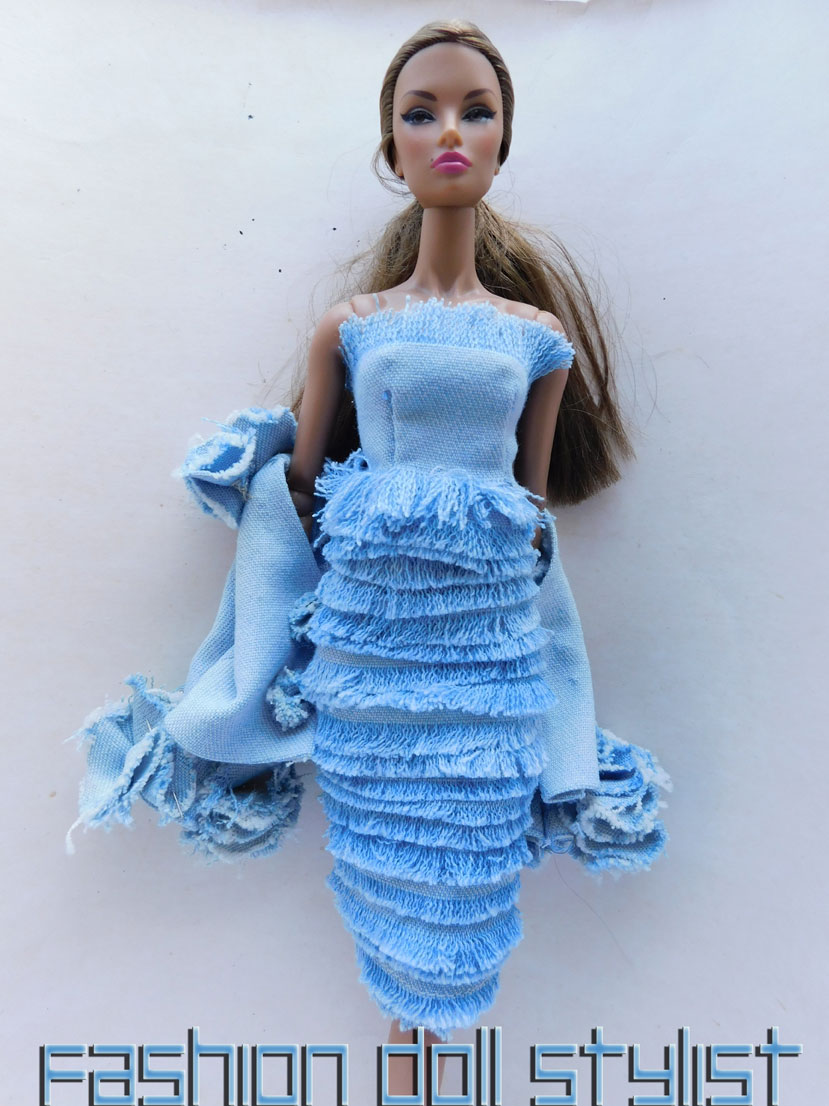
For my first skirt, I added the fringe from the hem to the waistband. I didn't measure the placement of each row because I wanted a an irregular alignment. However, if you want something more uniform, you can always measure and mark the placement line for each row of fringe.

What is that she's wearing at the top? I started to make a simple tank top but decided to go all the way with my Spanish them by creating a simple camisole with fringe at the top and bottom. If you fray the edges as I have, the end result will be very irregular. You can visually correct that by adding a layer or two of fringe, tacked to the inside of the camisole. Take a look at our initial post on fringing HERE. She's also wearing a swing jacket with denim "roses" at the cuffs, as a corsage on one shoulder and "rose" bottoms down the front. The next project show you how...

Rose Garden
I made another camisole, this time with removal "rose" puff sleeves. The sleeves are actually small tube with several clusters sewn on. 
1. Cut a small square of denim to fit the doll's arm. Fray each end. A single, underarm seam is all that is needed.
2.Cut circles. They don't have to be perfect. In fact the imperfection will make them more interesting.When you begin to fray the edges you will discover that where there are curves, it won't fray as easily. That is ok. You just want to fluff up the edges enough to soften the cut edge.
3. Fold each circle into quarters. 
4. Pin then sew the first one on the sleeve at the point.
5. Take another frayed circle. Fold into quarters and sew the midpoint to the midpoint of the previous circle.
6. Continue adding these quartered circles until there are enough to cover the sleeve.
If you want, you can tack each sleeve to the camisole where it meets under the arms, or treat them as removable sleeves.


And now...getting back to that jacket...This is a basic jacket with straight sleeves, each trimmed with these poufs of denim roses. I used smaller circles to create the buttons. 

Feather Weight

I found this on the craft pages of Pinterest and thought they were so interesting. These are fabric feathers! Again, they are made by removing enough of the cross threads to create the illusion of feathers. Before you start, you will need to figure out which direction each color thread moves in and which color you want for the feathers. I chose the cross thread (white) which I felt had a softer, fluffier look.


1. I roughly cut leaf shapes out of the denim. 
2. With my seam ripper, I begin lifting away the cross threads. 
3. On each side remove the cross threads. With my smaller "feathers" I can remove them simply with my fingers. 
4. Work from one side to the other side, pulling the cross threads away until you arrive with a strip down the middle that is about 1/8" (3mm). 
5. If you want an even look to your feathers, you can always trim them into the exact shape you want.
6. Now that I have a variety of feathers, I can begin to embellish my garment.
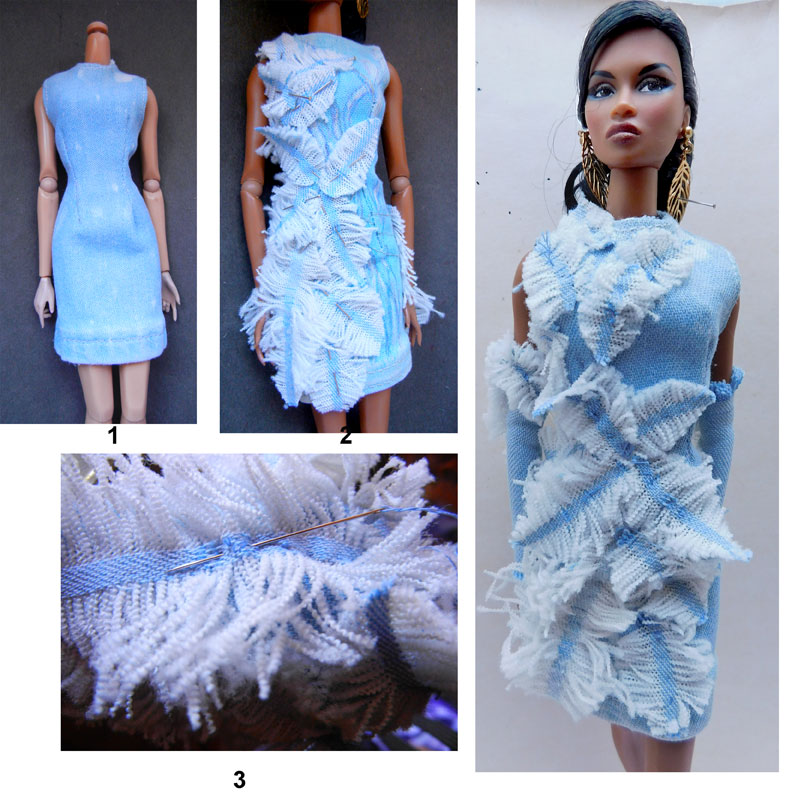
1. And so I begin with a basic sheath dress
2. I pin on feathers until I have just the look I want. 
3. Hand stitch each one partially down the middle (about 1/3-1/2 the length of each feather) so that they can "flutter."
And voila....my completed dress. I made "gloves" to match out of longer tubes of denim where the edges are frayed.

And here's what it looks like from each angle.

Fancy Pants
Of course I could have stopped there, but by now, you know me.... I could have made a gown and added feathers but instead, I decided on a pair of "cha cha" bell bottom pants, instead. 
Again, I started out with a basic, bell bottom hiphuggers that I frayed at the hemline. It doesn't matter if it is uneven because the feathers will cover everything.. I made enough feathers to achieve just the look I wanted. For her top, it is a basic bodice with a square neckline. I made small "feathers" to add to the hem of the sleeves, which repeat the design of the pants.

Okay, let's hear it.....One...two...cha cha cha!!!!!


Like us on Facebook: @FashDollStylist
We're also on Pinterest: @FashDollStylist
And of course, we are on Instagram: @fashiondollstylist


Unless otherwise noted, all images and text of this blog are the copyrighted property of Fashion Doll Stylist 2022. We are independent and not part of any other group or website no matter where this post or its elements appear on the internet or social media. Please request permission before reproducing any parts of this post. And please, always credit us. 


Thursday, January 21, 2021

Behind the Design: Painting with Markers


In a few months, our divas will be ready to show off their spring summer fashions. And from the looks from our last report, it seems that floral prints will be really big. The secret to creating any one of these cool warm weather looks, is employing prints that perfectly adapt to 1/6th scale garments. Awhile ago, I did a tutorial showing how to recreate designer prints using photo editing software and an inkjet printer. But what happens if you don't have access to a printer, or cannot find a commercially made floral print of your doll's dreams in a store? Here's the perfect solution: Create exactly what you need using textile markers! 

Textile markers look just like the regular variety except, they are filled with permanent, color-fast dyes specifically formulated for fabrics with smooth surfaces. Available in wide, chisel tip, fine and ultra fine nubs, they are sold separately as well as in variety packs both online or at your local crafts/art supply store. While they don't replace commercially produced fabric prints, they are quite useful for those times when you want a very specific print, "ethnic" stripes, or a unique hand drawn OOAK print for a special garment. 

For this project, you need fabric markers, perhaps watercolor brushes, pencil, container of water, and embroidery hoop (optional). I've included the embroidery hoop for those who might be drawing an intricate motif. The hoop comes in a variety of sizes and is good for holding the fabric taunt while you draw detailed motifs.

To begin, we must first create a "motif." This is a basic design which will be repeated all over the fabric. You really don't need to be able to draw. Since the doll is so small, you only need to create the "essence" of a design. For my floral print, look how I've only used circles, X's, little scallops (for leaves) and a few squiggly line. It doesn't take much!
While creating the motif, remember, again, scale is everything. Cut a small scrap of paper and scribble your print. Place it against the doll to check the scale. Next, choose a basic fabric with a smooth finish: cotton, silk, satin... In one piece, cut enough to make the entire garment. (But don't lay or cut your pattern pieces unless you want the motifs to fall in specific places.)


Now make a grid for the repeat of your motif. Most prints are staggered in a diamond shape. The boxes I've drawn here represent the placement of each motif. They can be closer together or further apart depending on the overall look of the finished print.

Before you start, do a series of small tests to see how the marker reacts to the fabric. Shake the marker before you start. And if it seems a bit dry, dip the nib in water first. 
Pictured above, I began with the motif on paper using the same fine tip marker I'm using on a variety of fabrics to show you the differences. On the upper left hand corner is the original motif on paper, and from there, I've shown how it looks on a medium weight cotton, a fine, tightly woven polyester, a shiny satin, a twill weave silk and finally, a sheer chiffon. Note how in some cases, my marker sometimes bleeds into the fabric's fibers.


Once you have chosen your fabric, motif and plotted the pattern repeat, you might want to trace the design onto the cloth. Usually you don't need much fabric for most garments, so I tape the fabric onto a window, slide the motif underneath and trace onto the fabric. Even if you don't want to trace all of the motifs, you need to at least make enough of a guide so that each motif will remain in scale and relatively similar.
The print I made for the dress at the top of this post, reminded me of this drawing of violets, a logo of a famous bygone New York department store. What you note is that even though the drawing looks detailed, it really is only a series of dashes, dots and strokes. My interpretation is not a copy of this logo. But it does simply convey the essence of the original. Because the original fabric has a 3-D component, I have tacked on a petal created with polyester organza. 
I show you this to give an idea as to how to go about interpreting an existing print. 

Note how at the base of my flowers, there is a splash of transparent watercolor. This is achieved by either scribbling the color onto the surface then using a wet brush to blend or wetting the surface first then drawing over with the marker and letting the color bleed. You can work in layers. Make a wash, let dry then draw over with a crisp line. The beauty of this medium is that you can always come back and add to what is already there. Moreover, you create add a 3-D effect by adding petals, beads or embroidery.

Another useful way to use this medium is to create what is called "Ethnic Stripes." These are what appears to be hand drawn stripes which gives the print a folkloric look. Essentially, you still need a guide so that the stripes don't get too out of sync. But again, what is nice, is that you can create your own color palette and design create your own pattern of thick and thin stripes.
Again, I begin with a smooth surface fabric. In this case I am using a medium weight cotton and a chisel tip textile marker. But first, you need to lightly draw vertical lines in with a pencil and ruler. Once you have finished, place the market at the top of each line and drag it down to the bottom. Don't worry if it is not perfectly straight. These are, after all "ethnic" stripes. 
The end result, complete with imperfections can make for a really interesting garment!

There are other things you can do with these markers. For example, they can be used in conjunction with rubber stamps! Most craft stores sell stamp blocks in all different sizes and shapes. Just be aware that the final result will be somewhat irregular.


Use a broad tip marker to thoroughly ink over the surface of the rubber stamp. Work quickly and press it into the fabric, rocking it from side to side. Again, plot your repeat pattern and apply accordingly. But if the edges are a tad bit too blurred, you can always use a fine tip or ultra fine tip market to fill in as I have done on the lower right box.


If you can use these markers with rubber stamps, you can surely use them with stencils!
You can find stencils (like roses, stars and letters) online that can be used for your final design. 
1. Make your selection, then trace off onto freezer paper.
2. Using a broad tip marker, fill in the cut out spaces.
3. When you are finished, it will look like this.
4. Carefully, peel away the paper.
5. Here's the result. But notice, there are a few fine details missing.
6. You can take a fine point marker and fill in the missing details.

Note: Unless you are using recycled fabric, it is advised that you wash the fabric prior to applying the marker designs. This is because many fabrics have some sort of sizing product which may alter the results. Also, most brands of markers claim you do not need to iron the finished design to set the color. They advise waiting 24 hours after painting before using in the garment. Out of an abundance of caution I iron the fabric anyway and, if the marker bleeds through the fabric to the backside, I tend to line the garment or dress the doll with an undergarment. NEVER use regular markers (or Sharpies). The chemicals are different and they will most likely stain the doll.


Follow us on Twitter: @FashDollStylist
Like us on Facebook: @FashDollStylist
We're also on Pinterest: @FashDollStylist
And of course, we are on Instagram: @fashiondollstylist


Tuesday, January 5, 2021

Ragtime Melodies


There is something called "artwear." Generally found at arts and crafts fairs, these are hand made, one-of-a-kind garments and accessories created by regional artisans. Most of the time these items are not fashion. However, from time to time, designers are influenced by a craftsman's technique and translates it into high fashion. A few years ago, I saw a shaggy jacket during menswear week that I thought could be interesting. So, for this first tutorial of the new year, I have revived the "rag jacket" and scaled it down for my dolls. This is super easy to make and takes almost no skill. 

The concept is simple. In essence, It's a rug knotting technique used to create a jacket or shawl. You begin with a netting material at the base and an old garment cut into slivers. Tie each piece onto the honeycomb cell of the base. There is no sewing. It's as easy as tying a simple knot! My base material in this case is the plastic nettin that encased my Christmas turkey. Sometimes vegetables are wrapped in the same "material." But if none of your food comes wrapped in such a material, an old fashioned hairnet (generally found at beauty supply stores) will work as well! 


You need to use the most simplest patterns as possible. I really wanted sleeves, so I created a very simple "boxy" pattern that is joined along the underside of the sleeve and side of the garment. But frankly, the simple tube  we used to create our shrugs or a stole is less complicated and will render almost the same look. 

Here is the pattern I used. It was created by stretching out the doll's arms (for width) and deciding the length of the finished garment and drawing a box around the whole thing. There is a slit at the center front. Usually whenever I've used such a pattern, there is a horizontal slit at the neck. However, the netting is so loose, you don't really need to introduce a slit.

Cut a piece of the netting so that it covers the pattern. You will use the pattern to help guide you as you tie on the slivers of fabric. What I discovered is that it is better if you make that cut along the center front line. You can "finish" the front edges with fabric ties.
1. It's very simple. Whatever your fabric or material source is, cut them into slivers. For this jacket, I cut up an old pair of my dad's jeans into slivers that are approximately 1/2 inch (1 cm) by 4 inches (9cm). They don't have to be even. If the fabric frays, all the better. But if you want a more "controlled" effect, you could use ribbon, for example. You could even cut up non-woven materials like tulle, vinyl, even dryer sheets. 
2. Get comfortable. Put on a good movie or two. Pour yourself a glass of wine or put on a pot of coffee. You're going to be working on this for awhile. Tie each piece around the cells of the netting. Continue until you have covered the area. 
3. Put this on the doll and cut more ties.

4. I use more fabric slivers to tie the underarm and sides of the jacket.
5. Once I have finished, cut away the excess netting. Then tie on more slivers to hide the cut plastic edges.
6. And Voila! Here's Nicki and her new jacket. Very 1980's! But very versatile. With jeans and sneakers it's an extravagant daytime look. With a short circle silk skirt and thigh high boots...it's urban high fashion. 
I will say this. The jacket is heavy. What I learned is that you do not have to tie up the entire surface of the netting. But where you see gaps (around the neck and sleeves, for example), you can "modify" the fit simply by tying the cells together. The look of this jacket will change depending on the material used.


By changing the fabric to a lightweight metallic, my 80's jacket is upgraded to something that could walk the Met Gala (US Vogue Magazine's annual high fashion red carpet event at New York's Metropolitan Museum of Art). 

Katoucha wears it over a silver lurex gown. Of course before finishing this post, I wanted to try one more variations. What happens if you use yarn?


1. This is your ordinary wool yarn. I cut it into pieces of 6" (15cm) in length). I cut two pieces which are then folded in half and cut to make four pieces. I thread the four pieces of yarn through each cell and tie. Eventually I smooth the yarn so that it is all moving in the same direction. 
2. Since this is a stole, the base is a simple rectangle. When finished, you can add two longer lengths of yarn as ties to hold the stole around the doll's neck or shoulders.
3. When finished the backside looks like this. 
4. If you want, you can add on a lining. Here, I've used a piece of panne velvet as my lining. Turn the edges down and pin in place. Then hand stitch the lining in place.

And voila....Samantha looks stunning in her shaggy shawl!  Stay safe. Have fun!


Follow us on Twitter: @FashDollStylist
Like us on Facebook: @FashDollStylist
We're also on Pinterest: @FashDollStylist
And of course, we are on Instagram: @fashiondollstylist


Wednesday, November 14, 2018

Let’s Go Vegan: DIY Faux Leather


A few posts ago, I posted an update to my original tutorial on making leather doll fashion. I assumed some of you might not have access to stores selling leather or even its vinyl or pleather look-alikes, which is why I included a few online resources. And while that provided a solution, the truth is, it is still difficult to find more than three colors: black, brown and...if you are lucky...tan. While preparing the report for our Milan Fashion Week report I needed a specific color of leather that was not immediately within my reach. That’s when I decided to try out a craft technique I found for  for DIY (Do It Yourself) faux leather...otherwise known as “Vegan Leather.”

The technique for creating it involves painting layers of acrylic paint on fabric. On some sites, there were comments questioning the interest in making such a thing especially given the cheap price of vinyl. And yes, if you have access to glove weight leather or vinyl, or if you are selling your creations, this project might not be of interest to you at all. But if you are keeping up with the trends and your budget is limited...or if you simply have limited access to the desired materials in the color of your choice...or perhaps you are vegan...this tutorial wproposes a creative solution.

Full disclosure: While the end result of this technique approaches the look of the real skin, it lacks the buttery touch of leather and tends to be a bit brittle. However, there are numerous advantages to making your own “leather.” First of all, you have control of the weight and color and can create the exact quantity of material needed. The cost is very small. Sewing it is easier on your sewing machine than real skins, and you can have lots of fun experimenting with the surface texture; you can decorate it with painted designs or even manipulate it to create pretty embellishments! 

MATERIALS NEEDED
To transform fabric into “leather” you will need lightweight fabric, acrylic paint, a sponge brush and paper towels. 

FABRIC

The fabric you choose is a factor in how supple or stiff your “leather” will be. Stay away from heavy cottons, canvas, duck, linens, unless you are making accessories like hats or handbags. On the other hand, for articles of clothing, I found that lining materials: lightweight polyester, acetate, habitai silk, are the best. They have structure but, unlike cotton, their surfaces are slick enough to hide most of the grain. You can choose a similar color to the one you will be painting. It is interesting to work within the depths of the tone, however the paint you will be using covers well so it really doesn’t make a huge difference in the end. Nonetheless, I found it best to start with a dark tone (like black) if your “leather” will be dark.

PAINT

You have a choice between using a good grade of artists’ acrylic paint or latex acrylic house paint. Both are water soluable and cleanup is easy. I made the Fendi dress (above) using a brush and Windsor Newton artist acrylics which is easy to work with and is somewhat supple when dry. However, my end result was a bit shinier than I wanted which prompted me to experiment with acrylic latex paint (satin finish). Some stores sell tiny “tester” containers (50ml) of paint for a couple euros or dollars. With latex paint, I got the look and sheen I wanted, but the end result—depending on the color--tended to be a little brittle. Strangely, the black was more supple than the beige! The garments I made with the black latex paint were nearly identical in appearance to those made from real leather! But I highly recommend you experiment, experiment, experiment to get just the look you are going for.

BRUSHES

The problem with traditional brushes is that later on, the brush strokes are noticeable and you must work hard to rub them into the fabric. A sponge brush better conceals the fabric grain and distributes the paint more evenly. You will still need a soft rag or paper towels to rub the paint into the fabric. 
(1) You can use a brush, but the strokes might show. (2) Sponge brush is better; dilute paint with a little water; (3) brush on even layer (4) use a soft rag or paper towel to work paint into the fabric; (5) the end result using Windsor Newton acrylic paint and a brush.

TECHNIQUE

1. Begin by protecting the surface of your work area with plastic.

2. Next, be sure to iron your fabric before you begin because the paint will not hide any creases or wrinkles! (photo a)

3. If you are using artists’ acrylics from tubes, squeeze out a little and mix with a little water to obtain a fluid consistency (photo 2 above). Moisten your sponge brush. If you are using latex acrylics (house paint) moisten the sponge brush or roller just a little and squirt a little paint onto the brush. Brush your first layer of paint into the fabric.

4.  Brush the paint from side to side (photo b), then top to bottom (photo c) until the surface is well covered and the paint has been worked into the fibers of the fabric. Because the paint is wet, your fabric will also be wet. When you are finished painting be sure to lift it up from the plastic protection and place it on another surface (parchment or waxed paper for example) so that it can dry.

5. Let the fabric completely dry. This is, after all, the foundation layer.

6. When dry, paint an undiluted layer of paint evenly across the surface—side to side, top to bottom. (photos b, c) With a soft rag or paper towel, rub the paint into the fabric (photo d). Let dry.

7. Paint a third (last) layer of paint onto the fabric (photos b,c). Note: three layers of paint seem ideal. Two layers is not sufficient to cover the fabric properly and more than three will greatly stiffen the end result.

8. Let this layer dry slightly. While it is still damp, take your fingers and rub the paint into the fabric (photo e), moving in all directions (photo f). This will add a certain patina to the surface, replicating that of real leather.


TIPS

As with leather—keep your design and pattern simple. Sewing this material is pretty straight forward, but the tricky part is when you have to turn sections of the garment (like sleeves, or paint legs) right side out. I have not yet made anything requiring this. However, should I encounter problems, I would probably give the fabric the first coat of paint. Let dry. Assemble the garment. Stuff the sleeve or leg with plastic, then carefully apply the two layers of paint afterwards. Again, I haven’t tried this out, so this is only a thought. I will post an update later to this page.

Don’t iron directly on painted areas. If you must, iron the material face down on a piece of cotton and place a pressing cloth on top to protect your iron. 

You can hand sew your “leather” but you will need to wear a thimble as you are now sewing through paint! Be sure to knot the thread at the beginning and the end of each row of stitching.

Unless you are lining your garment, you do not have to turn down the edges or hem. The paint has saturated the fabric, thus sealing off the fibers. In short, you can get away with cut edges!

One last thing...this is unchartered territory in terms of interaction between the paint and the doll’s skin. When working with dark or bright colors, it is recommended you line the garment!


Have fun with this. There really are no rules except to be as creative as you want to be! Feel free to gather, pleat or even create little medallions to embellish your garment. You are, after all, still working with....fabric!

P.S. I used Velcro to close the garments.

One thing I noticed while working with my “leather” is that it can be cut into fringe (without fraying) just like the real thing.

Have fun experimenting with the base fabric. Paint over quilted or textured surfaces. The end result may not resemble anything you have ever seen, but you might just stumble upon a really interesting look! One thing you should avoid—painting over plastic. I tried painting over plastic bags and wrappings. Though the black paint held up better than the beige, the paint will eventually flake or peel off. 

That said....I admit not listening to my own advice. Just for fun I made this kimono jacket out of painted bubble wrap!!!

All photos and text property of Fashion Doll Stylist. 2018. Please request permission and credit us prior to reproducing. Thank you.

Follow us on Twitter: @FashDollStylist
Like us on Facebook: @FashDollStylist
We're also on Pinterest: @FashDollStylist
And of course, we are on Instagram: @fashiondollstylist