
Well, here it is....the first tutorial of 2018. I thought we should get the year started off on a festive note by delivering what I promised...a mega-tutorial on working with tulle! And it is huge! I've divided this project into two with this post featuring cotillion style ballgowns. These are great big, swash buckling, cake-top dresses one generally sees at sweet-16 coming of age parties, debutante balls and summer weddings!
There are two types of tulle commonly found in stores: crafting tulle which is cheap, course and quite stiff and dressmaking nylon tulle which is finer, not quite as stiff but still has body. Avoid the crafting tulle and spend an extra dollar (or Euro) or two on the fine variety (on the right). Still, the nature of this material is such that there is still quite a bit of body and it will jut away from the doll's body.
 |
| Crafting tool (left); dressmaking nylon tulle (right) |
There is another variety: silk tulle. It is soft, drape more smoothly over the body but is expensive. It is used primarily for wedding dresses and high quality couture gown. Unless you are near a store catering to the wedding dress trade, you'll only find it online for as much as $50 a yard (or meter). For my tulle dresses, I am using an average priced nylon dressmaking tulle which costs about 3 US dollars a yard and is quite wide (45-54"). There are also fantasy tulle. This includes tulle speckled with glitter, felt polka dots or hearts and maybe even sequins, beads or lace.

You can soften nylon tulle a little by dunking it in a bowl of boiling water for about 15 minutes then blotting it dry with a towel. Surprisingly, tulle can also be dyed! When sewing, it's best to use cotton covered polyester thread. For brights and dark toned garments, chose a color slightly darker than that of the tulle. There is also something called, "invisible" thread. This is a fine plastic thread I use for hand stitching light colored garments. It is not that easy to work with in that it is slippery and stretches. If you work with it, remember to work with a double thread, knotted at the end. And when you have finished your stitches, knot before cutting off the excess.

 |
| A basic foundation over which to build the dress. |

Unfortunately we cannot make a dress or skirt with umpteen layers of tulle because of bulkiness. So each silhouette here has a underlying foundation (#1,2, or 3, for example) on which we "build" the dress. Whenever possible, I like to use a sheer fabric for this because it maintains the lightness of the silhouette, disappears under the tulle while giving the illusion of many more layers of tulle.

I've started with something pretty simple. This is a dress designed by Jason Wu which appeared on the red carpet of the Oscars, last fall. For this look, I made a foundation made from a strapless bodice and an evening length circle skirt joined at the waist. (The technique of creating a dress from a bodice and skirt is explained HERE.) I've cut two layers of a sheer nylon fabric (like the kind used for old fashioned nightgowns) and two layers of sparkle tulle. Each part is sewn separately then joined at the waist. To see how I sewed the bodice, see the next dress just below. After put together the dress. I took scraps, bunched them together and tacked them to the dress bodice the same way we applied the embellishment on the corset at the end of the tutorial HERE. You could stop here or.....

You can make a separate tutu using the no-sew method (click HERE for the tutorial) to use as an overskirt.

Or....Take that same tutu and drape it around the doll's shoulders for use as an elegant (and extravagant) evening wrap!

Instead of a one piece dress, you can also make it in two parts: a corset with a separate skirt. This makes for a most versatile option which can later be mixed and matched with other elements in your doll's wardrobe.

2. Note: You won't be able to trace the darts onto the tulle. But you can mark the apex and end points with hand stitches. Sew as you normally would. Trim the back seams down to 1/4" fold them inwards and sew shut. Take a strip of tulle and drape over the bust.
3. Tack this in between the bust at the center front point of the bodice. Turn the edges at the back under itself and tack in place
4. The skirt is a four-layered circle skirt topped with a 10x50" length of tulle all gathered into a piece of ribbon.
 |
| A dolly version of a vintage Christian Dior dress |
But let's not forget that tulle dresses will be all the rage for Spring/Summer 2018 fashion trends So let's be inspired!
 |
| Giambattista Valli Spring/Summer '18 Haute Couture |
Let's take this to the next level with a look inspired by the Spring/Summer 2018 collection of high fashion designer, Giambattista Valli.

1. The foundation is a basic dress consisting of our #1 silhouette (strapless fitted bodice with attached circle skirt). I did not have a sheer fabric so I used a cotton for my foundation.
2. Next, I make a gathered skirt from 4 layers of tulle. For my 12" Barbie, I cut a length of 12" by 48" wide which is gathered into a waistband measuring approximately 1x10". The gathers only stretch over the doll's waist. The rest of the ribbon (on both ends) is left free.
3. Lay the tulle strip or ribbon, over the right side of gathered skirt and top stitch it flat. The part of the waistband not attached to the skirt will be tied into a bow in the back of the dress. At this point you have, essentially, an apron.
4. When you have finished sewing it, attach to the dress.

6. Pull the gathers so that it fits the bodice of the dress. Baste in place.
7. Using the gathering stitch as a guide, sew this ruffle onto the bodice.
8. Since the top part of the ruffle is likely to fall forward away from the body, I tacked on a sheer ribbon waistband. (Optional)

10. Lift one layer of the tulle skirt in the center of the dress, midway between the hem and the waist.
11. Tack it to the waist to create a center ruffle with a cascading effect on the sides.

I'll be honest. When I finished, I did not like seeing the (cotton) dress underneath. So to mask it a bit, I tacked squares of tulle onto the underdress (underneath the tulle layers)!

The skirt part of the burgundy tulle gown has a distinct round shape. We can create a more triangular shape which remains voluminous but removes much of the bulk away from the waistline. I did this by by using the #1 foundation to which I attached folded squares of tulle to get this cascade of handkerchief points.
 |
| Dress by Maticevski, Spring Summer 18, Paris ready-to-wear collection |
My inspiration came from this dress, by Polish born, Maticevski. I like the asymmetrical aspect of the skirt and the "vintage" spirit of the entire look. To start, I gave my tulle a boiled water bath and rung it out to introduce a bit of softness and texture.

2. I made a 4.5" (7cm) long ruffle and attached it to the bottom of the skirt.

3. Next, cut a series of tulle squares. Cut 8 squares: 12x12" (30x30cm) and 6 squares: 9x9" (22x22cm) One by one, fold into quarters and, hold it by the midpoint so that it is hanging in triangular shape.
4. On the skirt, (in line with the bust point of the bodice) pin two squares about 5" (13cm) from the hemline. Pin two more, 2" (55mm) above those. Pin the last two at the waist.
5. Pin the larger squares at the waist all around the rest of the skirt part of the dress.
6. With everything in place, go back and stitch the squares onto the foundation.
7. At this point your dress will look like this.

9. Add a waistband. This can be sheer ribbon or a length of the tulle. It should be the measurement of the doll's natural waist plus enough to tie a soft bow in the back. Again, the waistband should be sewn flat against the layers underneath.
10. Close the back of the dress at the waist with a snap or hook&eye. Tie the waistband into a bow at the back.
11. You can clip the longer layers to make them more uniform near the hemline (or leave them as is).

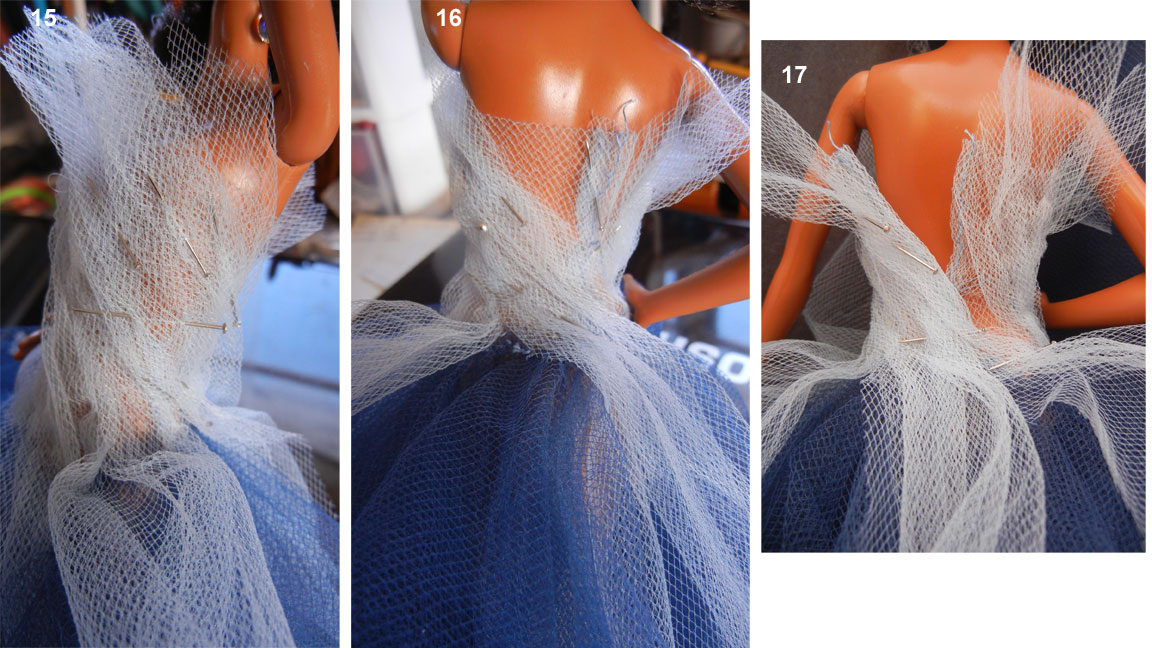
12. Cut a strip of tulle about 2x10" (5x26cm). Twist it twice at the midpoint then pin to the midpoint of the bodice. Pin also just at the underarm point of the bodice.
13. Pin just at the underarm point on the opposite side.
14. On each side, wrap around the doll's arm and pin at the underarm at the back.

16. At the back near the center back seam, cut the excess away to about 1/4" (7mm). Tuck the tulle under itself and tack down.
17. You should do this while the back of the dress is open so as not to sew the doll into the garment! Close with hook and eyes.

This is a very sweet dress! If you're doll is a bit more sophisticated, there is another dress for her. It's based on this dress from Oscar de la Renta's Spring/Summer 2018 collection.
 |
| Dress by Oscar de la Renta Spring Summer '18, NY ready to wear. |

This time the foundation is strapless knee length tulle dress.

2. Fold the left side over the right to create a center back seam. Pin in place. (Don't worry about the excess. We'll trim this away later.
3. Using a back stitch. Stitch up the back to about 1" or so (enough so that the doll can get out of the dress.)
4. On each side of the opening, fold under and stitch the edges down.

6. Fold the edges over the right side of the opening and stitch that edge down.
7. Remove the foundation. Turn inside out then carefully cut away the excess to within 1/8".
8. In the front it will look like this. Don't worry yet about the bulges at the waist. We'll fix those later.

10. Continue until you have a full skirt. Stitch everything down.
11. Now, come back and pinch out a dart on either side of the foundation garment. It doesn't matter if this is not perfect. This will be covered and thus hidden from sight.

13 Pin to the bodice so that is draped diagonally across the body from one shoulder to the opposite hip. Pin in place. I tack this to the foundation, using "invisible thread." Stop when you get to the hips
14. Drape the next piece diagonally from the underarm to the hips, leaving extra fabric at the top (under the arm). Pin in place then tack to the foundation.
16. Just because to avoid the back seam where the dress needs to close.
17. Work the draped strips around this so that the dress closes as normal.

19. Spread the tulle of the skirt open so that you see the foundation and pin down the lighter strips.
20. Adjust. When you are happy with the way it looks, stitch those to the foundation.

22. And from the back. We need to trim the top of the dress.

23. Cut away so that the ruffles are more or less even. And voila!

In another version...


My foundation is slightly different. I used a hip length foundation with a gathered skirt using a double layer of apricot tulle. I cut strips long enough to wrap around the bodice and fall to nearly the hemline (about 1-1/2" by 10" wide (Because my skirt was a bit too sheer for dolly's taste, I added in triangles of tulle in between the strips of tulle. You could, instead, make a sheer underskirt from nylon or chiffon.) At the top of the bodice, I sewed a small ruffle cut from cream white tulle.

We're not quite finished here. Just because we're working in tulle, doesn't mean it has to be a ballgown. We have a few more ideas on modern look. Coming up next: part two...more sophisticated (not to mention modern) tulle dresses!
 |
Like us on Facebook: @FashDollStylist
We're also on Pinterest: @FashDollStylist
And of course, we are on Instagram: @fashiondollstylist
Beautiful, beautiful dresses! I don't know if I will ever attempt this, but I am glad you provided the tutorial. I look forward to installment 2.
ReplyDeleteThank you, Phyllis. This has been a really fun project.
DeleteThis is the great tutorial! So many useful tips. I love the wihite-navy blue dress. It's so beautiful!
ReplyDeleteThank you Kamelia for your very kind words. I wanted to bring in the new year is grand style. What better way than with a big tulle ballgown! Happy you enjoyed this post.
DeleteThan you very much for the tutorials April! When you announced that you were going to publish tulle tutorials, I went to the fabric store to buy tulle (I have turquoise, gold and black tulle waiting now to be used!). Your creations are fabulous! I can't wait to see the next part!
ReplyDeleteI love all the dresses you made, but am in love with the blue/white and the red one :-).
You are so welcome and thank you for your wonderful comments. These dresses remind me of what attracted me to fashion many years ago. The wonderful thing about working with tulle--as long as you have a fairly decent underdress--almost anything you do with the tulle layer on top will look glorious! I love your color choices. I think you will have a lots of fun!!!
DeleteBardzo fascynują mnie stroje wykonane z tiulu. Są przepiękne, lekkie, bogate i takie "królewskie"! Dałaś mnóstwo wskazówek, jak stworzyć taką wspaniałą kreację i na pewno z nich wkrótce skorzystam! Dziewczyny w nowych ubraniach wyglądają rewelacyjnie! Brawo!
ReplyDeleteOlla wrote: I am very fascinated by the outfits made of tulle. They are beautiful, light, rich and so "royal"! You gave me a lot of tips on how to create such a great creation and I will definitely use them soon! Girls in new clothes look sensational! Bravo!
DeleteThank you Olla for your lovely compliments. I am happy you enjoyed this post. I too, was amazed at how well these dresses looked on my dolls. But, oh my, I can only imagine the types of tulle dresses you might create for your lovely dolls!
A great tutorial. I've learned a lot.
ReplyDeleteThank you and best regards.
Thank you Dlubaniny. I'm so happy you enjoyed this post. Big hugs. April
DeleteFantastic stuff! And thanks for the tip about how to soften tulle. I had washed some but would never have thought to put it in boiling water for any length of time.
ReplyDeleteParticularly love the blue and silver.
Thank you Stevi. I too have washed tulle. But over time, this seemed to be less effective. (I think whatever they use to stiffen is stronger than it used to be.) I got the idea of the boiled water bath from the method to straight doll hair. It softens the tulle somewhat but not as much as I'd like. Happy you enjoyed this post.
DeleteSo many pretty gowns. I love them all.
ReplyDeleteThank you Jaye for your kind words.
DeleteWow, niesamowite suknie. Tiul to materiał, który kocham, ale nie jest łatwy w szyciu i nadaje się tylko na większe lalki. Dla mniejszych niż Barbie już ciężko uczyć coś z tego materiału. Nie mniej Twoje suknie wyglądają przepięknie i w najbliższym czasie na pewno skorzystam z Twoich wskazówek i podpowiedzi. Ściskam mocno :)
ReplyDeletePikulina wrote: Wow, amazing dresses. Tulle is a material that I love, but it is not easy to sew and is only suitable for larger dolls. For smaller ones than Barbie, it's hard to learn anything from this material. No less your dresses look beautiful and in the near future I will definitely use your tips and hints. I squeeze tightly :)
DeleteThank you, Pikulina for your kind words. For dolls smaller than Barbie, you would have to work very simply. But you could still make a little skirt to add to an outfit! In any case, thank you so much for stopping by. Big, big hugs to you. April
Thank you for your tutorials :-) Your ideas are amazing as always :-) Hugs my dear friend!
ReplyDeleteThank you so much, Aya, for your kind words. Happy to know you enjoyed this post. Big hugs back, my friend. April
DeleteAnother fabulous piece you've done! :)
ReplyDeleteKeep up the awesome articles & photos, we all really enjoy them!
P.s. I bought another FR16 doll.The Platinum Society Hanne Erickson ( blonde one this time). Sigh, these dolls truely are addictive!
Thank you so much and glad you enjoyed this tutorial. And yes, FR dolls, in particular are sooooo addictive, they should put warning signs on the box "Purchasing these dolls can do massive damage to your wallet!" Each year I say there's nothing much else to buy and each year I fall for new, pretty faces!!!!
DeleteYou are so talented. I get inspiration from you for my dolls. Thank you for sharing with us.
ReplyDeleteThank you for your very kind words, Sharon. So happy to know you find our tutorials useful. And thank you so much for stopping by to visit.
DeleteLovely. I have got to try this! Thanks for sharing.
ReplyDeleteHi KMQ. Thank you and good to hear from you again!
DeleteHi, April! I noticed that Shasarignis shared some new doll fashions inspired by your post. I'm sharing the link. Thanks for sharing your tips.
ReplyDeleteD7ana--I just saw it and I am very very flattered!!!!! Shasarignis had contacted me inviting me to her page where she told me I'd find a surprise. I've had a busy couple of days but as soon as I got your message I rushed over to take a look. What beautiful dresses she made! I was very humbled by that post.
Delete