


I am not alone in my love for this lustrous jewelry. Kamala Harris, the newest Vice President of the United States has made pearls her signature style. While a strand or two of is enough for me, sometimes I like to go overboard and pile them on.... Chanel style! The iconic designer was to incorporate ropes of faux pearls into the hushed world of Haute Couture..something for which she was both criticized and applauded. In fact, for this post I consulted several of the house's modern designs for my dolly versions. Needless to say, I had LOTS of fun! In advance I apologize for the length of this project, but once I got started, well you know me.....it was hard to stop. And frankly, I couldn't figure out how to divide this into two. While there are a few jewelry making basics, this post is really an assembly of tips and ideas adopted for dolly.

Jewelry pliers: flat nose, long nose and if you can, bent nose pliers.
Craft wire: This is a soft wire that comes in a variety of thicknesses (the higher the number the thinner the wire). For 1/6 scale jewelry, 20- 24 gauge wire is perfect.
Invisible or nylon thread. (Invisible is perfect)
Beading needles
Jump rings
Headpins
Eye pins
Crimp beads
Clear gel glue
(Doll size) clothes pin (to be used as a bead stop)
An assortment of pearls (or beads). Seed beads (1mm for the smallest, 2mm are "to scale," 3mm are "large" and anything over that is "oversized). Faux pearls are fine. They generally have larger holes and you can probably use regular sewing needles. Tiny fresh water pearls are more interesting but their holes are smaller and require fine beading needles.
Chain
Beaded chain
For the purpose of vocabulary, I am posting this reference to necklace lengths. My measurements were based on an Integrity Toys 12.5" doll.

Prior to this project, I had a tendency of stringing beads on a bit of wire and wrapping it around the doll's neck. The problem with that is that my necklaces never "hung" like the ones I wear around my own neck! While researching the "perfect" string for making necklaces, "bead stringing wire" was recommended. And though stringing pearls on this material was flawless, my necklace was still too stiff!

Using the traditional bead wire results in the matinee length necklace forming a circle as shown in the upper right image. Beneath it is the same length necklace created using the invisible thread. To show more clearly the difference, I've put the two together. Notice the difference when both necklaces have been strung with the invisible (clear) or nylon thread. Get your supplies together, let's get started!
The Rope

Bella is wearing a 6" rope of (4mm) fresh water pearls in a style made famous during the 1920's. All you need is a beading needle and clear (aka "invisible" thread. Thread your needle with enough length to make the necklace and place a doll size clothes pin at the far end of it. Slide on enough pearls to complete. Leave a tiny bit of space at the end so the pearls will still be flexible, then tie the thread into three knots. Cut away the excess. You can add a tiny dab of glue to the knot to make sure nothing unravels and everything stays put. If you are using nylon (sewing) thread, this is very important to keep the thread from unraveling.

The Choker
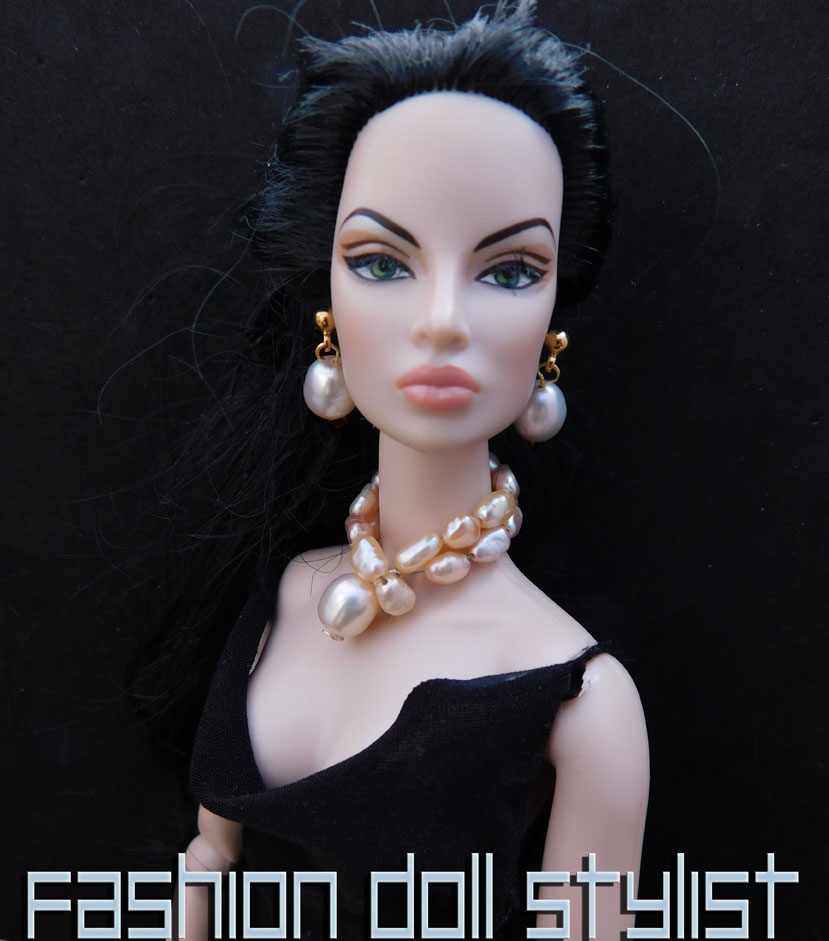

This is essentially a single strand necklace of (5mm pearls) with a (7mm) floater pearl in the middle. (I show how to do the floater further down in this post.) The underlying thread is knotted three times. The necklace is then folded into a double layer and wrapped around the neck, slipping the larger pearl through the bend of the other side. Everything stays in place as is. Her earrings are simply floater pearl attached to a standard pierced earring post.
 Sold by the foot (or by the centimeter) beaded chain (sometimes called rosary beads), comes in a variety of chains, beads and colors. All you need to do is add the hardware. You don't need to cut anything. Using your flat nose pliers, simply open the links to get the length you want, and join them together to form one long rope. We can also do a multi-strand necklace.
There's another easy solution for creating necklaces. And that's with beaded chain!

Before we start, let's think about how the necklace will close. You can always use a store bought "findings." But you can also make a simple S-ring with a bit of wire.


1. With the long nose pliers, I bend the wire into an open loop.
2. Note where the circle is pointing.
3. At that point, bend the wire into the opposite direction.
4. Here, you can see more clearly the direction I am going.
5. You are literally forming an S.
6. Eventually completely close the bottom of the S (over the end of the necklace), while leaving the top slightly open.
7. The closed end of the S is joined to an eye ring which, in turn, is attached directly to the necklace.
8. The jump ring on the opposite side should be slight larger.
Now let's make our multi-strand necklace.
 1. Decide the length of the first row of beads by draping the chain around the neck of the doll.

2. Open the link with your snub nose pliers and place a jump ring on both ends.
3. Make the next length a little longer and add this length to the eye rings on the first strand.
4. Repeat for subsequent strands you want to add.
5. When you are finished, add the closure findings to the same eye rings.
Now, let's do this with a pearl chain!


I love the toss of different sizes and shapes of rope necklaces all worn with such ease. The white on white is gorgeous, but I decided to do something a little less classic...a little more "urban."
 We combined these four necklaces (L-R): single strand rope, double strand pearl chain, single strand pearl chain and chain with CC charm. Together this makes for the look on the far right.
 On the model, look how fabulous it dresses up a basic dress!

 1. I have needle and a double thread. Tie one end around the jump ring.
 5. Continue adding beads until you have reached the desired length.
 To Denise's two strands of pearls, I've added a "brooch" which is, in reality, a vintage earring!


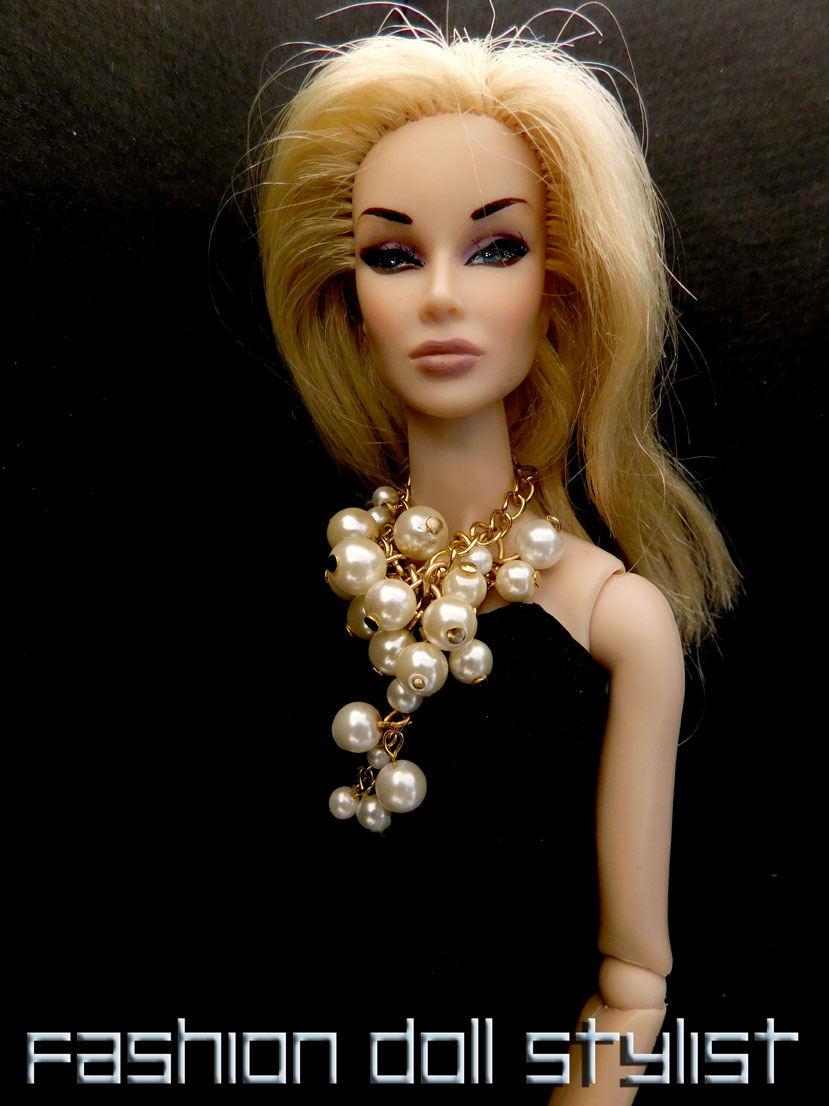
Now, let's have some more fun. For my next item, was inspired by this chunky Chanel "charm" necklace. The original has a mix of oversized pearls and charms suspended from a golden chain.


 Using the long nose pliers and a tiny bit of 18-20 gauge craft wire, bend the wire into a pair of C's. Take your time to get them as close in size and shape as you can. Next, using a hammer, pound each C flat. With a toothpick, dab a tiny bit of clear glue on the curve of each C then layer one over the other. When dry. Hammer the charm a tiny bit more to flatten them together. You may have to clean up the excess when all is dry. I bent a small bit of fine wire (24 gauge) around the middle of the charm and in the form of an eye loop to hang onto the necklace.
  I did see another necklace with pearls suspended from chain. I like the variety of sizes incorporated into this piece and how they seem to tumble down her cleavage.
  Here's Morgan wearing my dolly version of this necklace. As with the original, I suspend a series from "floater" pearls from a chain. This is not difficult, but it does take time and patience to complete.


Let's go back to the classic pearl necklace. You can always tie the stringing thread to the findings, but the purpose of this exercise is to show how to get a more finished look from start to finish.

For this necklace you will need your tools.

2. Thread a crimp bead onto the thread and over the excess thread as you move it close to the jump ring.
3. With your pliers, crush the crimp bead
4. Slide the first pearl onto the thread and once again, over that little bit of excess thread. (Essentially you want to hide that tail under the bead.) Finish threading on the rest of the beads.

6. Add another crimp bead to the end. (But don't crush it yet.) Loop the needle and thread around the closed end of the S-ring (or other closure ending) and through the holes of the first 3 beads.
7. Pull to draw up the slack but do allow for the beads to remain flexible on the thread so that they are not overly taunt..
8. In between the third and forth bead, tie a knot directly on the necklace a couple of times. You can also dab a tiny bit of glue on the knot for added strength.
9. Go back and crush the crimp bead.
 Here is my finished necklace with a closeup of the back closures.


I made this necklace for my Barbie (Model Muse) using 2mm pearls. If you want the necklace to look a bit special, add in clear crystals to give the necklace a bit of sparkle. I also mix in crystal beads when working with dark pearls.


Here's Gail wearing a black, seed pearl choker, a matinee length (4mm) black pearl necklace, and the three strand blue crystal necklace together. Her coil bracelet is made using (1mm) seed beads.

Now, let's have some more fun. For my next item, was inspired by this chunky Chanel "charm" necklace. The original has a mix of oversized pearls and charms suspended from a golden chain.

I decided, instead, to do this a multi-strand necklace. I played around with this for a while, at first adding a fourth strand of pearls. But it overwhelmed her, so I stopped after the third strand! Strand by strand, this is how Kym's necklace is composed:

One strand has double CC charms and a variety of pearl sizes.
Another is a strand of 2mm silver beads
The bottom layer has pearls and an assortment of charms and pearl drop clear beads.

So, you are wondering...where did I get those double C charms from!?! this is how I made those double C charms I made them and without the use of a soldering iron....


Headpins resemble straight pins except they are blunt and are made from a more flexible wire. They come in a variety of sizes which you can always cut to size, but you will need to bend them into a loop so they can be joined to a chain or necklace.

1. After threading the bead through the pin, bend the wire in about a 45 degree angle using your long nosed pliers
2. Bend the wire into a curve moving in the opposite direction
3. Clip away any excess and continue to bend into a loop.
(Note: if you run out of head pins, you can always improvise with a bit of wire. After threading the bead through the wire, add a dab of clear glue to the bottom to stop the bead at the base.)


2. Repeat on the other side.
3. Measure out the length of chain you need to wrap around the back of the doll's neck and over the shoulder. Open the link and remove.
4. Add the pearl to either side of the chain.
5. Add the strands of pearls/chain to the bottom loops below the pearls at both sides.
6. Put the necklace around the doll's neck and check to see if you are happy with the length. If not, pull the chain up at the back of the neck. Remove the unwanted links at the midpoint. To each of those two ends, add a jump ring and S-ring or closure.


1. This begins with a pearl on an head pin attached to both sides of a chain. I decide how much of a drop under neck I want the one end of the chain to hang and attach an eye ring at that point,
2. To create the decorative part, I use an eye pin.
3. Bend the pin in a series of loops until you get roughly the look and size you want. The loop end of the pin will be adjoined to the side of the chain that doesn't move.
4. At the last minute, I decided to slide on a couple of tiny beads for added interest. You can skip this if you want. However, you might want to keep manipulating your wire design until it is exactly what you want and the pearl is able to be threaded through the design.
5. When you are finished, it should look somewhat like this. The left side of this chain will be threaded though an opening in the wire design.
Here's my finished result.

Before we end this very long project.... without a doubt, you've been eyeing those bracelets. The coil bracelets are a small tribute to a high school friend of mine. DonnaD was known for her gorgeous memory wire bracelets comprised of 8 spirals of semi-precious stones and crystals.

2. Leave enough wire at each end to make a loop.
3. Using the long nose pliers, create your loop.
4. Close the loop. If you can, tuck the end of the wire into the closest bead.
5. Add a charm or bead (strung on an head pin) to each end of the bracelet.
Wrap tightly around the doll's arm from the wrist up.
If your doll has removable hands, you can leave the bracelet in a coil. But for Barbie, you will have to wrap it around her arm each time.


2. Begin by making looks, circles or whatever.
3. I even crushed this in my hand. Now place on the doll's arm and continue playing around with the loops and waves until you get something that fits her wrist! 

Photos of Vice President Kamala Harris courtesy of WhiteHouse.gov
Follow us on Twitter: @FashDollStylist
Like us on Facebook: @FashDollStylist
We're also on Pinterest: @FashDollStylist
And of course, we are on Instagram: @fashiondollstylist
I love jewelry and have tons, especially many vintage a family pieces. But, I don't wear it...well since pandemic ---Never wear it, and my poor girls never wear it....BUT, I can hear them all demanding some pearls-immediately, and my goodness what a fabulous tutorial, I think you have EVERYTHING covered completely! I'm sharing on FB to my doll groups---If you don't mind! Thanks for all the ideas! Sandi
ReplyDeleteSandi, I don't mind at all. I was laughing as I read your comment. While scouring the house looking for faux pearls I could dismantle for this post, I found a ton of pearl jewelry I didn't even remember having!!! Necklaces, bracelets, and a fabulous cluster pearl ring. And yes, I have covered nearly everything (still haven't made "diamond" jewelry or flat dress shoes). But leave it to me to find something new!!!! Thanks for stopping by. Big hugs.
DeleteLove the information you have shared. I am wondering if you have ever tried using magnets to close the necklaces. I bought some but they were too large and ended up pulling the necklace down the doll's back. I plan to search for smaller ones one of these days.
ReplyDeleteHi PatLin and welcome to my blog. No I haven't tried using magnets, mostly because I haven't seen them in my craft stores. But it does sound like a very interesting alternative and should I ever find one, I'll be sure to give it a try. Thank you for stopping by.
DeleteDear april_n_paris. I have just found your site and I love it! I'm a
ReplyDeletesenior. No longer working. So in searching for craft ideas for dolls on
Pinterest, I found your site. I have other dolls (6 inch to 18 inch) two
1 inch to 1 foot scale dollhouses, and a handbuilt wood Barbie two story house and a pile of Barbies. I've been meaning to sell the Barbies and her house. But when I saw your site, all kinds of creative ideas came to me to delight and bring out my creativity in this mundane world we now live in.
I'm now thinking of redoing Barbie's house for her (which one?) and a
few of her friends and making them fashion models.
I love, love all your ideas! I hope you keep creating them.
Phyllisa
Dear Phyllisa. Welcome to my blog. Eight years ago when I stopped working to look after my dad, I needed to find a way to fill up my days. After a long career in fashion, I felt this would be the perfect way to do it. Over the years, I've had a lot of fun figuring out how to adapt "real world" fashion into 1/6 renditions for the fashion doll. With this blog--part sewing, part crafts--100% fashion and fun---I've brought my dolly friends along the journey with me as we all "live our fashion fantasies through the medium of dolls." With a little know-how, patience and practice...almost everything is possible!!! Have a good time. On the right side of the screen under "Tutorials" is a list of everything we've done. Come back to see us as often as you'd like. April
DeleteYou can't go wrong with pearls!
ReplyDeleteNo you can't!!!! Thanks, dear for stopping by.
DeleteI came across your blog recently and I love it! Your passion and experience with fashion design is super evident from your well-written and detailed posts. I'm not sure if you are interested/want to expand your fashion doll model collection, but in the off-chance that you are, may I suggest adding fashion dolls after Yasmeen Ghauri (amazing face & walk), Brenda Schad (her cheekbones are spectacular), Imaan Hammmam, and/or Halima Aden (model known for her hijab, although she recently quit being a model)? Love, love, love this blog! Bisous! <3
ReplyDeleteWelcome to my blog. Always good to meet a new doll lover. Thank you for the name suggestions. All my dolls have supermodel, catwalk model, pop star names. And with each new girl who arrives in the house, I try to find her a name within that sphere. I have an Iman already, but yes, I have seen Yasmeen (and she is GORG),, though I'll have to look up Brenda. Halima I know...but I haven't tried to imagine her without the hijab. But she does have an amazing face. It doesn't matter if she's still in the business or not. I named an older IT doll "Helen" after Helen Willians, a 1950's top black model! Thank you for stopping by. Love having you here.
DeleteAleż niespodzianka! Biżuteria! Wspaniale, że podjęłaś ten temat! Pokazałaś mnóstwo doskonałych rozwiązań! Choć zrobiłam już kilka naszyjników i kolczyków dla moich lalek, to jednak pokazałaś mi tu dużo nowych, prostych a jednak efektownych projektów! Najwięcej kłopotu sprawiają mi zawsze zapięcia. Widzę jednak, że można się bez nich obejść! Rewelacyjne modele biżuterii! Bardzo mi się podobają a dziewczyny wyglądają w nich zjawiskowo!
ReplyDeletePozdrawiam Cię serdecznie ♥
Olla wrote:
DeleteWhat a surprise! Jewelry! It's great that you took up this topic! You showed a lot of great solutions! Although I have already made some necklaces and earrings for my dolls, you showed me a lot of new, simple and yet effective designs! The fasteners always cause me the most trouble. However, I see that you can do without them! Amazing jewelry models! I like them very much and the girls look phenomenal in them!
Yours sincerely ♥
Thank you, Olla, for your kind words. Oh yes, I have not been able to draw much inspiration from the fashion world, so I set my sights on costume jewelry. The pearls are beautiful, but they also can be so much fun, as I discovered. I still have not been able to figure out how to make "diamond" jewelry for our little divas. But I am working on it!!! Always good to see you, Olla. Big hugs.
Hi Linda...this was a lot of fun. And I think I did almost everything that was in my head for this post. (I only wish I could have found teardrop pearls to get closer to the Chanel chunky necklace.) In any case I'm pretty happy with the results. The only problem right now is....the other girls in the house are staring at me....I may have to make a few more strands. LOL! Thank you for stopping by.
ReplyDeleteGreat theme. Never too much jewelry. Thank you for sharing your ideas. I hope to use some of them in my work.
ReplyDeleteThank you Dlubaniny. I almost always use jewelry on my dolls, so it was good that finally, I took the time to make something decent for them. Glad you enjoyed this post. Thanks for stopping by.
DeleteO la la, que dire : j’aime 😻
ReplyDeleteThank you April for this new post. It is just amazing. J’aime tes bijoux.
Tu nous a inondé de ton savoir faire qui est tellement inspirant. Je suis impressionnée.
De mon côté, je ne fais pas de bijoux, mais je reconnais que c’est un plus de savoir en faire pour habiller nos créations.
Merci de nous montrer comment faire, tes techniques... qui sait peut-être un jour je pourrai m’inspirer.
J’ai mis un commentaire, mais je ne sais pas si c’est passé.... je vais attendre ....
ReplyDeletePearls look always so beautiful. You had a great idea for making them for your models. They look amazing now.
ReplyDeletefashion is my favorite things. You have written very nice blog thank you for sharing.
ReplyDelete