Saturday, March 25, 2023

Oscar Buzz 23


This was a most interesting Oscar "Red Carpet" event. First of all the carpet was champagne and not red. The  number of nominees and Oscar winners was, perhaps, the most diversified in the Academy Awards' history. But for my purposes, most of the dresses worn by the celebrities were tasteful and some designs even provided a good dose of inspiration for the one-sixth renditions I would be creating for my divas. For this post, I chose 12 dresses, though there were a few others I wanted to try. My biggest regret...that gorgeous Moschino plum colored chiffon gown worn by actress Angela Bassett. I could get a hold of that fabric in a timely fashion. But for the ones I singled out....I got ambitious. Very ambitious. Some of these dresses were quite simple, however for a few, I had to treat them as pure craft projects. No pattern, I build the dress piece by piece, directly on the doll as I tried to figure it out! All in all, though, the trends from this year's event fell into three main categories: Simple Elegance (column dresses), Cake-Top Ballgowns, and Peek-a-Boo I see you. The color story was very clear..lots of black, lots of white and the occasional burst of bright color.

Lady Gaga is always a standout for my girls. She pushes the envelope with such class and elegance. For the most part, we didn't care too much for the Peek-a-Boo dresses. Though my girls can wear them well, most normal human bodies cannot. And there's always the question of...what happens when the body starts to move under those cage-like structures. But this Versace dress worn by Gaga..we couldn't resist. And here is what I mean by a pure crafts project. I used the netting (taken from the selvage edge of some sequin fabric I had on hand) and constructed a bodysuit. I thought this would be the best way to get the bodice close to the body without seams. On top of this, I stitched on a bra top. I used a stretch jersey inasmuch as the bodysuit was stretch. In hindsight, this was not the best fabric because it didn't lay as flat as it should. The outlines are made of 1/8-inch (3mm) satin ribbon. I would have preferred to use something matte, but yarn was out of the question because I needed something flat and I've never seen 1/8 inch ribbon in velvet. For the skirt (which is separate) I started out with a jersey skirt but it didn't have the structure needed for the stark A-line shape. So I swapped it out for a fabric with more body. The "jewels" on the belt are stickers. Her necklace is the double row of "diamonds" we featured in the previous post.

You know me...I LOVE a good basic black dress! I suppose I love them so much because, not only do they go everywhere, but you can dress them up or down. In this case, this one, worn by actress Andie MacDowell and cut in stretch velvet with its asymmetrical neckline is from the house of Saint Laurent. For this dress I used a basic jersey pattern and simply drew in a similar asymetrical neckline. It serves as the perfect backdrop to help showcase Lindsay's cascading "diamond" necklace.

As soon as we saw Vanessa Hudgens, one of the red carpet greeters on Oscar night, we fell immediately in love with her Chanel gown. Again, very simple, very elegant and 100 percent class! For the version modeled by our lovely model, Belle, I used a stretch velvet trimmed with white satin. I kept her "diamond" necklace simple. It's a single row of rhinestones tied into a single knot in the middle!


The problem with black dresses is that, most often, you cannot distinguish the details. So for me, the Dolce et Gabanna dress worn by Phoege Walker-Bridge appeared to be a column dress with a sheer black lace corset top. For my girl, Helena, I created a black lace corset worn over a sleek black narrow skirt. The look begged for something else. So I tossed a fancy embroidered shawl with silk fringe over her shoulders. Only when I finally saw a larger photo of the original dress did I discover that the skirt is made from dévore (burn-out or acid etched) velvet. Dévore will be the subject of a project I will be presenting in the near future. I have to order the supplies. 

But for the moment, what I would like to bring your attention to is Helena's necklace. It is a 1/6 scale rendition of the diamond version of Elsa Perretti's serpent necklace for Tiffany's. I added a clay head and tail (later dipped in silver glitter) to a length of rhinestones. 

My Barbies were all over award winning film maker Ava DuVernay's shimmering look. Instead of sequins for the shawl and train, I used a dark silver Lurex. I also used a panne velvet for the dress underneath. On the other hand, we did not think she Ms. Duvernay needed the belt which, in our opinion, interrupts the sleek lines of the dress. 
We were very happy to see the first Asian actor win Best Actress. (It's about time, no!!!) Congratulations Michelle Yeoh. We love the soft white gown she wore from the house of Dior. For our girl Yoon's 1/6 rendition, we did not have time to source out the feathers and apply them one by one. So... we cut out the dress and added row after row of a sheer nylon cut into fringe then attached row by row. Around her arms...a whisper of white tulle. (P.S. We tried to get Yoon to smile. But she's bashful and this is her first time on the red carpet and this was her first cover shot. She was very nervous. Sorry about that!) 

Nicole Kidman is another actress we always have our eye on when she arrives on the red carpet. Her dress, from Armani Prive, is a simple, one shouldered black sequin sheath, slit up the thigh and adorned with silver roses. For our girl Karen, we stuck pretty close to the original design, using a micro sequinned fabric decorated with silver Lurex roses planted on one shoulder and the top of the thigh.

Quelle Elegance! Here is Danai Guirira looking positively regal in this gown designed by Jason Wu. It is a very simple but spectacular dress with the strapless bodice topping a full gathered skirt. Our girl Grace wears her version in the same elegant fashion. We got a little fancier with the bodice, opting to use flattened drapes over the torso. And please note.... we were able to recreate a similar mile-high hairdo! 

Here's another "cake-top," fit and flair scarlet dress designed by Elie Saab and worn by Cara Delevigne. It is an one-shouldered gown with a bodice draped close to the torso and lots of volume in the skirt. We recreated the same look for our girl, Yvette...right down to the giant rose on one shoulder to the thigh high slit in the front.

And while we're on the subject of big dresses..... We really wish the stylist for Florence Pugh had chosen a simpler dress for her. While we saw so much potential in this dress, we felt it overwhelmed the wearer. The black hot pants and platform shoes underneath did nothing for the overall look. Moreover, Ms. Pugh came across as looking as if she had gathered up all of her bed linens around her just before appearing on the red carpet. That said... we did like the spirit of the dress and was motivated to select our fresh face model Ingrid for our 1/6th version. I chose an oyster white taffeta...a fabric with enough body to carry off such a spectacular look. Initially I began with a bra top, but ended up with a more simple empire waist bodice (which I pinched in the middle)  instead. It was just easier to suspend the skirt from a simpler structure. The skirt is gathered then attached to the bodice. I will be honest...this resulted in a dress that was way too heavy to stay up. So....I used small strips of clear vinyl to create straps which are nearly invisible in my photos! The dress by itself was nice, but I felt it could be taken to the next (more avant-garde) level with another skirt underneath. The sleeves, both in my version and the original version, are separate. This is a large tube with gathers on both ends. We tacked the excess together in a variety of spots across the back. The end result is abstract yet elegant at the same time. In some ways, it almost recalls the creations of architect Franck Ghery .

Another cake top dress....
Normally I loathe this sort of fishtail gown, here, worn by India's Bollywood superstar, Deepika Padukone. (Please note, Ms. Padukone was misidentified by the Hollywood press as Camillia Alves.)  But Veronica (who is modeling our dress) reminded me how this look really smacks of old Hollywood in its glory days. As simple as it is, this dress taught me a few lessons. There is a reason why you rarely, if ever, see doll dresses in velvet. Other than a simple tube dress, the fabric is too thick for most 1/6 scale garments. I began with a small empire waist bodice that I pinched in the middle to create the sweetheart neckline. The skirt part of the dress is attached to this bodice. A gathered piece of fabric is attached to the hemline. I made the decision not to go as wide as with the original dress because I felt it made the dress appear a little too kitsch. In the original dress, there are pieces gathered into the dress draping down from the shoulders over matching gloves. When I tried this, those pieces did not drape well; they appeared to be wings. So.....I made the decision to create instead, matching velvet gloves with poufs on the top. This gives us the option to wear the dress without the gloves and under a coat, for example.
 

I've saved this one for the last because, other than the fact there is a silver dress in both looks....there is no relation between the two. I chose this dress because I do like the notion of silver combined with another color. Ms. Bingbing's dress is lovely, but I thought it could be so much more interesting than that standard beaded column dress with deep decollete that we know so well. I'm also not fond of the color of the "duster coat" nor of its overpowering winged sleeves. For Anna's dress, I chose some sparkly wired Christmas ribbon and had a little fun with how it unraveled at the edges. Instead of a big bulky coat, Anna chose a pleated silk wrap in teal. Softer, more contemporary. 


Like us on Facebook: @FashDollStylist
We're also on Pinterest: @FashDollStylist
And of course, we are on Instagram: @fashiondollstylist


Unless otherwise noted, all images and text of this blog are the copyrighted property of Fashion Doll Stylist 2023. We are independent and not part of any other group or website no matter where this post or its elements appear on the internet or social media. Please request permission before reproducing any parts of this post. And please, always credit us. 

Friday, March 10, 2023

Diamond Life


For awhile now, I've been wanting more estate jewelry for my girls. But for reasons of time, cost and current geopolitical issues, I have not wanted to order from abroad. I have seen ropes of rhinestones, but never knew how to work with it. Recently I found what's called "rhinestone chain" at a nearby bead and crafts store (though you can order from Amazon if you know what you're looking for). And eventually I discovered a DIY site that explained the various things you can do with it and finish off the ends. You can use glue instead of solder and you can even wire the chain to another surface. To my surprise, it was amazingly easy. And so....the post which I had hoped would go up on Valentine's Day is here, just as my girls are setting their sights on Oscars night at the red carpet!  

For this project you will need:
Rhinestone Chain (3mm)
Rhinestone Cup Chain Ends (for chains 3mm)
Jump rings
Wire to make S hooks 
Strong glue
Jewelry pliers

At first when I set out, I had visions of grandeur! You know, Queen Elizabeth style baubles. But then I took the time to research trends from high fashion jewelry houses.

It should come as no surprise that given current lifestyles, simplicity reigns supreme! In any case for us, it is a good place to start. I had fun with this project, so trust me, as I find more stuff that can be used for jewelry making, I will be coming back to this subject in the near future!!! For my first attempt at creating "fine jewelry," I focused on the basics in my efforts to keep things fast and easy.


Anna's first jewels! What could be sweeter than a single row of diamonds! Making this choker is simple. A piece a string around her neck will give you an idea as to the amount of chain to cut. Add another 2 links to allow a bit of ease. 


This is so easy, The rhinestone chain is a series of crystals embedded in minuscule, clawed cups, linked together by a bridge which runs throughout the length of the chain. The metal is very soft. So you can cut it with a pair of ordinary scissors. Then there is the chain cup ending, a small claw link with a tab on one side and prongs to hold down the jeweled end of the chain on the other. Hold the chain cup by its tab and place the end of the rhinestone chain inside (a single crystal). If you look carefully, you will notice there are two prongs standing upright. Using a pair of jewelry pliers, carefully press each one towards the stone. You don't need to press too hard as the metal is quite soft. 

You will also notice that the tab has a small hole to which you attach a jump ring or a closure. You can use anything you want. However, these necklaces are quite tiny and getting them on the doll can be a real pain. If you plan to sell your creations, go ahead and use the standard jewelry clasps. But if this is for yourself, you might want to make your own S rings with an extended hook! Note: for instructions on making your own jump rings or S-rings, see "Pearls of Wisdom."


With this single strand of "diamonds" you can create a lot of different looks simply by hooking on a small pendant-- perhaps something out of your own jewelry box. Those pendants which I wore in my teens and early 20's make for impressive estate jewelry on the doll! All you need do is to create a small hook out of a bit of soft wire which can be attached to the front of the necklace (as opposed to threading through the chain)! 


Most pendants fall vertically from a chain. However, I found a pendant and added a loop of wire around the lower end so that I could connect it to rhinestone chain on both sides, thus creating a very glamorous "diamond" choker. 


And even if you don't own pendants, feel free to create your own using rhinestone stickers! 

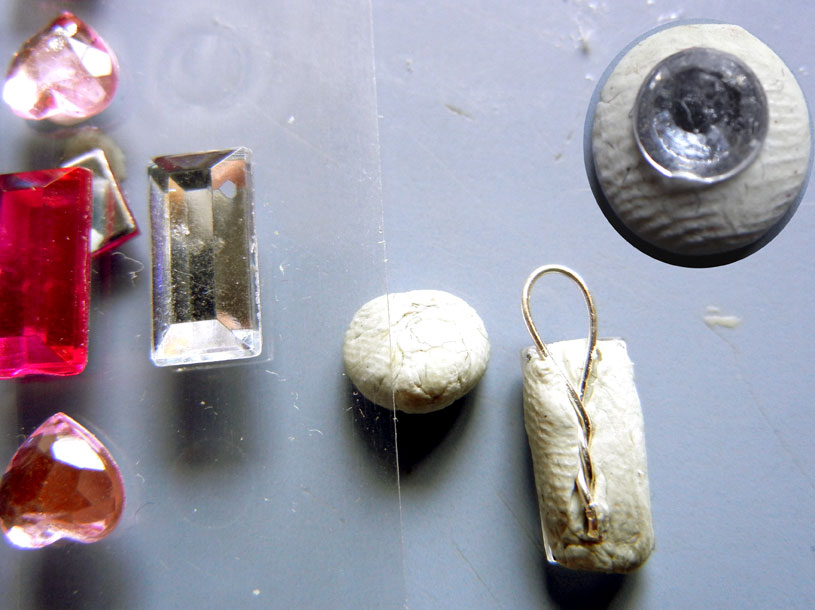
Use a tiny bit of air dry clay and press the jewel onto one side. Make a loop with some thin wire, then twist and press into the clay to completely cover. At the top right, I started out with a round stone in the center of a small ball of clay. Then I added a row of rhinestones from the chain around the perimeter. You'll see the result in the photo below.

You can also use a longer single chain to wrap around the doll's neck, thus giving the illusion of a double chain. For the one below, I added a S-ring only on one end of my "rope."

While we're on the subject, let's talk about a double row of diamonds. You can cut two lengths of chain and put jump rings on both ends. Then join those ends together with a single ring before adding your closure. 

Dolly can wear it as is or..... Atoia is modeling a double strand to which we added a that mega-baguette diamond we created earlier! But you can also create double strand choker that is....shall we say....very Van Cleef & Arpels!


Normally the two strands are soldered together, but a good clear glue works just as well!


After measuring your doll's neck to determine the amount of chain to cut, you will measure out another length that is 2 stones shorter. Turn one length of chain on its side and, using a toothpick add a line of glue. (This gets tricky, but keep on going.) Next, line up the two rows of chain close together gem side down, then liberally apply glue to the back.  Press the two rows together using your pliers. Allow to dry and add a second coat. 


While researching,  I came across the Van Cleef "A Cheval" necklace....an extraordinary piece of jewelry valued at about $700 Million dollars! My dolly's version didn't cost nearly that much, but don't tell that to Dorian who felt like a billion dollar babe in hers!
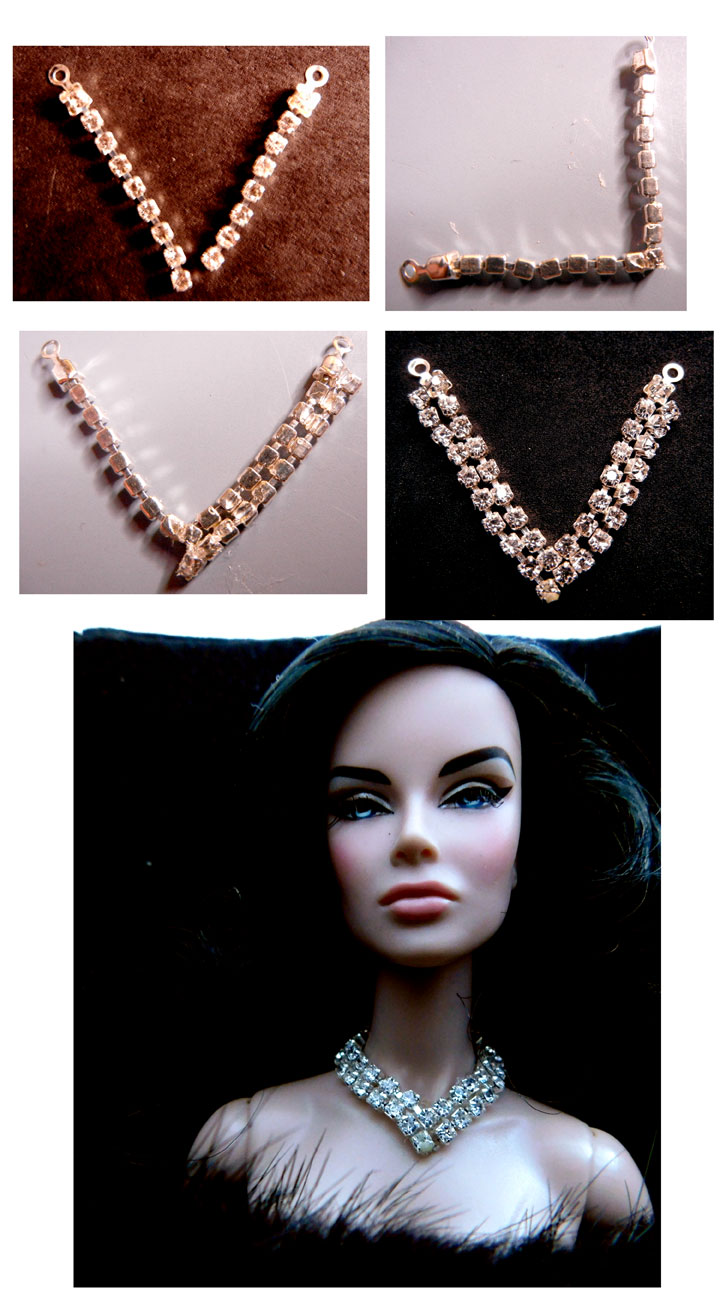
After deciding where on the doll's neck I wanted the necklace to fall, I cut two lengths of chain. One will be one stone shorter than the other. Glue the two together on the side at a 90 degree angle as shown. Then carefully add some glue to the side of the send row and press together. Repeat on the other side, being sure to meet at the center. When all has lined up, turn the necklace over on its back and apply glue. Let dry. Add a second coat of glue.


This method of gluing (which replaces soldering) allows you do have a little fun with the design of your necklace. I'm sure many of you have seen some version of Iman's necklace. This is a very contemporary design and super easy to replicate.


 I started out by measuring the chain around the doll's neck then deciding how far down I wanted the diamonds to drop. You can end with something symmetrical or make one side longer than the other. I decided where I wanted the chain to meet in the front and tied a bit of wire to keep it in place while I found the center point in the back. Cut the chain at the center point and add the chain cups and closures.
then turn the necklace over so the back is facing you. Add a drop of glue to two links where the necklace will join in the front. Let dry, add another drop of glue.


Or.... you can simply glue on extensions at right angles to the basic choker. 

This is where this project would have ended had I not gone back to the store.... I discovered some "novelty" chain on sale. But, unlike the rhinestone chain, this one is made of plastic, rhinestones and thread. I assume it was really designed to be sewn onto a garment, but since it was the closest I could find to the Cartier necklace that inspired me, I decided I would work with it a bit.

It isn't as heavy as the rhinestone chain so it wouldn't lay flat around Catherine's neck. (Metal is always better for this sort of project.) So after carefully pondering the situation, I decided to add a bit of thin wire to "tame" it. 


I threaded the wire through the double rows of thread running throughout the length of trim. Instead of threading, you can also tightly wrap the wire around these rows. I left enough wire to create a loop on one end and an S-link on the other. 

And true to form...I was able to shape the necklace to better fit the necklace to the doll.


My goodness, this was a lot of fun. All my divas are now all singing "Diamonds are a doll's best friend!" Believe me when I tell you..... This.Is.Not.Over!!!!!

Looking for more fine jewelry ideas? Check out "Pearls of Wisdom."


Like us on Facebook: @FashDollStylist
We're also on Pinterest: @FashDollStylist
And of course, we are on Instagram: @fashiondollstylist


Unless otherwise noted, all images and text of this blog are the copyrighted property of Fashion Doll Stylist 2023. We are independent and not part of any other group or website no matter where this post or its elements appear on the internet or social media. Please request permission before reproducing any parts of this post. And please, always credit us. 


Thursday, February 2, 2023

What a Difference a Decade Makes


OMG! Can you believe it's been 10 years already! Back then after not finding the style of doll fashions I was looking for….  I launched this blog. 

“Welcome to Fashion Doll Stylist! Your fashion doll collection is about to get a little more interesting! If you've found your way to this blog, you don't need me to tell you about the expense involved with doll collecting. Between the initial cost of purchasing the doll and the associated costs of dressing her, you can easily run yourself ragged trying to keep those 12" plastic divas in the height of fashion. This blog is for the frugal collector who wants to create sophisticated fashions for their dolls. We will look at how to get your creative juices flowing; how to choose fabric and create basic silhouettes; and where to look for inspiration. There are countless blogs and websites all to dedicated to making clothes for Barbie. Trouble is, most of the clothing rarely goes beyond the juvenile styles one makes to satisfy the tastes the children in our lives: prom or princess frocks, sparkly party dresses, beachwear. I wanted something different. Something reflecting adult tastes like....suits, sheath dresses, fur coats, uncomplicated trends reflecting modern tastes.” (FDS, February 2, 2013)

Bloggers and collectors have come and gone but we are still here. Admittedly, it's not easy maintaining a blog like this for 10 years. Someone once asked me if I really thought I could find enough to blog about long term. I said "of course!" Fashion is a living breathing entity. Of course I could not have imagine all of the aesthetic and lifestyle changes that lay ahead. We have tried our best—even though we hobbled along to the finish line this past year. So we can say… we made it! And that’s thanks to you and your loyal support. But let’s not get sentimental, just yet. Instead, let’s take a look back at how our dolliverse has changed over the past 120 months. 

In 2013,  finding dolls was as easy as strolling through retail stores or perusing information on blogs like Collecting Dolls by Terri Gold, Inside the Fashion Doll Studio or The Fashion Doll Chronicles. Even better, there was “Doll Observers” a free online club where many of us met up to post photos of our favorite dolls, participate in challenges and communicate with other collectors. (That’s where I learned that not all 12” dolls were Barbies!)  In fact, 10 years ago the internet was host to lots of bloggers: some who talked about new dolls; others posting dolly  “soap operas” or adventures; and a few (very few) who offered tips on making naive doll clothes. Some used their blogs to showcase their own dolly photography or handcrafted clothes. There were even blogs that promoted our blogs (Fashion Dolls Top 100). And some of us even found ways to promote each other (remember the Liebster award).

For me, what I found missing at the beginning of the 2010s, was real information on how to create current fashion trends on a 1/6 scale complete with DIY tutorials on patternmaking and where to find ideas for clothes. The few designers who sold their wares did not share their secrets! 

Mission Accomplished

Hanky Couture

Over the past ten years, anything and everything I could imagine I would want to wear myself, I transformed into miniature versions and delivered it via tutorials and “trend reports.” At first I assumed few folks in this community had sewing experience, so I began with simple ideas: wrapping fancy or colorful pocket squares around the shoulders of a doll, making a fringed poncho out of a square of chamois. Over the next several we covered all the basics of patternmaking beginning with slopers customized to fit your own doll whoever she is. Then we showed how to manipulate those slopers into a few basic patterns. As if that weren’t enough, eventually we expanded into clothing for Ken and friends!

I was so focused on the clothing, I did not think about accessories until I started looking at “Billa’s Dolls & Fashions” blog where I noticed how well put together her dolls were right down to their toes. That prompted me to venture into DIY accessories: hats, handbags, designer luggage, stockings, lingerie, gloves and of course, shoes. Oh yes, I found myself spending so much money on shoes!


Especially those little gems from Integrity Toys dolls! With encouragement from BlackKitty (one of my first to leave comments on my blog) and a tip about epoxy clay from Galacticat (a fellow member over at The WClub), I figured out how to make my own 1/6 scale footwear, information which I promptly turned into a set of tutorials for you. 
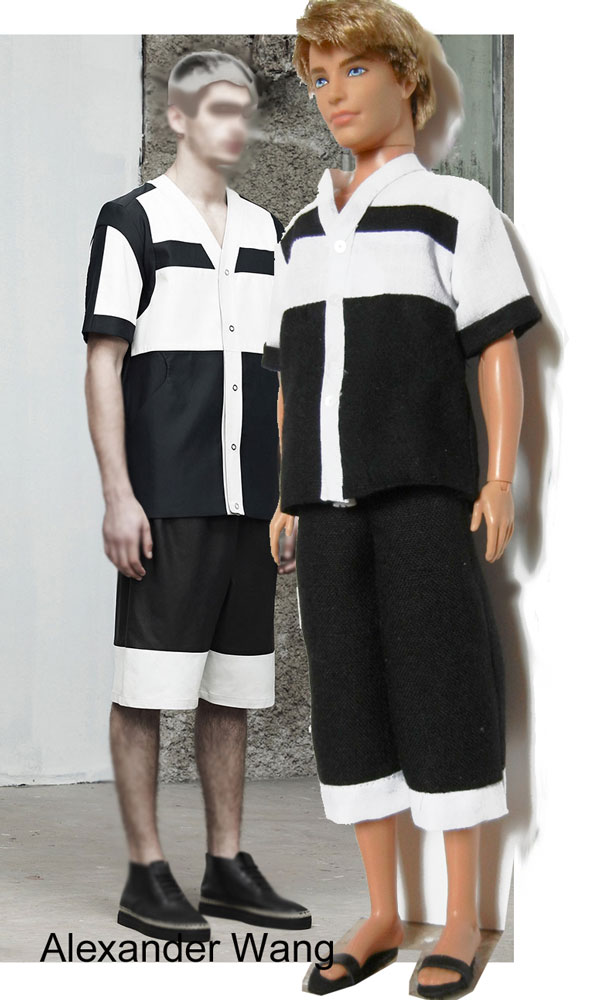
Oh and let’s not forget the guys! It was my dad who asked why there were no male dolls. Wonderful, I brought Ken into the house and eventually he invited his FR Homme friends. All of them needed clothes but I was warned about how silly looking “home made” Ken doll clothes could look, So I found looks that did not require any type of tailoring for him and our menswear was born.

During this journey, we even took our dolls to the beauty salon, showing  how to care for them, apply lashes and even how to make hair pieces or apply flocking. (Unfortunately we could not do manicures because we couldn't figure out how to get the long fingernails to stick!)

You've Come a Long Way, Dolly

Many of the dolls we collected back then--especially if you collect Barbies, Monster High, My Scene or Bratz, are no longer in production. But if you’re lucky, they have, perhaps, appreciated in value! Mattel’s SIS dolls cost me as little as $7-13 a piece in my local (US) store. When you can find them, they now run $50-120 each! My Model Muse Barbies have also tripled or more in price! When I stop to think about how much money in dolls I have, I started putting some of those dolls away!

On the plus side, doll technology has greatly evolved over the past decade. Most now have articulated bodies and are found in a vast array of ethnicities, skin tones, looks and hairstyles. For those of us who collect Integrity Toys, all dolls now have removable hands, allowing them to wear form fitting sleeves, bracelets modeled in one piece and more realistic “gloved hands.” Some dolls have legs (with heeled feet) that come apart at the knees and can be swapped out for lower limbs with flat feet thus allowing them to wear flats, sneakers AND high heels whenever they want.

The last 10 years has also been about customizing our dolls. A few of us tried our hand at re-rooting and repainting. Many more have given our dolls new bodies! And yes, a few of my dolls are hybrid: Barbie heads atop Fashion Royalty bodies.

In terms of aesthetics, I've noticed how today scale has become extremely important. Dolls and everything in their world look incredibly real. Facial features are more refined and the details of the torso more natural. Gone are all of those figure eight bodies with pinched waists. "Belly button" torsos are now the standard.The male dolls really look like guys (and not bug-eyed nerds). Many of my dolls today have personalities, attitudes. Some even give the side eye. 

Look at the difference in beauty and expression. Top left is a replica of AA Barbie 1980 placed next to Fashion Royalty's "Modernist Eugenia" 2018, On the bottom... I was very happy with my SIS Chandra Barbie 2013. But IT's Annick Vandale (2019) takes Black doll aesthetics to a new level. 

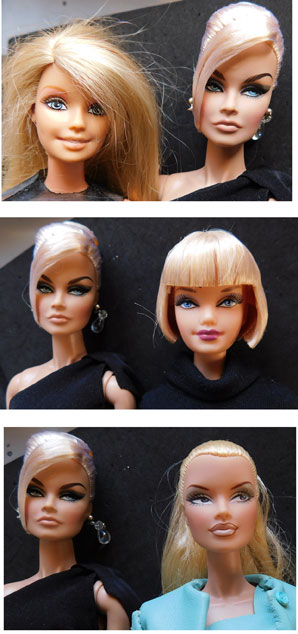
Let's go back to the basic blond fashion doll. They have become so much more sophisticated over the last decade. This is IT's Petite Robe Classique Veronique (2020) giving attitude (from top to bottom) to Barbie Fashionista (1999), Barbie Basics (2010) and FR Veronique Silver Society(2001). 
Ken dolls have always been a challenge. Look at the difference between Ken as Barbie's inanimate sidekick, and the heart throb FR Hommes dolls. Notice how modern, even daring the hair styles are!

(Top) Ken circa 2010 and IT's latest Weekender Lucas Maverick doll. The dude dolls have grown up! (Middle) An Adonis doll on the left and Studio Sessions Darius Reid on the right seem to overpower Barbie Basics Ken. The bottom photo is another example of the modern guy doll versus classically coiffed Ken. 

What we lost 

Robert Tonner no longer produces his iconic 16" Tyler Wentworth and Antoinette dolls. 

And unless you are collecting Mod Dolls, Sybarites, Kingdom Dolls, JamieShow and the like, it seems that 16” divas are no longer a thing. Tonner’s DollChat on Twitter has ceased. Not enough interest as other social media platforms took over the spotlight. And those of you who collect classic Barbies, you lost your beloved Silkies when Mattel halted production of the Silkstones! 

We also lost some really great blogs. Some bloggers dropped out of the hobby and onto other interests. While others fell to health issues. There are many that I miss, but one in particular: "Fashion Dolls at Van Doll Treasures." I miss seeing not only the adventures of Vanessa's dolls, but also the fashions she created for her Dasha doll. 

FDS by the Numbers

Over the past ten years I have made 559 blog posts, visited 1.39 million times. The most popular ones are, of course, anything with patterns, slopers and sewing tips. On Pinterest, our shoe tutorials continue to generate a lot of serious buzz, followed by accessories.

Though I post almost exclusively dolls from my IT collection, my doll family now numbers 176 which includes 67 IT dolls, 57 Barbies, 24 dude dolls; 7 Tonner; and 3 My Scene.


The female dolls share more than 620 garments which are hung on little foam hangers in 17 closet boxes. They have 287 pairs of shoes and boots (132 pairs made in house); 55 Bags, 53 hats, and an assortment of over 150 accessories ranging from scarves, extra hands, gloves and hairpieces to jewelry, small props (like cellphones) and sunglasses. And yes…. My bedroom resembles a toy store!

State of the FDS  Blog Report 2022

2022's Tutorials
Ten years ago when we were new and there was so much to cover, we put up 102 posts in 2013. But as content on our blog began to build, and fashion trends tumbled into astraction, not to mention the blinding impact of pandemic lockdowns, it became more challenging to be inspired, harder to arrive with new ideas. Last year was lean…. only 13 posts and out of those, only two were tutorials: Pucker Up Again (revising permanent pleated fabric) and Hot Glue, Cool Corsets. Moreover, my blog was one of several victims of web-scraping and plagiarism by another toy based website . This for me was disheartening, discouraging, adding to my mental block.  Somehow I managed to keep up with the fashion reports, but could not avoid being impacted by personal challenges, which also crimped my creativity. 

But the dolls were still there…cheering me on! I’m not sure which dolls put the word out there but, we apparently have a reputation for one of the best dolly wardrobes on the planet. So there’s no stopping the constant stream of dolls knocking on the door to join us! In 2022, we let seven of them into our home. For the first time ever, members of the Poppy family arrived: Simone (Resort Ready Poppy) and her sister Sandy (Belle Mariee Poppy)  Even though I no longer collect Barbies anymore, I could not resist Yoon (Vera Wang Barbie). Much to the delight of my ladies, two handsome new boyfriends arrived in the house: Ahmed (Weekender Lukas Maverick) and Terrance (Studio Sessions Darius Reid). And finally, two very sultry ladies rounded out the year: Vivienne (Glamour Coated Elyse Jolie) and Lindsey (Petite Robe Classique Veronique.)

From left to right: Simone, Sandy, Vivienne, Lindsey, Yoon, Terrance, Ahmed.

So, what will the future bring? Honestly, it is anyone’s guess. I simply hope I can keep my head above water while the rest of the universe adjusts to this “new world order.” Fashion right now is as insane as ever which makes it difficult to find inspiration on catwalks or red carpets. I’m still hopeful that I can find small snippets that can spark new ideas. Personally, things are such that there is less stress in my life right now.. Hopefully I will be able to sustain this momentum and create decent content over the next 12 months.

Ten years ago, this hobby was ablaze and blogs were immensely popular. Back then we were doing something very new. And though I perhaps can’t take credit for any of this, we’d like to think our presence had some impact on what we see today in our dolly universe. Everybody’s dolls are so much better looking, better dressed and wearing current fashion! There are lots of very professional doll fashion and accessory designers doing very interesting things! And for anyone not creating their own dolly wardrobes for their dolls, Etsy and Ebay is abound with amazing products ranging from 1/6 garments and jewelry to footwear and designer handbags. There's even a professional furrier, Dimitha Doll Furs with a store on Ebay (ebay.com/str/dimitha) selling doll sized mink coats (made from recycled garments!

On the other hand, there are many who have left the blogosphere for Instagram. It’s a platform that is quick, easy and doesn’t require as much work as a blog. And, it reaches a broader audience. But the “tutorials” are to my eyes, more “quick tips” or “show & tell” and don’t afford lots of hand holding though the creative process. Though I do post photos to our Instagram and FaceBook pages for those who simply want to look at pictures,  I have remained faithful to the blog format because it allows me to provide in-depth detailed tutorials and commentary on the things that matter the most---all things fashion for the fashion doll.

Thank you for your friendship, your loyalty, your curiosity and your moral support. Thank you for continuing to follow us here at Fashion Doll Stylist.

April & the gang


Like us on Facebook: @FashDollStylist
We're also on Pinterest: @FashDollStylist
And of course, we are on Instagram: @fashiondollstylist


Unless otherwise noted, all images and text of this blog are the copyrighted property of Fashion Doll Stylist 2023. We are independent and not part of any other group or website no matter where this post or its elements appear on the internet or social media. Please request permission before reproducing any parts of this post. And please, always credit us.