Sunday, August 3, 2014

Blue Collar Fashionista

Oh that ubiquitous jeans jacket...... This garment which started for the blue collar worker a century ago, has enjoyed a long illustrious path throughout fashion history. Once reserved solely as a uniform for truck drivers and farmers, it became the ultimate anti-establishment symbol to Woodstock hippies and 70's activists, this after surviving the "cool factor" of the 1950's thanks to iconic rebels like James Dean and Marlon Brando.
The guys check out the cars at Detroit's "Woodward Dream Cruise." This year's event is Aug. 16.
Whether we see it in the pages of the glossies, the fact is...the jeans jacket has never gone out of style. It is now a classic, a necessary fashion staple. And it is also an amazing garment that keeps us cool in the summer and warm in the winter. No other garment can boast the same! In the recent  menswear collections, the jeans jacket was, once again, the focus of Spring/Sumer '15's hottest trends. With that in mind, I thought it necessary to get my guys up to speed. Again, this is not difficult to make. You simply need the patience to carefully mark each pattern piece then double check that you are assembling this together correctly. Again, I am hand-holding you through the entire process. Not just with the pattern but with the assembly as well.

Before we get started, I would like to point out that my jacket is the most basic design. There is no one look. You can have as many panels in your jacket as you feel you can handle. Just be aware that for a 12-inch doll, real estate is scarce and you do have to worry about bulk created by seams. So you might want to keep the number of seams to a minimum. With the male doll, you don't have to deal with darts. Think of it as a jigsaw puzzle whereby you cut the basic sloper into pieces, add seam allowance then sew everything back together. So feel free to cut your center seams on the diagonal or design the yoke to have western style V-shape or design patch pockets instead of flaps. Anything goes so long as it is cut from a denim looking fabric. Once again, working with traditional denim is likely to make you cry. I've used the same silk twill I used for the jeans.

THE PATTERN
Trace your men's bodice sloper onto paper.

1. Mark off the front yoke. Mine is simple. I've marked it 3/4-inch down fom the CF, indicated by the red dotted line.
2. Decide where you want the front panel to be. Mind is 1/2-inch from the center front line and is perpendicular to the yoke (red line). Remember, you can also make this a diagonal line.)
3. The top of the waistband will be at the top of the hips (red line).

4. Straighten the side by connecting the lower armhole point to the top of the waistband (blue line).
5. For the front placard, I extend the center front by 1/2-inch (green).
6. For the waistband I would like it to be 1/4-inch long (blue line).
Now we will either cut and paste down or trace off the individual sections to create our patterns pieces.
7. Cut or trace off the yoke, front, side front and placard. Add seam allowance.

8. Let's design the back. Again, I begin with the back yoke. Mine is 3/4-inch down the center back line (red). I've divided the back into two. The line is 3/4" from the center back (red). The top of the hip falls at the same point it did in the front.
9. Straighten the side seam by drawing a straight line from the armhole to the top of the hip (blue).
10. Mark the waistband by making it 1/4-inch long (blue)

11. Cut and paste or trace the yoke and bodice sections. Trace the one side to the opposite along the CB so that you have the full yoke and the full center back panel. Add seam allowance to each pattern piece.
12. Cut and paste or trace off the front and back waistbands. Join them together at the side seam making sure the back is first, then the front. Double the length of the waistband. (I added an additional 1/4-inch to my 1/4-inch band.) Now double the width by folding your paper at the CB to trace off the other side so that the waistband is in one piece. Extend the CF line (on both outer edges)  by 1/2-inch on both ends. Add seam allowance all the way around.

13. Trace off the sleeve. Cut off 1/4-inch from the bottom to make the cuff. Trace this and double the length. Add seam allowance to this and the rest of what's left of the sleeve.

ASSEMBLY
1. Attach the front panel to the side front. Topstitch
2. Tack the pocket flap in place over where the front seams join.
3. Attach the front yoke.

4. Press with seams pointed upwards.
5. Topstitch
6. Attach placard to front bodice.

7. At the very top of the placard, turn the edge down and tack or glue in place.
8. Now fold the placard over the seam onto itself.
9. Topstitch.

10. Attach the side back panels to the center back panel. Press both seams to one side.
11. Topstitch.
12. Attach back yoke. Press seam upwards direction.
13. Topstitch.
14. Join jacket together at shoulder seams. Press seams to one side. Topstitch.
15. Shave 1/8-inch from cap of sleeve (to flatten it slightly).
16. Set sleeve in armhole and sew. Press flat.
17. Topstitch top of sleeve.
18. Fold garment down as shown above. Pin then stitch underarm seam of sleeve and side seam of garment. Press seams open.
 19. Turn garment right side out. Attach waistband.
 20. Press seams down. Turn side edges inward, then turn waistband over seam onto itself and topstitch.

21. Pin length of 1-inch fabric, preferably cut on bias along the neckline of the jacket from edge to edge. (The rectangle of fabric for my collar measures 3-3/4 inch wide by 1-inch long. Place wrong side to wrong side of jacket. In effect, you will attach the collar to the inside of the neckline, allowing it to roll over to the right side of the jacket.

22. Fold the sides under as well as the top edge. When you have finished it will extend in between (but not on) the placards. Press. Topstitch. Add mini brads or pearl stickers for the "metal" buttons.

 
Follow us on Twitter: @FashDollStylist
We're also on Pinterest: www.pinterest.com/FashDollStylist
 
All images and text property of Fashion Doll Stylist.
 
Oh my! What's that on his head??? Why, it's a baseball cap and we'll be back with the pattern and a mini-tutorial for anyone who wants to make one for their special doll! (It also fits Barbie!) Stay tuned!!!!
 

Tuesday, July 29, 2014

True Blue

In my classroom, I used to say to my students regarding menswear, "Men don't wear junk." Where women will wear anything and everything--even poorly made cheap clothing--as a rule, men are less likely to buy a garment that has been badly cut. Women tend to go for the latest, greatest "look." Men, in my opinion, look for things they will wear until they fall apart--and even then....

In a man's wardrobe, a good fitting pair of jeans is THE most important element. And though I've already covered the subject for the girl dolls and though the process is the same, I decided to revisit the subject of jeans, but this time in a more "authentic" way. That means creating a miniature version of the original garment with all of the details in right down to the belt loops.

Faced with having to make it work, I also resolved some issues I had with my original post concerning the waistband. For women's clothes, the waistband is usually cut in one piece and added to the top of the skirt. But after looking at many pairs of men's jeans, I discovered the waistband is cut in four parts-two for the front, two for the back. This also allows for adjusting the fit should you need to after you've sewn everything together.

Drafting the jeans pattern is really not difficult. With Ken, you don't have the problem of dealing with darts. However, since I am revisiting the jeans pattern, I decided to do a great deal of hand holding which those of you with limited sewing skills should enjoy. Following immediately, I will also post a detailed description of the jeans jacket (using the men's slim sloper) because it is very much in focus for next summer's menswear trends.

 I begin with the trouser slopers. You decide how wide or slim you want them to be. Also how long they should be as well. The length of the pant is a "style" choice. In the photo above, the first doll wears a pant that stops just below the ankles. His friend's jeans "breaks over the shoe." For the latter look, you should cut the jeans longer. After making the first pair, I decided to make a longer pair for another doll. I added an additional 1/2 inch. The longer you make them, the more they will "crush" over the doll's shoe. One more thing I should point out..my choice of fabric. Though these jeans look as though they were made of denim, my fabric is really silk! If you recall earlier, I had made my girl dolls jeans from my dad's old jeans. It was extremely difficult to work because the fabric is thick (even when it's soft). You can use a chambray (normally used for men's shirts) which will give the illusion of light blue jeans. Or you can search in your fabric shop of a blue fabric with a twill weave. This silk had the necessary body but was thin enough to work well. This is really important when making itsy bitsy belt loops and pockets.
After you've determine the length of your pants, let's add the "fly front to the pants indicated by the red dotted line in the shape of a small rectangle extended from the CF. I drop this down this down 1-1/4 inch from the waist.. enough so that the doll can get in and out of the garment. Now, I indicate the guidelines for the waistband indicated by blue lines on the front and back. It's about 1/4 inch down. Next, on the back pant sloper, I draw in my back yoke. There is no exact measurement, but this line should slope from the side down to about the middle of the CB seam. Cut the waistband off the top of the initial pattern and add seam allowance to the bottom and on the side. Extend the top of your front waistband by 1-1/2 times. (see next illustration).

This garment will have real pockets that an articulated doll (Ken Fashionista, FR Homme, for example) can slide his hands in. The pattern above has had the waistline removed. The red dotted line (drawn on the remainder of the pattern) indicates where to draw the pocket. It is roughly half way between the side seam and CF line on the waist. And about 1-inch down on the side seam. The (side front)  is the backside of the pocket which includes the left hand corner extending beyond the pocket drawn indicated by my blue lines. Trace this off and add seam allowance to the side and the top.

Now we need to draw in the inner front pocket. That is represented by the area marked by red curved line and the blue (pocket) line. Trace this off, adding seam allowance to the top and the side of this piece. Now let's finish the back pattern.
I've removed the yoke, adding seam allowance to all sides. As in the front, I extend the top of the waistband by 1-1/2 times the length. Add seam allowance to the sides and bottom.
 
There are quite a number of little pattern pieces of varying shapes and sizes. It is very easy to mix them up or sew the wrong side to the wrong piece. (Yes, been there, done that..too many times!!!) Mark your patterns well on the fabric, indicated which side is up. And keep the pattern nearby to verify it is the correct piece.
 For the inner pocket, use a very thin fabric. I've used china silk. Stitch to the curve of the pocket on the front pant sloper. Clip the curve close to the edge. Then turn and press down. Topstitch the edge.
 
 With the fabric facing up, overlap the pant front on the side front so that everything lines up (upper left image). I've lined up the tissue pattern pieces in the next image so that you understand better what we are doing. We see the upper corner visible while the rest of the pocket is hidden. Pin then tack at the two points where these patterns overlap (bottom left). Turn the fabric over, fold back and stitch the inner lining to the side front as shown on the bottom right image.

Attach the bottom of the front waistband to the top of the pants front. The waistband is placed upside down (fabric right side to fabric right side). Press with the seams pointed upwards. Clip the bottom of the fly on the right pant front slightly.
 Press the fly (right up to the top of the waistband) inwards. Now fold the waistband over itself. Press and topstitch.
 Topstitch a "J" over the fly front. For the left pant front, I topstitch the edge to keep it from fraying.
Take the back pant piece. Pin then stitch the bottom of the yoke to the top of the pant leg. Press, seams pointed upward. Then topstitch on the yoke. Pin then stitch the bottom of the back waistband to the top of the pants+yoke piece. Fold the waistband over itself towards the back. Press (seams pointed upwards) and topstitch.
Stitch the front to the back at the side (left). Now is the time to turn up the hem and topstitch in place. Fold the pant (wrong side of fabric showing) and pin then stitch the inseam (center). Press the inseam open (right).
Turn one of the pant legs to the right side. The easiest way to do this is with a safety pin attached to the bottom of the pant leg. Slide the pin up the leg then continue to pull until the pant leg is right side out. Leave the safety pin in for the moment because you want to now, put one pant leg inside of the other, right side to right side of fabric. Pin the front to the back stopping just before you arrive at the fly front. Stitch. Press. Turn the pants to the right side out. I use a hook in eye as a closure. (It's more sturdy than Velcro)
 Belt loops!!!! This is when it gets tricky because you're dealing with itsy-bitsy stuff. I cut a length of fabric that is 3/8-inch wide by whatever length will yield at least 3 loops (5, if you're ambitious). Lengthwise, I fold in thirds towards the middle. I used glue to hold everything together then pressed it well. Then cut off as much as you will need for each loop. (Mine was about 3/8-inch). Each of the smaller lengths is folded in thirds with the raw edge underneath. I glued this to the pants. However, I tried to leave the loops open so that I can get a belt through. The studs were easy. You can use "mini-brads" (mini attaches parisiennes) (mini broches alemanes) or gun metal toned pearl stickers. I've also topstitched the back center seam and added another row of topstitching at the back. This is a design decision.
Oh no, we're not finished yet! You cannot imaged how many pockets I made before finally arriving at a formula I could post! But here it is.
This is a square folded as such. For the girl doll, you can use less complicated pockets. But on the boy jeans, those square pockets are hideous! So you really need to do a shaped pocket. I also tried to "embroider" a pattern, without much success. So in my attempts to bring authenticity to the garment, I emulated Levi's with a leather patch on one back pocket!

Now that he's got his designer jeans, Monsieur needs a jacket as well. We'll be right back with a detailed tutorial. Stay tuned!
 
Follow us on Twitter: @FashDollStylist
We're also on Pinterest: www.pinterest.com/fashdollstylist
 
Also, join us doll lovers and collectors each Tuesday (between 9-10 pm E.S.T) at Tonner doll's #dollchat  on Twitter.
 
All images and text property of Fashion Doll Stylist. Please credit us when reposting or sharing. Thank you.
 

Tuesday, July 22, 2014

Dolly Couture 101: The Classic Draped Couture Gown (VIDEO)

Dolly Couture inspired by Zuhair Murad.
 After having featured posts on the Charles James exhibition in New York and the most recent Haute Couture week in Paris, I thought this would be a good time to revisit couture "draping" techniques we posted a while ago. This time I've prepared a video:


For the 12" fashion doll, you'll need a length of fabric roughly 36 by 18 inches. Use it width wise and not length wise as stated in the video. Should you misjudge the amount need (which is what originally happened in the video) you can simply sew on an extension which you will steam press until barely noticeable.

Here are the important things to keep in mind:
1. Find a photo of a dress that inspires you and keep it in sight while you're working.


2. Analyze the design to discern out how it was made. Decide where the dress will close (side, back, front). Use hooks & eyes. And make design decisions as to what you'll do with the back since you cannot see it in the photo.

3. Make the foundation out of a structured fabric. It should not be stretch nor soft. Try to match it to the color of the dress. Complete it right down to the closure and put it on the doll.
4. The foundation can be a full sheath dress, a strapless mini (like mine), a corset or one-shouldered. It depends on the ultimate design of the dress and the amount of control you'll need over the movement of the folds.
5. Your thread should match your fabric.
6. You can use almost any material for the dress fabric provided it is not too thick or too stiff.
7. Take your time when stitching the fabric to the foundation. Remove the pinned dress from the doll prior to stitching down the folds. Try to slide the needle between the layers so they remain as invisible as possible but don't pull your stitches too tight. It will shrink your dress.

8. Don't despair if the result is not a line for line copy of the original. Often, the imperfections make it more interesting AND it makes the original dress your own!
Use this technique for an all over draped effect or simply in small areas like over a bodice or corset.

The possibilities are limitless. Once you get the feel for it, explore your own designs!!!

 
Follow us on Twitter: @FashDollStylist
We're also on Pinterest: pinterest.com/FashDollStylist

Tuesday, July 15, 2014

Doll's Eye View: Fall/Winter '14 Paris Couture

A study in stripes, Isabella wears a dress inspired by Zuhair Murad
Simplicity seams to be the norm when it comes to current Paris Haute Couture trends. Think of it as "cleansing the palette" from all the bling-bling that littered the catwalks a decade ago. That said, I still feel that couture, by its nature, should be something really special. You know, clothes that make you feel like a princess or a queen!

The Versace dress in the middle can be interpreted in numerous ways.
For this, the Fall/Winter Haute Couture collections, there were quite a few grand looks that remind me of the "good ole days" of yesteryear. Sumptuous ballgowns with dramatic drapery and intricate embellishments.

Moreover, much of what I saw easily translates into incredibly gorgeous clothes your doll will die to wear. Though I have demonstrated how to do the foundation with the draped silhouette over, I will soon post a video to help guide you through the process more easily. In the meantime, sit back and enjoy my dolls' picks from the Paris Haute Couture Fall-Winter 2014 trends.
Indian Summer Days
 Okay, it does look like Spring. And we can get started with these dresses while the weather is still warm. I love the throw-back silhouette to the 1950's with this trio of dresses by Giambattista Valli. You can achieve a similar look with the flared, princess line dress
As we progress into Autumn, these neat and tidy looks is the best way to face cooler temperatures. I like the little touches of fur at the neck and hem, the embellishments on the capes, and the look of brocade for evening suits and coats, whether they're the basic straight coat or the redingote.
At Jean Paul Gaultier, we loved the details that render the classics thoroughly feminine. A great big ruffle around the neck of a black silk wrap coat, fur at the neck and hem of a fishnet covered cape. And a touch of lace peeking out from a slim black velvet gown. I also love the idea of the dip dyed herringbone suit.


Armani rhymes with elegance. A simple cape or jacket gets a feminine touch with the addition of a ruffle. And flocked tulle adds a fairy-tale princess allure to the classic evening gown.

We can always count on Elie Saab for red-carpet glamour. Start with a metallic lace, flared princess line gown then toss a fur boa over her shoulders. The boas here can be made with a rectangle of faux fur held together with a satin ribbon!
An Armani look easily moves from the catwalk onto the doll!
And there's always feathers! A flame red feather boa over a slim silk evening skirt....dolly's ready to paint the town...RED!!!
Many fabric stores now offer a wide variety of faux fur and shaggy fabrics. This is a simple fur coat cut from a white shaggy material.
 
Black and white is a natural choice with dramatic results. We especially like the black and white prints at Valentino and Zuhair Murad. Does the middle dress look familiar? It's quite similar to this one we showed you how to make a few months ago.
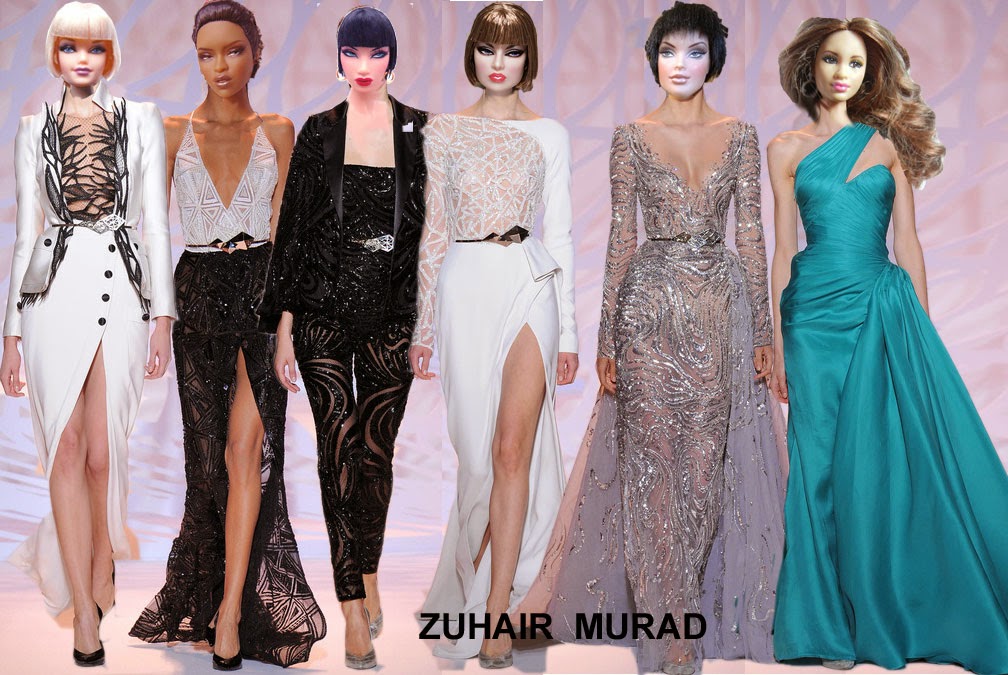
 Our absolute favorite collection this season was that of Zuhair Murad. Glamorous, chic, most of what we saw on the runway is easily translated into gorgeous eveningwear for the doll. All of the photos below can attest to that!
 
Gowns of this type begin with a foundation with the fabric draped and stitched on top like the one we featured here.


A similar dress to the one worn by our Lupita, we've cut this one using a devore satin, then cinched in the waist with a silver belt.
This is a basic, strapless dress with a satin ribbon belt. The pouf of lace is stitched to the belt.

Follow us on Twitter: @FashDollStylist
We're also on Pinterest: pinterest.com/FashDollStylist