
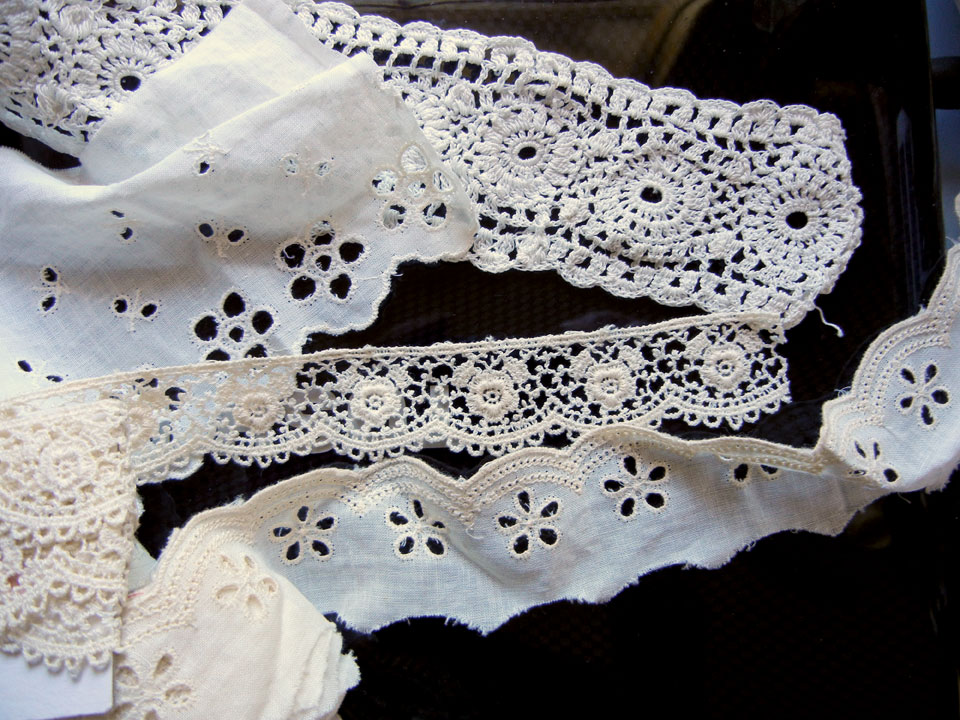
The real difference between this post and the last, is that the fabric in the other post has lots of fluff and bounce and these garments droop closer to the body. To achieve this look, you must first wash the fabric then resist the urge to iron it afterwards. These garments are also trimmed with either (English) cotton lace or some sort of crochet trim. For these looks, I had some vintage crocheted trim on hand (that I had to bleach back to white). But you should be able to find something similar in the notions department of your local fabric store.

The standard peasant blouse has a "crochet yoke" and trim. Instead of going the route of a traditional drafted pattern, here is a quick and easy way of achieving the look without a pattern! Before we begin, cut a strip of fabric roughly twice the circumference of the doll's body wide by the length of the blouse you desire. For my blouse, this equated to 2.5" long x 9" wide (9x23 cm)

2. When dry, seal the edges using an anti-fray product.
3. Trim the bottom edge with the same width of crochet lace. Set aside.

5. Join the two ends at the center back of the doll then allow for overlap. (Later you will fold, sew and attach a fastener).
6. Cut two more strips of crochet lace and attach to the horizontal strip.
7. Stitch together at the front and the back. You now have a yoke.
8. Take the cotton strip of fabric you first created. Make a double row of running stitches. at the top. Pin it to the middle of the strip to the middle of the blouse then at end. Pull the threads to gather the fabric into the size of the "yoke." I have a detailed tutorial near the bottom of this post to better illustrate this process.*
9. Remove the blouse from the doll and stitch the back seam up to about the waist of the doll. You can press the seam open then attach snaps on the "yoke" and another about 1/2" (1cm) further down


2. The skirt part is made using a 3 1/4" (9cm) wide embroidered cotton trim. I cut a length roughly 2.5 times the width of the doll. In my case, this measures about 17" (40cm). Make a double running stitch along the top edge. Pin the skirt at each end and then in the middle. Pull the threads to make the gathers and adjust so that everything is fairly equally spaced. I have a detailed tutorial near the bottom of this post to better illustrate making gathers.*
3. Add a string to the center front point (which is used to tie around dolly's neck). Then stitch up the back to the waist and add a snap or two at the back.


 2. Wrap around the bust of the doll, leaving an overlap at the center back seam. Because this does not stretch, you will need to make a tiny dart under each bust to fit.
 3. My second layer is a strip of cotton 1.5 times the width of the doll times the desired length which I have washed and dried first. (Again, it is recommended you use an anti fray product to keep the edges neat.) In my case, this is 7.5x2" (19x5cm).
4. Gather this second tier and sew onto the lower edge of the first tier. I have a detailed tutorial near the bottom of this post to better illustrate making gathers.*
*Working with Gathers:

Put a double row of running stitches at the top of the strip.
1. Pin the center of one strip to the center of the other.
2. Pin the ends of the longer strip to the edges of the smaller tier.
3. Working from one side to the other, gently pull both lines of stitches at the same time. Be sure to pull the stitches made by the bobbin) as they are easier to manipulate.
4. Adjust the gathers as you go. The double stitches make it easy to do this and keeps things fairly stable.
5. Once everything has fit in well, place more pins in the gathered strip. Sew in between the two sets of stitches.

7. Remove the running stitches that fall below the sewing line.


When you finished, you might want to crush the dress in your hand to keep it close to the doll's body
Of course, the dress or the blouse is only part of the story. Aside from a jeans jacket, dolly will need something to toss over her shoulders on those cool days or nights.


1. Prepare the trim. (My trim here is 2" (5cm) wide. Carefully cut two strips of trim of equal length. The length will depend on how long or short you want the jacket. Place it over the doll's shoulder until it falls at the desired length.
2. I close up the broken links with a few stitches to stabilize the edges first.
3. Here, I have used a thinner trim to finish what will result in the hem of my jacket.
4. Sew trim to both raw edges

2. Leaving a space for the arms, lay the front edge over the back edge and pin. Hand sew together with perfectly matched thread.
3. Repeat on the other side.
4. Join both sides together at the back. Pin, adjust, sew.

When you have finished, no one will guess you did not crochet this yourself!!!

Same jacket, shorter length, narrower trim (1" 2.5cm). I used the same steps to make the jacket as explained above.

Here's the jacket, front and back.

Follow us on Twitter: @FashDollStylist
Like us on Facebook: www.facebook.com/FashDollStylist
We're also on Pinterest: www.pinterest.com/FashDollStylist
Come show us your stuff and join the fun on Instagram: www.instagram.com/fashiondollstylist
All photos and text property of Fashion Doll Stylist. 2016. Please do not reproduce without prior permission.
Ubrania w stylu folk bardzo mi się podobają! Twoje dziewczyny wyglądają tak ładnie i świeżo! Pomysł z uszyciem jest rewelacyjny! Naturalne tkaniny tego lata - super!
ReplyDeletePozdrawiam serdecznie i dziękuję za rady i wskazówki!
Olla wrote: I like very much folkloric clothing. Your girls look so nice and fresh ! The idea of sewing is sensational ! Natural fabrics this summer - cool!
DeleteI cordially greet and thank you for advice and guidance !
Thank you, Olla. It has been awhile since we've seen fashions like this (on my side of the world) and I had forgotten how pretty all of this looks. And it's even prettier on the dolls!!
Bonjour,
ReplyDeleteC'est vraiment fabuleux. Je pense acheter de nouveau de la dentelle pour essayer de faire quelques modèles. Merci pour toutes les idées.
Merci, Shasarignis. C'est la saison pour les dentelles! En plus, c'est tres simple de creer quelque chose vraiment jolie!
DeleteHi, great fashion <3 I love it :*
ReplyDeleteThank you Urszula. Glad you enjoyed this post.
DeleteLoving the boho chic look. Danielle really likes those first two blouses. They will work well as maternity pieces for her. Love your little crocheted sweaters, too. Very cute.
ReplyDeleteThank you, Vanessa. I don't have your talent for crochet, but, for the moment, sewing together the crocheted strips is the next best thing. So true that the blouses could double as maternity pieces. I think Danielle would be very pretty in either of them.
DeleteMore fresh summer looks! Flowing and fun, they look romantic and mimick the styles we are seeing on the street - fresh romantics mixed with jeans. I too particularly like the little crocheted top. It looks great over the cotton eyelet tops. All adorable and different casual look for the fashion dolls' summer vacations!
ReplyDeleteI can forgotten how both comfortable and pretty these 70's looks could be. The girls LOVE them. I doubt I'll get these looks off these dolls before the end of the summer!
DeleteI love everything about this. It is so very like my personal style. In fact I wore a dress similar to that first one just yesterday. I will give a couple of these a try...I think. With your helpful photos and detailed instructions, I just might be able to pull it off.
ReplyDeleteThank you, Jewell. These looks have been particularly popular, probably because many of us have worn them at some time or another. Putting these outfits together is so easy and so fast, I'll probably make a few more for some of the other dolls in the house!
Deletethey look great in your outfits, as always! Thank you for sharing your tutorials! :-) :-) <3
ReplyDeleteThank you Aya. I'm happy you enjoyed this post and thank you for your visit.
DeleteLove all of these! I am definitely going to have give them a try. Especially love the jackets made from crocheted lace edgings, brilliant!
ReplyDeleteThank you Chris. Look forward to seeing your next Fashion Friday!
DeleteI really love all of these! I have some lace I have been holding on too. No more!!! I' have to make a few of these!
ReplyDeleteThank you. I've had a drawer full of white lace for a long time now. So I was so happy to finally find something to make with it, too!
DeleteBrilliant way to liven up a plain dress. I particularly like the tiered dress and the string halter neck - just the simplest of changes to the standard Barbie shift dress. Definitely on the wardrobe list for my charity girls.
ReplyDelete.... Even as I was typing charity girls I started to think about a broadly uniform look - not quite Victorian workhouse or orphanage but a set of clothes (day dress, best dress, top, skirt etc) that I can make up in co-ordinating fabrics.
These looks started in the windows of Paris. Immediately I knew they would translate well to doll clothes. And I had seen somewhere how to distress cotton to give that "un-starched" look, so I am very happy with the outcome. Also, over the years, I have been collecting a lot of vintage lace and crochet (as so many of us have). So it was fun to finally find something to do with it. Whatever look you are trying to achieve, my best advice is to start off with photos of what you like, then simplify. Simple shapes will allow you to mix and match. From photos, you will get ideas as to how to style.
Delete