Showing posts with label doll corset. Show all posts

Saturday, September 17, 2022

Hot Glue Cool Corsets

After nearly 10 years of producing content on my blog, it is difficult to create something original and current. For this project, I began by revisiting the corset. But it all seemed deja vu. So I went back to the drawing board and decided it was time to do something more "21st century" with the idea. In my effort to come up with something, my attention was diverted to a photo of a model wearing clear plexiglas jewelry. Unfortunately, the only method to replicate versions of it is by using resin...a highly toxic chemical requiring LOTS of ventilation. I turned to hot glue, thinking that would be a cheap and easy way to get the look..... But no matter what I tried...everything came out with a milky translucence. AND....working with the hot glue gun was not as simple as I though. Very, very messy. I put the glue gun down. But still, there was something that kept me picking it back up. It wasn't until I made the first corset with it. There, in front of my eyes, I had created a 21st century version of a turn of the last century looking Art Nouveau bustier for my doll. 

At first, though, it seemed like a one-trick pony. I could make bracelets and necklaces...but at the end of the day....it all had the same look. I felt it still wasn't enough for me to post it as a project. So, just before abandoning this "new medium," I pulled out my pack of foiling papers to see what would happen. Oh my goodness.... I love foiling on various materials as it stands. But when combined with hot glue...it looks just like metal. As you can imagine, I had FUN. 

MATERIALS


For this project you will need a low temp hot glue gun, a package of glue sticks and a few sheets of craft foil. You want the low temp glue which is less dangerous should your fingers come in contact with the glue (which it probably will). And besides..this is pretty cheap. When buying glue sticks, just make sure they are the right size. (Probably mini-sticks).  The most common ones are a translucent white, though other colors exist. The sheets of craft foil is usually sold in packs and comes in gold, silver and copper, though you might find other colors. 

COOL CORSETS

Let's get started....

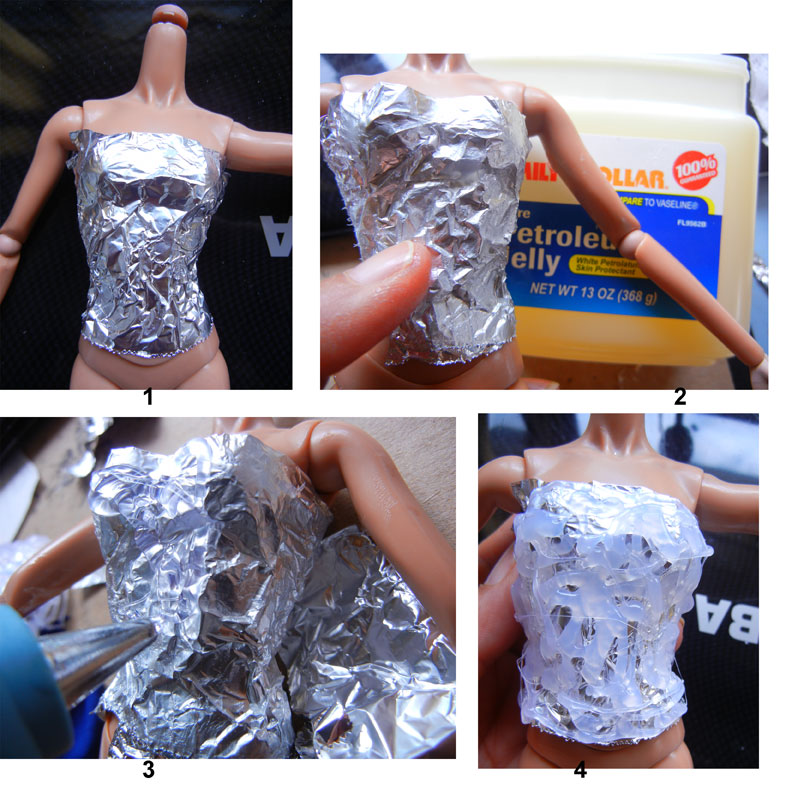
1. I have a separate body which serves as a mannequin, and whether or not you are doing the same thing, you must protect that body (or that of the doll) with aluminum foil
2. Apply a little bit of vaseline or hand lotion so that later, when you need to pull it away from the glue, it will release more easily.
3. After the glue gun is loaded, plugged in and the  glue has started to melt, make swirls, globs at random. The reason you are doing this directly on the form is so that, once cool, what you create is in the same curved shape as the doll body.
4. Keep in mind, you will want to leave some holes in your design. It will look more like Art Nouveau AND..in the back, it will allow you to thread some ribbon through to use as a closure.
5. After the glue has cooled, begin peeling away the foil from the back.
6. If it rips in areas, or you discover the holes are too big, you can always come back with the gun and either fill in the gaps or use the side of the nozzle to melt and connect specific areas.
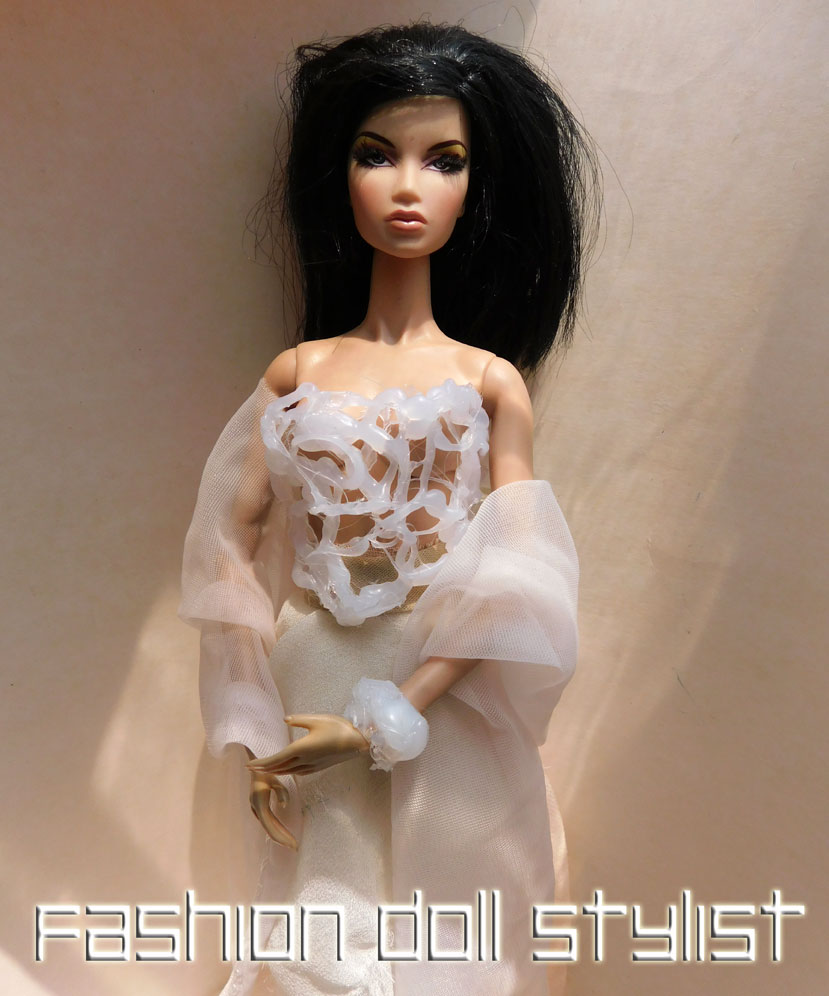
7. And so here is my completed bustier.
8. I used a thin ribbon to thread in the holes at the back.
It's not Couturier Iris Van Herpen, but it certain fits in with the modern concept of Haute Couture!
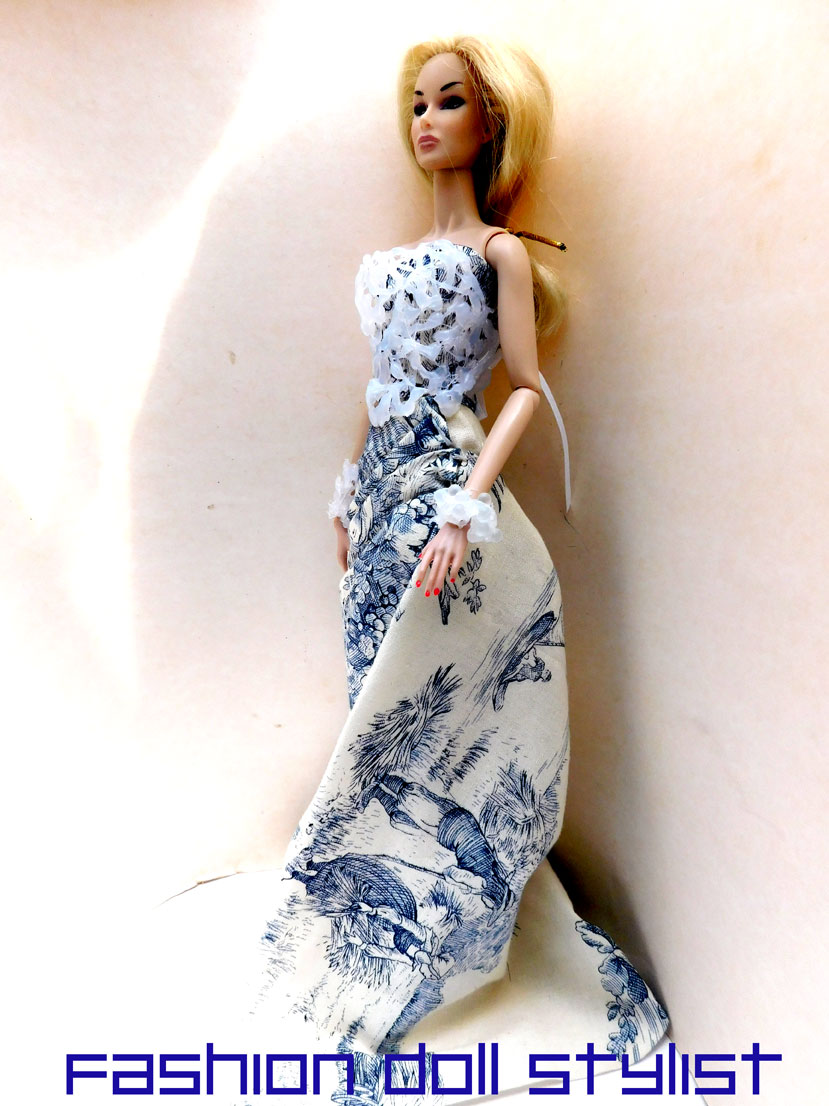
Here, the hot glue corset is layered over the strapless top of this Jouy cloth dress.

The hot glue corset adds another dimension to an existing look. You can also use a colored glue stick instead of the white.


In this version... I created the same corset as the one above. But this time I made a bib out of the hot glue. You proceed the same way as you did for the corset, except you'll need to line the area around the neck of the doll with aluminum foil before applying the glue. 
The back of the neck and the center back waist provide points where you can attach a ribbon for closure.
I've used white for my corset and necklace, but feel free to play with colors. What I do not recommend is painting the underside of these accessories. You don't want to stain the doll with paint!

HOT EFFECTS
Hot glue + craft foil equals melted metal effects! Once I figured this out, I decided to make something "Very Versace." Gold on black. 
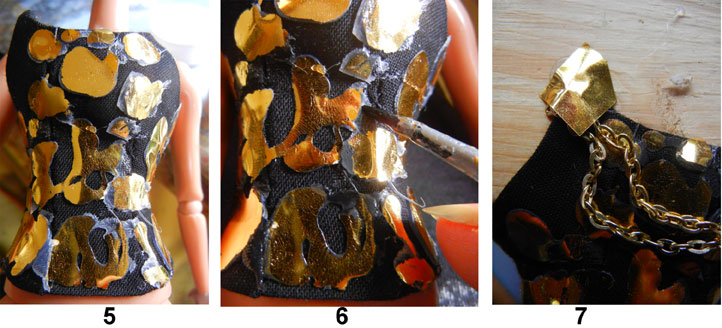
1. First of all, make the corset of your choice. For this I have used a black cotton. But any fabric is fine.
2. The hot glue is applied directly to the fabric. I would recommend cutting the foil into small squares and working in small areas instead of trying to cover too much at the same time. The glue cools down really quickly!
3. As soon as you apply the glue to the garment, lay the square of foil directly on top (dull silver side down onto the glue) and press.
4. The carefully peel the foil away. Top to bottom is mostly best!
5. Keep going until you have covered the entire bustier. 
6. On mine, the glue shows, so I went back with paint. However, the next time I do this, I will use a black glue stick instead of white! Or...there is a metallic filled glue pen  that supposedly looks just like shiny metal which should also be interesting to use.
7. In keeping with the spirit of Versace, I attached gold chain which drapes over the bust. After sewing the chain to each side point of the bustier, I hid those points with a little glue and foil!
My finished result...Very Versace! 


Then I wondered, what it would look like if I were to do a hot glue foil on a metallic leather....

The result was a shiny areas over a "hammered" metal look.

This was so much fun. You can do this on any material. The blobs of irregular shaped "metal" almost resembles jewelry. On this tweed top, I randomly applied both silver and gold globs


And just as I thought I was finished with this project, the idea came to me....what happens if you apply dots of glue/foil to, say...sequins!

It looks like paillettes mixed in with your sequins. Quite interesting!


Let's Talk Accessories...

Unless it is the bib that you want, the process is simple. 
1. Apply the glue directly to the dull silver side of the foil in the pattern of your choice and let dry.
2. Peel the glue away from the foil
3. Wrap one point with a little wire then hang from another bit of wire.

I created the belt the same way. Determine the width of the doll's hips. The create your design with the glue directly onto the surface of the foil.
When cool, peel away from the foil. 

I use ribbon to tie the two ends together. Belt can be work with the opening in the front, side or back.

The bracelet is a little more tricky. I did try to do this flat then glue the two edges together. But when it has cooled, the glue doesn't have all that much give. You would have to melt areas of it so that it bends around the doll's arm. Or...


I found a wooden dowel or pencil roughly the same diameter as the doll's arm. 
1. Cover the dowel with aluminum foil and rub a little bit of lotion or vaseline onto the surface for quick release when you are finished. Apply the glue all around.
2. Remove from the dowel. If it breaks in areas, don't worry. You can always come back with your gun and melt those broken areas back together or add more globs of hot glue.
3. One more thing... You can always press in beads, rhinestones or whatever while the glue is still warm. On the middle cuff, I pressed in some frosted beads.

And yes...you can always use a little foil to get the look of a metal bracelet!


Like us on Facebook: @FashDollStylist
We're also on Pinterest: @FashDollStylist
And of course, we are on Instagram: @fashiondollstylist


Unless otherwise noted, all images and text of this blog are the copyrighted property of Fashion Doll Stylist 2022. We are independent and not part of any other group or website no matter where this post or its elements appear on the internet or social media. Please request permission before reproducing any parts of this post. And please, always credit us. 


Wednesday, March 19, 2014

Paper Gladiators


Often, when working on a post, I have something specific in mind. Sometimes it works out as envisioned. Other times, I'm forced to rip things up and start anew. And then there are those rare times when things exceed my expectations so much so, I will remove an element out of the original theme and consecrate an entire new post on that item alone. Such is the case today.


By extension, this post is part of the one before, "Going Green." I found an old package of metallic doilies in a drawer and decided to see what I could do with them. The challenge, quite naturally, is creating something of "quality" from a horribly cheap material. Things can easily go very wrong. But au contraire! I was quite pleased with the results of this craft project. And though I'm not a huge fan of Donetella, these fashion items could very easily parade down one of her Versace couture catwalk shows.


Each packet of doilies will be different in design. This exercise shows how to start as well as the design decisions I made putting the garments together. Should you be tempted to make any of these paper treasures, just be aware that paper doilies are VERY fragile and rip easily. On the other hand, I only needed two doilies to make all four elements pictured. If need be, any mishaps are easily repaired! (And the mistakes don't show!) Think decoupage. Just keep gluing!


Ideally you should chose doilies that have lots of rosettes and/or medallions. For the long corset, I wanted the doll's "skin" to show through. So this garment is thin. I began by wrapping the doll's body with a little bit of plastic wrap (to protect it from glue).


Start by taping a medallion to her torso.


For the conical "bra," I folded over one of the spokes so that it becomes more 3-D and fits over the bust. I use a toothpick and some white craft glue (that dries clear). Continue to cut the medallions out and paste onto the other medallions in place until the doll is covered. If needed, cut the medallions so that they will conform to the doll's curves. By itself, a single layer structure is way too fragile. So you will need to keep adding and gluing on medallions on top of the original structure. This will provide a more "hammered metal" look. Be sure to glue on rosettes to secure fragile joints.


When it comes to the back... the medallions should over lap in the back.  I added two more sets of medallions at the point I designated to be the closure.


When you are finished. let the glue dry. Check to see that everything is well glued, adding additional medallions. When dry, cut the plastic wrap down the center back and carefully, very, very carefully peel the plastic away. If it sticks, it is better to use scissors to cut around the stuck parts. I used a small square of Velcro in a single spot to close. Or......


I made a second corset using the same method. But this time, I cut two strips of stretchy nylon (from some old  lingerie which I glued to each side. On the inside of the corset, over the point where I glued the strap, I added another medallion. If you can live with a tie at the back, it's perfect because all of the stress of closing is absorbed by the stretch ties and not the paper!


Then I decided to do a "girdle" which could be worn over a dress. The 1st two garments are too fragile, so this garment begins by first creating a girdle made of air-dried paper clay (found in crafts stores). Roll into a ball then press directly onto the doll to form this girdle. (Those FR dolls with the wasp waists have the perfect silhouette to wear this accessory.)  I let it dry a bit, then carefully remove it from the doll's body, allowing it to completely dry. Paint it the color of the dress it will be worn with (while it is off the doll). Now cover the doll's torso with plastic wrap and slide on the girdle.


Add the central medallion. Since the girdle is made of paper, you can use straight pins to hold it in place while you decide how you want the design to go. Then glue a central medallion in place, then add additional medallions or rosettes. Sometimes I cut the spokes so that the medallions conform to the girdle smoothly.


Continue until you are happy, adding additional layers until it is complete. When all the glue has dried, carefully remove the plastic. Since the girdle stays up by itself, you don't have to worry about any closures.


I could not stop there! So I made a pair of spats. I was afraid, however, that with all of the manipulation of getting the doll's leg in and out of this accessory, the paper medallions would not stay glued to the fabric.


So I created the basic form using air dried paper clay. You roll it in a ball and press over the doll's legs until it is thin enough to have a nice shape, but not so thin as to break. (It will look like her legs are in casts!) Since it's made of paper, you can use scissors to trim it. Let them dry and remove from the doll's legs. Paint. Then add the medallions. Though I loved the open-work of one layer, I still felt  additional layers of rosettes and medallions needed to be added for the illusion of hammered metal.


All images and text property of Fashion Doll Stylist. 2014. Please do not reproduce without prior permission. Thank you.


Follow us on Twitter: @FashDollStylist


Thursday, August 8, 2013

Dolly Boudoir: The Full Torso Corset


As a long time consumer of fancy French lingerie, I now fully understand why something with such little fabric costs so much. Drafting, cutting, manipulating and sewing together tiny pattern pieces is not only labor intensive, it calls for nimble fingers and a lot of patience. For months after spotting a photo of a pretty doll in a corset dress, I was determined to create an real, old fashioned corset for my dolls. The style featured in this post is called "the merry widow," which dates back to 1905. It features a demi-cup bra, a short girdle, lacing down the front or back and enough boning to keep everything perfectly in place.

For me, the boning is the one single element that distinguishes this garment from, say the bustier or a camisole. But in devising a simplified version for the doll, my chief obstacle was finding boning small enough to trace the miniscule torso of my dolls. Finally I discovered twist ties (the kind that comes wrapped around small electronics). These have just the right proportions. And though I did use these little "under wires" for three of the four corsets featured here, my feeling was that, by folding over the seams and topstitching them in place (a.k.a. flat felled seams), you don't always need the boning. The lace used here is really hem tape because it is the easiest to find.

No bones about it, I had such a good time with this project. I made four corsets instead of two with panties to match and had to stop myself so I could get this exercise posted. I will show you two ways to make this garment: the first is created directly on the doll (couture) which is best suited for lace. The other shows you how to make a pattern using tape. With the latter version, you can even forego the boning.

The Made to Order Corset
Though rare, in France, there still exists the "corsetieres," crafts persons specializing in the art of made-to-order bras and corsets. As with Haute Couture, the woman is measured and a "second skin" undergarment is created perfectly conforming to the curves beneath. Though my technique has nothing to do with that employed by this highly skilled specialist, it is my way of paying homage to this disappearing art. I wanted the "boning" to be noticeable, but yours can be more discreet if you prefer. I begin by wrapping a narrow piece of tape around the doll sticky side up. Cut the twist ties in lengths that line up along the body's side front, back side back and side seams. Lay each one against the body on the tape. Lay the lace in between the "bones" and pin well in place.


For the black lace corset, the opening is in the back. The last panels at either side of the center back should end in the scalloped edge of the lace trim. Now carefully remove the corset from the doll. Then very carefully remove the tape. Whip stitch the "boning" in place.

Cut out the bra pattern (minus the seam allowance), aligning the top with the border of the lace. Overlap the bottom of the bra to the outside of the corset. Pin. Hand stitch in place. Join the center of the bra and stitch by hand. Now add the finishing touches. Cut away the edging from the lace trim and apply to the lower edge of the corset. You can also cut away some of the flowers from the trim and applique onto the bra. I've also added a tiny bow dotted a tiny rhinestone. Leave strapless or add small lengths of 1/8-inch ribbon for straps. You can also tack on tiny bits of ribbon at the lower edge of the corset to simulate garters!

At the back, I sewed on hooks to each side of the opening close to the boning. Catch the ribbon through the hooks and tie into a bow. Note: This garment will fit different types of Barbie!

The doll is wearing panties featured on the "Petites Culottes" posting. Because I'm closing them with Velcro on one side, I covered each side with a lace flower motif, dotted with a single rhinestone.


The red version features lacing up the front. For this I used 5/8-inch lace hem tape which was a bit harder to work with.

The real difference with this one is that the front panels will need to be lined with a bit of ribbon so that the hooks won't tear away. I used flat "loops" (from the hook & eye set) sewn to each side of the front panels. I gathered more lace trim and attached it to the end of the corset.


Off the Rack Corset

This is easy, fast and the technique most of you will probably use because you create a pattern that can be used repeatedly and modified into a litany of styles. I used the same technique for creating this version as I used in creating the bra pattern. I use paper tape to cover the torso of the doll from the center front to the center back of the doll. (Again, you're making half a pattern to ensure symmetry.)  Be sure to clip the tape at curves so it lies flat on the doll (at the sides and back). Draw the seam lines and style lines (the shape of the top and bottom) of the corset onto the tape. Carefully remove the tape from the doll in one piece. Now cut along those lines and flatten the tape pattern onto graph paper. Add seam allowance to the sides.


I used pale pink satin for my corset. Press the seams to the side and topstitch. Here, I've used a double row of topstitching to give the feeling of boning. I gathered 5/8-inch tape and added it to the bottom of the corset. You can attach the bra pattern to the top edge, however for this version, I've simply cut away a few lace embroidered motifs and added them to the top. I added a bow over the bust and tiny, adhesive backed pearls down the center front. The back is held closed with hooks.

For my last corset, I wanted to make a more contemporary version of the traditional corset. I used the same pattern as above and a heavyweight silk fabric which provides additional structure to the garment.


You can also use a lighter fabric and stiffen it with iron-on interface (as we did for Ken's jacket).

Take a piece of ripped silk chiffon 3 times wider than the width of the flattened corset. The ripped edges will give this garment a soft, edgy look. Fold the strip in half horizontally and softly pleat it. Pin in place at the hem on the exterior of the corset and stitch in place. Repeat the process, this time attaching the strip to the underside of the top of the corset.

I have finished this corset off with a tiny embroidered rose (taken from an undergarment) and a few tiny self-adhesive pearls. My corset will close in the back with the help of hooks and eyes.


These corsets not only make for sexy lingerie, they can be combined with tulle, sheer fabric or full skirts to make a dramatic evening ensemble.


Follow us on Twitter: @FashDollStylist

All images and text property of Fashion Doll Stylist. 2013. Please do not reproduce without prior permission.