Saturday, June 11, 2016

World Doll Day 2016

Today is World Doll Day. However you will not find a special post here.


Last year, some of us in the blogosphere, marked the occasion by answering an online survey where we were encouraged to name our favorite doll along with the reason. Well, I tried to answer this as best I could, but my dolls because enraged when they got hold of it. They felt it was insensitive of me to single out a few new dolls especially when others had been here for a number of years.


They vowed to take over the event and organize it themselves. So, this year, I gave them a couple laptop computers and a few smart phones and turned them loose!
Since I was not allowed to vote, nor to take the pictures.....I cannot post too much of their work on this blog. Instead I will invite you to check out their World Doll Day special event at www.fashiondolldiva.wordpress.com

But be warned! It is very long. They kept adding on all kinds of silly categories. Their photos are boring. (What can you expect when it's dolls taking pictures of other dolls! (Clearly the photographer did not have a good hand with dropping in backgrounds.) And the writing.....well.....miniscule fingers typing on a miniscule MacAirbook.....what can you expect!!!

In the meantime, we've prepared a new tutorial which will be posted almost immediately after this message!

Happy World Doll Day!
April

Pssssst. Spoiler alert. Grace won Top Doll!!!!!

Follow us on Twitter: @FashDollStylist
Like us on Facebook: www.facebook.com/fashdollstylist
We're also on Pinterest: www.pinterest.com/fashdollstylist
Show us your stuff on Instagram: www.instagram.com/fashiondollstylist

All photos and text property of Fashion Doll Diva. 2016. Please do not reproduce without prior permission.

Wednesday, June 1, 2016

Angel Food


The store windows of Paris are filled with the hottest trend for the summer....peasant blouses and dresses! Inspired by these looks, my project began. But soon after I cut the first dress, another, more romantic look emerged. Back in 1962, the "Angel Blouse" (also known as the "choir boy look" with its ruffles and flounces, was all the rage amongst teenagers of that era. And while I intend to return to a more gritty look, I decided, instead to work with this forgotten trend that is so very pretty on the doll.

For all of the looks here, I used a cotton voile and some very simple patterns.

The first dress begins with a classic 2-piece dress. The top is a strapless fitted bodice with a flared (or 4-gore) skirt attached.

1. Sew the dress and finish it.
2. You can use ribbon or make your own straps out of small scraps of the same cotton Folded, glued and pressed in place. I've pinned the straps to the dress then stitched them down. In this case, the straps are only attached to the front and tie behind the doll's head in the back.
3. Cut a diagonal strip of fabric that is twice the circumference of the doll and about 2" (5cm) long. Hem the edges.

4. Using a running stitch, gather one side of the strip then pin to the top of the dress. Adjust the gathers. Stitch the gathers in place with a backstitch.
5. You can stop there or... Make little sleeves. Cut a width of the strip. Hem both top and bottom, then make a tube by stitching the side edges together.
6. Make a running stitch at the top, pull the thread to gather. Carefully stitch down the gathers.
7. Sew the seam of the sleeve to the side of the dress bodice.


The one is a peasant dress that, in a shorter length, you can also make as a blouse and to wear over jeans, if dolly wants a more casual look.

1. Begin by cutting a length of fabric which is as long as you would like the dress. The width should be 2-4 times the circumference of the doll, depending on how full you want the dress. Pictured here, I made m dress 4x the doll's width.
2. For the sleeve, I cut two more rectangles that are half the size of the body of the dress. Altogether you have 3 rectangles which you should hem top and bottom. Fold in half and stitch each one down the one unique side.
3. Gather the tops of each segment. Adjust the body of the dress on the doll, then stitch the gathers down. The sleeve segments should be gathered at the top and the bottom.

4. You can then either stitch the sleeves to the body of the dress at the underarms or treat them as detachable elements which gives dolly two looks for the price of one!

Another very pretty look, inspired by the peasant wear we're seeing in Paris. This is a simple tent dress trimmed with a ruffle at the hem.
1. Start with the tent dress pattern. Click here for the tutorial. The dress is stitched at the side seams and the shoulders. I finished the armholes and neckline.
2. Next, take a strip of cotton which is at least twice the width of the dress's hem (or more if you want the ruffles to stand out more). Gather the top of this strip.
3. Pin to the dress, raw side to raw side. The ruffles will be pinned upside down on the dress. Adjust so that they are even. Then stitch down.
4. Finish the back seam. Then iron, near the seam at the hemline, (just above but not on the ruffles).

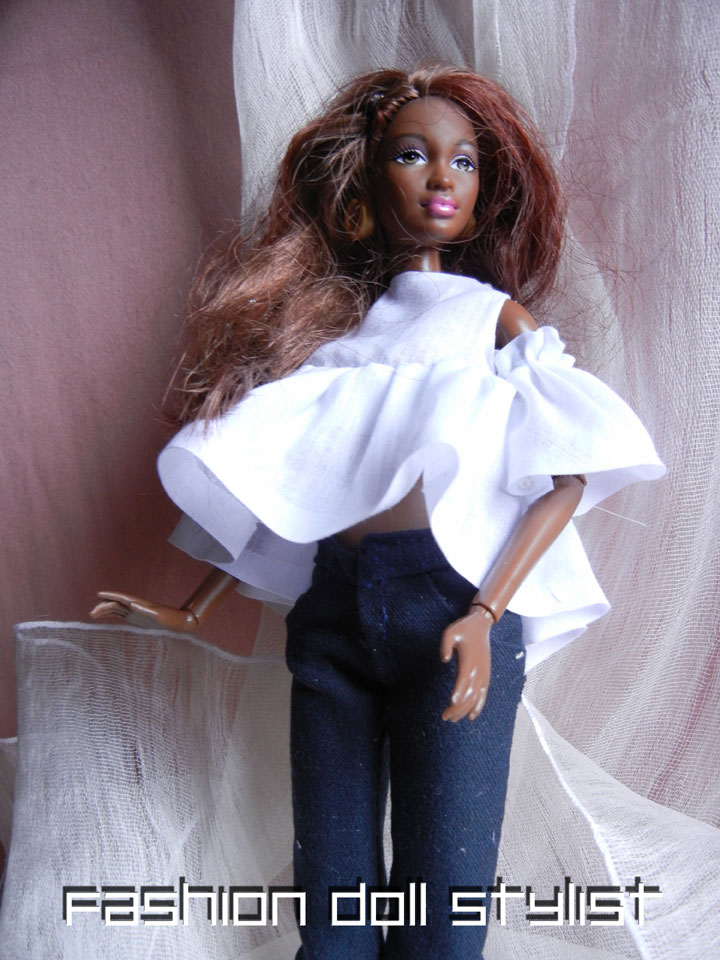
Finally is the "Angel Blouse" worn over jeans. It is a shorter version of the dress I just made but with a longer ruffle. Use the pattern for the tent dress but cut it down to a shorter length and leave the back open, closing it with a single snap or hook and eye. My ruffle here is twice the width of the blouse's hem and 1 3/4 inch (4.5cm) long.


All images and text property of Fashion Doll Stylist. 2016. Please do not reproduce without prior permission.

Follow us on Twitter: @FashDollStylist
Like us on Facebook: www.facebook.com/FashDollStylsit
We're also on Pinterest: www.pinterest.com/FashDollStylist
Show us your stuff on Instagram: www.instagram.com/fashiondollstylist


- Posted using BlogPress from my iPhone

Saturday, May 21, 2016

If Movie Stars Were Dolls...

We're having one DOLLICIOUS time in Paris this time around! Dolls of all types, sizes and shapes have literally invaded the French capital, appearing here, there and everywhere. In addition to the humongous Barbie exhibition we covered two posts ago, there are vintage dolls with their wardrobes on display across the way at the Musee des Arts Decoratifs' exhibition's "300 Years of Fashion." In another part of town, 12" dolls and action figures have come together at the city's Doll Museum for an exhibition focusing on "Hollywood Stars as Dolls."


On view through September 3, La Musee des Poupees is featuring over a hundred dolls and action figures, all fashioned in the image of iconic stars representing the glory days of the silent film era to the blockbusters of today. Many are familiar faces you know from Mattel's collector series like Elizabeth Taylor, Grace Kelly, and Audrey Hepburn Barbies. But there are a few surprises.

Grace Kelly
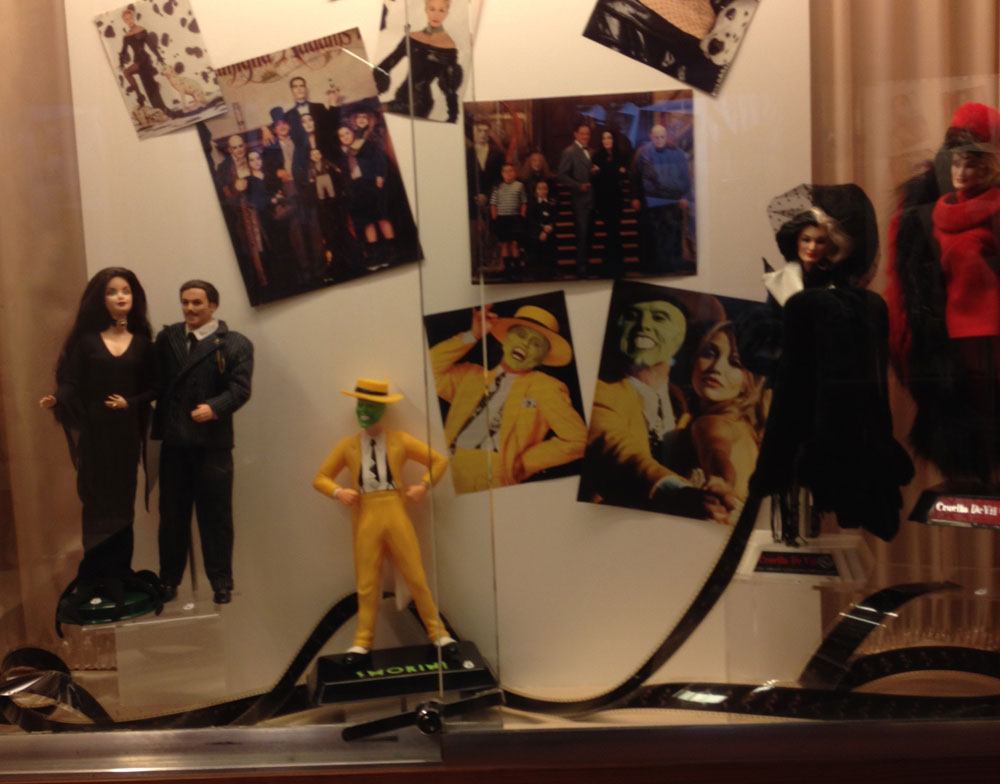
The James Bond series with 12-inch effigies of Sean Conner and Roger Moore, complete with martini fixings and handguns as well as a few of the film's Bond girls and notorious villains are a few examples of merchandise produced to promote the franchise. Other not-so-familiar figurines include a John Wayne cowboy, Glenn Close (Fatal Attraction), Rock Hudson and Doris Day, Jessica Lange complete with the gorilla (King Kong), Shirley Temple, Greta Garbo, Marlene Dietrich and even Laurel & Hardie and Groucho Marx. There are dolls representing the films, Titanic, Twilight Batman, Star Wars, Star Trek, Grease, Wizard of Oz, Cinderella and even The Adams Family! We also appreciated seeing pop stars in miniature: Diana Ross, Cher, Barbara Streisand and Elvis. In all, there are 24 Windows all populated with these 12" stars encircled with posters and photos of their namesakes. In addition to Mattel, there are also dolls from the Tonner Doll Company, Disney, Hasbro, DC Comics and Mego.
Roger Moore

Sean Connery

James Bond girls

While this is not the over-the-top Barbie exhibit we saw across town, it is a more intimate event doll lovers will find to be charming and worth the trip. For those of ou unfamiliar with this museum, the price of admission also includes a stroll through their "history of dolls" permanent exhibition.
Adams family, Jim Carey

Laurel & Hardy, Groucho Marx, Josephine Baker

Once again I have posted a great deal of photos for those of you who cannot make it to Paris to see this. I've also noted below, the museum's website so that you can keep up with all the museum's activities should you ever visit this neck of the woods. There is also a resale shop for vintage dolls (on site and online), clothes & accessories, books and cards. Appraisal and restoration service is also available here.
Catwoman, Batman

Charlie's Angels
"Hollywood Stars as Dolls." Musee de la Poupee. Impasse Berthaud. 75003 Paris. (Metro: Rambuteau or Les Halles). Open Tuesday-Saturday 1-6pm (last entry at 5:30pm) except holidays. Entrance: 8 Euros


Doris Day, Rock Hudson

Gone with the wind

Grease

Greta Garbo


Jessica Lange

Johnny Depp

Dick van Dyke, Julie Andrews

Marilyn Monroe

I Love Lucy

Cher, Barbra Streisand, Diana Ross, Elvis

Shirley Temple

Star Trek

Star Wars
All photos taken by Fashion Doll Stylist. 2016.


Follow us on Twitter: @FashDollStylist
Like us on Facebook: facebook.com/FashDollStylist
We're also on Pinterest: pinterest.com/FashDollStylist
Show us your stuff on Instagram: instagram.com/fashiondollstylist
- Posted using BlogPress from my iPhone

Saturday, May 14, 2016

Stardust Memories

A few of the girls are in France for the Cannes Film Festival and somehow I got roped into making a few dresses for them! (Yes, they have more than enough clothes already but you know how it is....they say they can't be seen in the same dress twice!) Nonetheless the seeds of this project were originally planted in my mind upon the sight of a black Versace gown Jennifer Garner wore at the last Oscars Award Ceremony.
Jennifer Garner in Versace (center). My rendition using beads (left). The same dress but with black glitter (right). Glitter works better in this case!
The dress had beads over one breast and in my attempt to recreate the look, I added beads to mine. But the scale was off. The beads were simply not small enough. This haunted me which prompted more research as to how I could more faithfully reproduce the look.

In the three and a half years I've been making these tiny clothes, what I've learned is that scale is important, but achieving a look often times involves.....illusion. There's lots of glitter on the streets of Paris. It's mostly contained to sneakers and T-shirts, but looking at it had me thinking that for the doll, the tiny sparkles could be interpreted as...BEADS! And yes, glitter is messy (but not always), and yes it can look really tacky very quickly. But by exploring the possibilities, I discovered that glitter can be used to create a sophisticated high fashion garment for the12 inch glamour girl.
 
 
There are three sizes of glitter: Super fine--just the right scale for doll shoes and accessories; Regular size--usually the cheapest, this is great for giving the illusion of tiny rhinestones--and; Large flakes--not easy to find, not so easy to glue, but gives the illusion of small sequins a doll's dress. There is also a way to work with glitter without the mess...iron-on sheets of fine glitter. It's really best for cutting out shapes or trims than using over large areas of a garment..

To keep glitter looking fashion rather than kiddie crafts, consider using unexpected fabrics like neutral tone wools, cotton or linen or go overboard like I did by putting glitter on shiny or sparkling fabrics. Here, I've used stretch lurex. As for glue, do NOT use craft glue as it will harden the fabric. Textile glue is better. If you can find it, there is a textile glue specifically designed for applying glitter.


For the first dress, I made a sheath dress out of grey wool.

1. I stitched one side of the garment together and turned under the hem. Mark the area of your design with tape.
2. Working quickly, spread the glue over this area.
3. Generously sprinkle the glue.

4. Allow to dry and shake off the excess.
5. Remove the tape. I used a soft brush to remove stray glitter from the body of the dress. Finish sewing the dress together.
6. I made leggings out of lurex to accessorize the dress.

My red carpet gown is both glamorous and easy to make.

1. It begins with a strapless sheath. I have added glitter to the dress down to the top of the hips. And I have added small straps made from glittered lurex strips.
2. I cut a full circle skirt from the lurex. There is only a slit in the middle the size of her waist circumference and it is cut down the back seam. Nothing is hemmed so that the fabric blends in with the dress underneath. Should your lurex fray, use a bit of fray-check product.

3. Create a pleat by grabbing a bit of the fabric from the left side of the doll and wrap it to the right and pin.
4. You can add as many pleats as you want simply by repeating step 3. Here, I've made three pleats. Hand stitch them to the dress underneath.
5. Here is what my dress looks like in the back. You can leave it open or stitch down the center back seam, leaving an opening near the waist, closing it with a hook&eye.

Since Veronique was appearing on the red carpet at the Cannes Film Festival, I added a small rhinestone brooch on her hip.


If you hate the mess but love the sparkle, iron one glitter is worth a try. There is a uniformity to this medium that you will either love or not. Here, I wanted to maintain the purity of line with this tunic and straight skirt.

1. Again, I put together a shortened tent dress, sewing one side then turning under the hem, but leaving it flat. I do the same for the skirt.
2. I try the outfit on the doll to determine how deep the border should be.
3. Using tracing paper, I draw the shape of the border, then put my draping on the back of the glitter sheet and trace. Cut it out.
3b. You can create any sort of design you desire. For the lurex dress to follow, I created this star.

4. Follow directions for your glitter sheet. For the one I bought, the glitter is placed shiny side up on the right side of the garment.
5. It's then flipped over and you iron everything together on the wrong side of the garment. You may have to iron longer than the instructions require.
6. Here is what the skirt looks like. Since you don't see the entire skirt, it is only necessary to put the glitter on part of the skirt.

Voila the result. I've kept it simple. Silver on beige cotton...like sand on the beach!

Here, I was more creative. I drew a huge star which I placed on one side of a lurex shift dress.

When I place to two techniques side by side, you see the difference. The loose glitter has a more "organic" or uneven look (though I could have added a second layer of glitter). It also looks more like tiny rhinestones! The iron-on glitter is finer, sharper, almost as if the design was woven into the fabric.

This is a bra and leggings that I have quickly draped a piece of black satin over Anna's form. The black glitter on black fabric gave me just the right discreet look of beads I was shooting for. I used the wrong (less silver) side of the lurex for the leggings and added a light layer of black glitter.


All text and images property of Fashion Doll Stylist 2016.

Follow us on Twitter: @FashDollStylist
Like us on Facebook: facebook.com/FashDollStylist
We're also on Pinterest: Pinterest.com/FashDollStylist
Come show us your creations on Instagram: Instagram.com/fashiondollstylist


- Posted using BlogPress from my iPhone