Sunday, June 30, 2019

Spaghetti Western

This post WAS supposed to be fringe. And it is. Except....I'm only telling half the story here. In this, the first of a two-part series, me and the girls ventured out to the ye olde days of the wild west for inspiration. Radiah wanted a cowboy jacket for her wardrobe and the 18-year old fashionista buried deep down within me, wanted it for her.


Though you can use almost any jacket with a back yoke, I chose the jeans jacket pattern and altered it by cutting it out of a thin suede and adding cut fringe under the back yoke as well as down the length of each sleeve. You could add more fringe just under the front yoke, but I decided all of the action would be in the back, complimented by a simple front.

Here is my pattern. For details on how it was created and steps on how to put it together please click HERE.

1. Sew the back bottom bodice together. Decide on the length of fringe you want. Cut a rectangle as wide as the lower seam of the back yoke by the desired length of the fringe you want to create. Place it over the back bottom bodice to get an idea as to where the final length will fall in relation to the back of the jacket.
2. Sew the front lower bodice together to the front yoke. Then sew the front to the back yoke at the shoulder seams.
3. Take that rectangle you cut for the fringe and draw in guide lines from the hem to about 1/4" (5mm) away from the top edge. For the moment, don't slash. It will be easier to control if you sew this into the seam as a solid piece.
4. The lower bodice will look like this--a panel to be slashed for the fringe and my princess lined back bodice.

5. I use rubber cement. I apply a thin line of the rubber cement at the top of the (fringe) panel on the exterior side and glue it to the back yoke bottom exterior.  The glue keeps it from shifting as you sew. 
6. Note the placement. the front of the (fringe) panel is pointing upward while the back yoke is upside down. Place the top edge of back lower bodice on top of this. This will form a sandwich where the (fringe) panel is sandwiched in between the back yoke and the back lower bodice. Now, sew the three layers together.
7. Lay the jacket face up with the back upright. Very carefully, slash that center (fringe) panel (outlined in green) using the guide markings to help you keep the slats fairly even and at a 90 degree angle from the hemline.
1. I altered the sleeve pattern by folding it into thirds and cutting away 1/3 and adding seam allowance to each side. That new seam created will fall at the back of the jacket and you will be careful to line it up with the bottom of the yoke. as you assemble everything together.
2. To one edge of that sleeve, cut a rectangle the length of that inner seam to just short of the length of the sleeve. (Be sure you leave space for the underarm seam allowance as well as the hem of the sleeve.
3. Again, I score my panel with guidelines. Place this panel in between the two parts of the sleeve. Stitch all three parts together. 
4. Rubber cement your seams flat and now carefully cut the slats (being careful not to cut the 1/3 sleeve piece).
5. Sew the jacket together down the sleeve outer seams and side seams of the jacket as you normally would. 
6. You will just have to carefully stuff all of the fringe in between the two sleeve seams. I pin the jacket together, but try to keep the pins inside the seam allowance so that you don't create holes within the body of the jacket. Now carefully stitch your jacket together being careful not to catch any of the fringe. (Note: it is easier to manipulate the fringe inside of the sleeve as you sew as opposed to an unslashed panel.)
7. Again, you want to try and align the inner seam of the sleeve with that of the bottom back yoke.
8. Turn the jacket right side out. Be very careful when turning out the sleeves to not tear any of the fringe. I used a pair of tweezers and tried to grasp the sleeve rather than individual strands of fringe. Take your time.
9. Meanwhile, back at the ranch....I had to figure out how to close the jacket. I wanted real buttons, but since there is a front placard to my jacket, I decided to use a strip of velcro instead. From here, finish the jacket...adding on the collar and bottom waistband.

Oh yes, by now you've noticed her boots!
 I used the pattern for SPATS. You can make this pattern as spats worn over existing shoes, or develop it further into real boots using the soles of existing soles. Click HERE.
As with the cowboy jacket sleeves, the fringe is sewn into the seams of the spats with the fringe on the exterior of the spat. Stitch them up, trapping the fringe inside, then turn the spat right side out, being very careful not to tear away the fringe as you do this.

You can add fringe not only to sleeves and spats, but to skirts and pants as well!!

And yes, that is a matching bag on her shoulder!

1. Start out with the basic bucket bag pattern.
2. Cut 2 strips of leather about 1-1/2" long (35m) by the circumference of your bag. Make tiny vertical slashes about 1/16' (1mm). Using rubber cement, make a thin line roughly 1/2" (1cm) from the top of the bag and another thin line alone the top of the fringed strip.
3. Make another small line of rubber cement along the top of the bag. Put a small line of rubber cement roughly 1/2" from the top of the the second fringed strip. Then press the two together.

4. There will be roughly a 1/2" (1cm) of the top fringe panel protruding from top of the bag. 
5. Add 8 metal eyelets equally spaced.
6. Cut another tiny strip of leather (about 1/8" (2mm) for the shoulder strap. and another tiny strip that serves as a drawstring threaded through the eyelets and tie into a knot. 
7. You can stop there OR...create a small tassel. This one is simply a 1" length of fringe rolled up and tied. I added it to the front drawstring.
8. Voila here's my finished back. You can find more ideas for fringed bags HERE.

Here's a no-sew option: a fringed scarf. Take a strip of suede. Turn down the top edge and glue. Slash into tiny strips. You can wrap around the waist of a basic dress. Pictured here, I used the scarf, but you can create a row of with longer fringe that serves as a belt to top off leggings, a skirt or bodysuit.

Or wrap around the neck and shoulders over jeans or a designer skirt.

A few years back, I made a two-piece dress inspired by Jean Paul Gaultier. At the time I used a faux leather fabric.
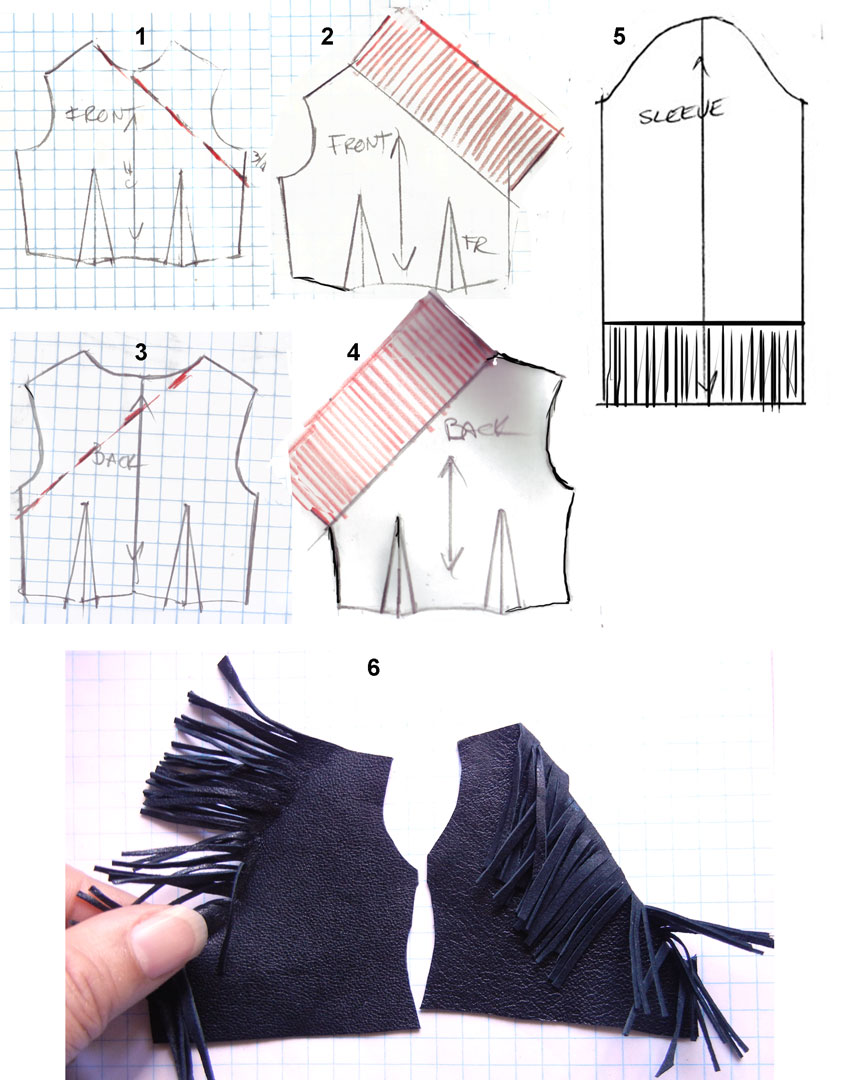
And although I still liked the dress, I was a little disappointed with the fringe detailing . So armed with a little bit of thin leather, I decided to try this dress again. The dress is in two parts. An easy way to do this is to make the basic dress and add (sew or glue) the trim to the edges. But I wanted to eliminate that step, so I built the fringed trim right into the patter.


1. This is a one shouldered top, so I created a whole front bodice using the basic sloper. Mark in the one-shoulder style line (diagonal red dash line).
2. Create a 1" extension 90 degrees up from that vertical line. It will extend from just under the armhole to the neck shoulder tip of the bodice. Slash into tiny slats (2mm) being careful to cut perpendicular or 90 degrees from that diagonal style line. 
Add 1/8" (2mm) seam allowance to your pattern pieces and lay out on your material and cut.
3. Repeat for the back. Note: the extension is on the opposite side of the back bodice. When placed right side to right side with the front bodice you want the two to line up on the same side of the body!
4. Place the front against the back, right side to right side. Sew along the shoulder line.
5. The sleeve is simple. After tracing off the sleeve sloper, simply plan to slash the bottom 1" (2cm) hem. Set in your sleeve as usual. Sew the top along the sleeve seam and down one side of the top. Leave the opposite side seam open. The top will close on the side. (I used velcro.)
6.  After slashing the extensions into fringe, I roll the slats between my fingers to distress them a little bit. I want my fringed edges to hang down so, if necessary I use an iron on the lowest setting to flatten the fringe down into the direction you want it to hang.

The skirt is just as easy. This is a simple sarong skirt made from the basic skirt sloper.
7. I start off by making a full front skirt pattern. Draw in a curved style line (ignore the far dart). 
8. Trace off and cut 2. These panels will criss-cross over the front of your doll's legs. 
9. Add 1" (2cm) to the length of this new skirt front panel. 
10. Once again, cut tiny slashes (1mm) along the hemline being careful to hold the skirt so that the cuts will be perpendicular (or 90 degrees) from the edge. You want to cut straight, not on an angle.
11. Repeat for the other side.
12. The back is easy. Simply extend the hem by 1" (2cm). 
13. Slash the hem into tiny slats. Add seam allowance and sew the skirt together.
Again, I closed the top with velcro added on the side seam. My wrap skirt is closed with a "brad" or button to one side. 


For Iman, we simply wrapped a piece of suede around the top of her bust, then slashed it into super fine slats. It's worn over a pair of matching slim pants. Her handbag (inspired by St. Laurent) and other fun ideas are featured in our post, "On the Fringe."

But don't go away just yet...Part two is on the horizon. We move from out on the range to east coast high fashion, this time with silk & novelty fringe!

Follow us on Twitter: @FashDollStylist
Like us on Facebook: @FashDollStylist

We're also on Pinterest: @FashDollStylist
And of course, we are on Instagram: @fashiondollstylist


All photos and text property of Fashion Doll Stylist. 2019. Please do not reproduce without prior permission and please always credit us.

Wednesday, June 12, 2019

Fresh Prints of Belle Air


Me and a few of the girls are enjoying some time off strolling in the gardens of Paris AND perusing the stock of floral printed fabrics that have just arrived in the fabric stores of the city’s famous « Marché Saint Pierre ». We’ve been looking at store windows as well as how the young Parisians are dressed and while there is nothing noteworthy in terms of silhoettes—we can attest that everything is in bloom with colorful florals!

This post is not so much a tutorial as it is a styling tip for the next time you go summer fabrics. Of course you can always opt for those quilting/patchwork squares. In general the « Liberty House » style prints are usually perfectly scaled for dolly. But those cottons have a certain structure which means the garments you cut from it will tend to be a little stiff and move sharply away from dolly’s body. There is another option. Look for rayon, viscose or rayon blends. Rayon or viscose is a natural fiber that is soft and lends itself to designs where you want soft drapes. 

Don’t be afraid of large scale florals. On the doll, they will come across as abstract flowers which work nicely for garments cut in voluminous silhouettes including summer evening gowns.

As you know, wider shapes are all the rage. Emanuela shows off a kimono belted over wide trousers

Underneath it all, you can see that we cut the pants a little high on the waist. You can team this off with a bra top or bare midriff tank top. Her outfit was cut from a palm leaf and striped rayon printed fabric. The oversized print gives the whole look an exotic, almost Asian flavor.

For younger dollies, we’ve borrowed this look from the 1970’s. It’s an empire waist mini dress worn over straight legged trousers cut from a floral rayon fabric. The nice thing about this look is that it’s two looks in one. Dolly can wear just the little dress., or wear the trousers separately with a little T-shirt or tank top.

Here’s a tip. Cut the yoke of the dress in one piece to get a good, clean line over the shoulders by eliminating that seam.

1. Put the front sloper and the back sloper together along the shoulder seam.
2. Trace around. It is a good idea to indicate the shoulder line. When you are finished there is one piece only.
3. Now trace the right side off to the other side along the center front seam so that the yoke is all in one piece!

Add a rectangular piece of fabric. It should be roughly 2-1/2 times wider than the hem of the yoke (or width of your doll) and as long or short as you want. For Karen’s dress, my rectangle is 5’’ (13cm) long by 15’’ wide (39cm). Hem the bottom edge, Make a double gathering stitch at the top. Gather the stitches so that it fits the yoke and sew. The seam should point upwards. Leave about 1-1/2’’ open at the back near the neck (so that the doll can get in and out of the dress). Then stitch the rest of the dress down to the hem.

For Kimora, we were inspired by the 1960’s. She’s wearing a tent dress/trench coat ensemble cut from that cotton square we bought. The pattern for the dress is HERE and the trench coat pattern is HERE.


Sissilie fell in love with a cotton pleated scarf we bought on the street for very little money. Her dress was made from a simple shift dress pattern. The cotton scarf has, what is called—a ‘place’ motif. I made sure the rose fell in the front and center of the dress.

Feel free to mix and match patterns. Her we tossed a kimono over Sissilie’s shoulders. The contrasting floral print is made of a cotton chintz fabric.

Nothing is prettier than a cheerful floral print bursting with color transformed into a summer evening gown like the one Kym is wearing. Instead of traditional evening fabrics, the floral prints lend a fresh, cool look to formal wear! Making this dress is such a breeze as well. Her dress is essentially a sarong skirt wrapped around the bottom of a short dress, accented with a bow.

1. For my foundation, I started out with a strapless minidress. 
2. Take a square of the same fabric and create several pleats in one corner. Pin to the dress.
3. Carefully wrap the rest of the fabric around the doll’s hips and pin in place on the opposite side. Adjust those drapes until you are happy with how everything looks. You can pin down those pleats in the middle while you make the adjustments. With a single threaded needle, tack the pleats down in only enough areas to maintain the look you want. 
4. When I finish, I turn under the edges at the opening, measure and cut the hem. In this case I added a length of satin ribbon for halter neck straps that tie on the back of the neck. 
5. Your straps don’t have to be quite a song, but I wanted to add a small touch of drama down the back.

6. You can stop there or....add a bow where the two edges of the sarong meet at the top. This is just a simple rectangle of the same fabric folded in half and stitched in place.

For those cool nights, I thought Kym might need a shawl. This is a simple rectangle with fringe added to each end. Tossed over her shoulders....she looks stunning!

Looking for more ideas for summer floral fashions. Click HERE to check out a post we featured a couple years ago.

Follow us on Twitter: @FashDollStylist
Like us on Facebook: @FashDollStylist

We're also on Pinterest: @FashDollStylist
And of course, we are on Instagram: @fashiondollstylist


All photos and text property of Fashion Doll Stylist. 2019. Please do not reproduce without prior permission and please always credit us.

Thursday, May 23, 2019

String Theory


In the previous post, we showed you how the addition of bows was a simple and easy way to transform a simple garment into a spectacular evening look. As we approach summer, some of my girls just want a simple little party dress with a sexy edge. For this project, you will need your knit dress slopers, some 2-way stretch fabric and a little bit of string.

I have chosen the jersey/knit sloper and fabric that stretches in two directions so the dolls can get in and out of dress with little problem. This also makes it easy to design the type of neckline you want without the complications of darts. 

1. Here we take the sloper and draw in the neckline. I would recommend you put your pattern up to the doll to get a good idea as to where your neckline will ultimately fall on her body. 
2. You need to do this with both the front and back slopers. After you have drawn in the front neckline, place the back sloper over it and draw in the back neckline. Pay special attention as to how the two slopers will meet at the side.
3. Add the seam allowance.
4. Lay the front against the back to make sure the side seams line up and that there is a smooth transition from front to back.
5. For the one shouldered dress I made for this post, I drew in the neckline.
6. Then I decided the front and back neckline would be the same. From here, you only need to add on the seam allowance. 

Except for the one shouldered dress and the gown, all of my other dresses share the same scooped back as the strapless dress pictured above as #3.

Though very basic in the front, the back of Kym’s dress is pretty fancy.

1. I started out by putting together the dress and turning down the edges.
2. I use embroidery yarn (for the “spaghetti straps) and a needle with a very large eye. Since the embroidery yarn is comprised of several threads, you should wet the edge, press it flat then carefully thread the needle. Knot only one side (do not double the yarn), for this dress.
3. I put the needle through the underside of one shoulder, then wrap it diagonally across the back to the opposite underarm seam. Continue crossing the back, up and down until ou have the number of “straps” you want. To help me with my spacing, I marked the area with pins. You can also use pencil. When you have finished, pull your needle through to the back and knot the thread then cut.
4. On the opposite shoulder, you will start the same way except...as you cross the rows of “straps” weave the needle in and out (lattice style). Again, when you have finished, pull the needle through to the underside of the neckline edge, then knot the thread and clip. 

Super simple in the front. Party in the back!

For daytime, you can do something a little more simple but just as stunning. For the next project, I started with a easy slip dress.

1-2. Turn down the neckline edges. Take your needle, thread it then knot both ends together. Slide the needle upwards through the point from the underside and pull it through.
3. Wrap the “strap” over the doll diagonally to the opposite side at the back.
4. Your needle should go over the edge from front to back.
5. Wrap the thread around the needle and pull the needle through this loop to form a knot. Then cut. Repeat on the other side except, wrap the “strap” around the shoulder and join it to where the other “straps” are attached to the dress. 


To give my one-shouldered dress, a bit of an edge, I worked the yarn from the high point down a ways over the arm cap. 

Of course, I had a little fun with the accessories. Her arm piece is a small, rectangular piece of of leather. I punched holes down each side then weaved through narrow strips of leather. 

Have fun with this project. My girls love black but you might try this with interesting prints as well. 
1. Zoe’s dress is a strapless sheath with cream colored straps radiating over each side of the shoulders. I knotted a single edge and worked from front to back.

2. Wrap the strap around the shoulders and sew onto the edge. Without cutting, return the needle to the front edge. 
3. Keep on until you have the look you are going for. 
4. I started to paint spots onto the “straps” but decided against it since I accessorized the dress with matching gloves and besides, the cream toned straps matches her boots.

You don’t have to think only about wrapping your straps around the doll’s shoulders. You can use the string to fill in areas—or hold elements of the garment together.

Case in point.... Sybille’s dress is a strapless sheath gown. It was cut all in one piece. I simply cut the fabric away in the front to expose her midriff and a smaller area over the top of her thighs. The back of her gown is all in one piece. Though I have added “straps” over each shoulder, the use of the string on this dress is purely decorative! 

Though the focus of this project is to use string to embellish the design, you can swap out the string in favor of ribbon or even chain!

Radiah’s dress is made of stretch lame. It hangs from a silver wire necklace and has streams of silver chain down her back.

1. To start, I used the basic sloper but shaped the front of the dress into a point at the throat. Turn the edges under. 
2. Shape a bit of wire (enough to wrap around her neck plus about 3/4” (150mm). Turn the edges into loops. One side the loop should be closed, the other should be left open. Add a jump ring to the closed loop.
3. Wrap the top edge of the dress around the center front of this neck ring. Pin in place until you get the placement just right, then stitch.
4. Here is what the back looks like right now when the necklace is closed. 
5. Measure out three lengths of chain—enough to reach the base of the doll’s neck to the top of the back neckline. Attach each chain to another jump ring at the top. Add smaller jump rings to the end of each chain.
6. Attach the top jump ring to the jump ring of the necklace. One by one, sew the lower rings of each chain to three points on the dress back.

Have fun with this project. You can add contrasting colors of string, jewelry string threaded with beads or clusters of string over strategically placed holes around the body!

Follow us on Twitter: @FashDollStylist
Like us on Facebook: @FashDollStylist

We're also on Pinterest: @FashDollStylist
And of course, we are on Instagram: @fashiondollstylist


All photos and text property of Fashion Doll Stylist. 2019. Please do not reproduce without prior permission and please always credit us.