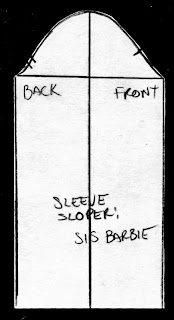
Let's stop and play catch up a bit. Though you've already created the bodice sloper (Block Club: Upper East Side), we need to create a separate sleeve sloper. This exercise is a tad bit more complicated than the others in that we must draft the pattern. Don't worry, I have simplified the steps for drafting a sleeve.
When you marked the doll, you were instructed to extend the shoulder line onto the tip of the arm (about 1/8"). You should have also drawn the "armhole" from that point dropping roughly 1/4" under the doll's natural joint (which aligns to the top of the bust), which is what we call the armhole length.

Measure the length of the doll's arm to her wrist to arrive at the arm length. Using a tape measure, determine the doll's most narrow arm width which slips over the her outspread hand. (Her hand limits the width of the sleeve).

1)With these these 2 measurements, create a vertical rectangle. Divide in half and mark with a center line. 2) Using the measurement of the armhole length, make a second line (in my case it's 3/4" down from the top). 3) From the center top point, draw a diagonal line to the horizontal line on both sides. 4) Mark the center of each diagonal. 5) from the bottom point of the diagonal make another mark 1/4". 6) Draw a bell curve above each diagonal. The midpoint of the curve should arc up 1/8" from the diagonal line and it should dip slightly below the 1/4 mark.The end result should resemble the last diagram. Be sure to label the sloper, noting the front and back of the sleeve. Note I have put tiny "notches" or small lines--1 on the front and 2 "notches" on the back. Place the front and back slopers against the sleeve sloper and put notches at precisely the point on the armhole that correspond to the sloper. This will help the placement of the sleeve to the bodice and will also remind you as to the right side of the sleeve.
As-is, this sloper produces a basic, straight sleeve like the one on the shirt in the picture at the top. It can also be manipulated to create a wide variety of sleeves from batwings to bouffants and everything in between.
There is another way to make a sleeve sloper and that's by draping it directly on the doll. Here is a video tutorial of that technique.
Content & Photos: © Fashion Doll Stylist 2013. Please do not reproduce without prior permission.


I could never figure out the sleeves. I just never tried. I have seen patterns where the sleeve seemed too wide. It makes so much more sense the way you explained this. I agree with you that quality sewing does not come from a pattern. Thanks,
ReplyDeleteAt the schools where I was employed, we offered two forms of pattern making: drafting and draping. This offered the student more than one way to arrive at a pattern. For this blog where there are many people with no prior experience, I try to keep things as simple as possible. In a traditional draft, there is lots of mathematics. But I find that draping the sleeve is the easiest.
Delete