
Slopers (a.k.a "blocks" in UK fashion speak), are the basic patterns--taken from measurements of the body--from which all other patterns are created. As I said in an earlier post, all fashion dolls of the same length (even within the same brand) are not created equally. I have three types of Barbies in my collection. (Warning: nudity ahead.) Notice how different they are even though their length is within a quarter of an inch of each other.

This is precisely why I feel it pointless to provide ready-to-download patterns. In this exercise, you will learn how to make slopers for each doll body in your collection. To make it easy, we will drape our basic pattern directly from the "model." You should take whatever time it takes to get your slopers as perfect as you can to ensure well fitting patterns in the future. First, we need to mark the doll.
MARKING THE DOLL
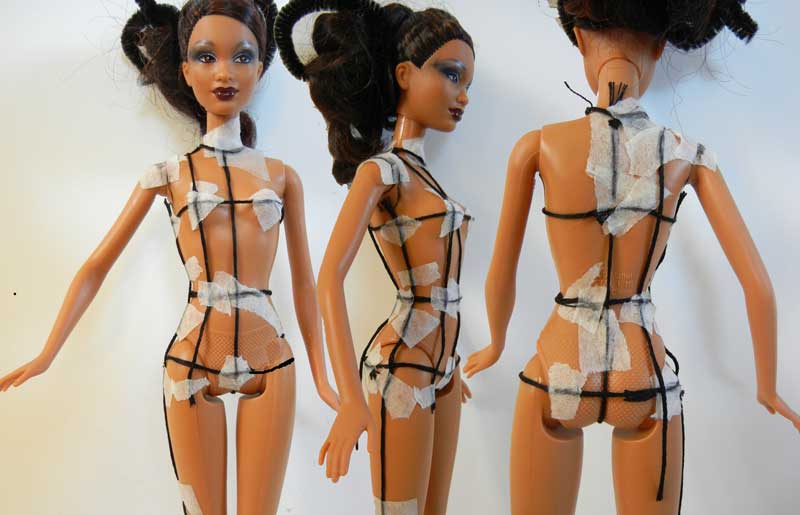
Add a final bit of yarn to mark another vertical: the center of the shoulder line to the center point between the side and waist to the center of the hip line. This will help you place the darts in the proper place.
"FIT MODEL" FORM
Afford an extra doll if you can. She will serve as the dress form/fit model for others with the same proportions. I've been tempted to create a dress form for my dolls. However, when I looked at the cost of model making materials, I decided it was cheaper to simply buy an extra doll with the same proportions). I created a "bodysuit" using a stocking anklet, (like those at DSW when you're trying on shoes). The bodysuit allows you to pin your draped patterns onto her.


THE SLOPERS
Take a rectangle of cotton and mark the horizontal and vertical direction of the grain.

For reasons of maintaining symmetry, we only drape half a garment. Place the fabric against the doll's body, keeping the fabric straight. (The marked grain lines will help you do this.) Cut around the doll's neck and clip, then tape the fabric on the doll's body to hold in place while you work. Smooth this fabric around her bust, holding it firmly in place just beyond her side. There will be a little excess fabric falling away just below her bust. Mark the doll's shoulder and side lines and trim the excess.


 Pin it back together and put in on the doll to make sure of the fit. When you are happy, remove from the doll and transfer the pattern to Bristol paper. For slopers we do not add seam allowance. On the other hand, notice I have indicated: CF (Center Front); CB (Center Back), vertical arrows (indicating the "straight of the grain" which means to place the pattern in the same direction as the vertical threads of the fabric). I have labeled them: front bodice; back bodice; and I have indicated the type of the doll for which these slopers were created.
If I want to make a simple "shell" like the one pictured at the top of today's post, I simply trace the sloper (including the darts) onto a sheet of paper and add my 1/4 inch seam allowance. The CF is placed on the fold. I cut two of the back. I stitched the sides and shoulders, pressing out the seams and darts. I rolled to the inside, the neckline, armhole and hem and used fabric glue to hold in place.
Below are two video tutorials to help you.
Photos: © Fashion Doll Stylist 2013. Please do not reproduce without prior permission.
I have been watching "Project Runway" on TV. I always wondered about the lines on the dress forms. Now I know what that is about. I have also this year joined the American Sewing Guild. A few days ago I was studying how to make slopers. I never heard that word until your site taught me. Anyway, I found the real person model to be a distraction. It was easier for me to follow you on the doll. I am still nervous about trying to make a sloper. Once again, Thanks.
ReplyDeleteSometimes, when things are presented in a small format, it's easier to comprehend. I used to teach drawing. Just by making a small thumbnail drawing on the student's pad, they were better able to understand how the body was moving. Now that you grasp the principle using the doll, things should be somewhat easier when you go back to the full scale dress form. BTW....the "tying ribbon" on the dress forms marks the woman's dimensions AND they are placed as guidelines to help the designer as they drape an original design on the form.
DeleteThanks a lots.
ReplyDeleteYour way of showing how this is done helps me better grasp women's clothing patterns. Have been struggling for several years (seriously) to finally alter a pattern to fit my shape. All the tutorials I've read for women somehow leave out important info about how their recommended pattern modifications actually translate to the fit. This actually helps me visualize what must be going on in those extremely confusing full bust adjustment tutorials! Would love to make a sloper for myself like you've done for your dolls, but that isn't completely in the range of options for me as only one person with no sewing helper. However, this tutorial does give me PLENTY of ideas and understanding in how to go at those pattern modifications once again. Thank you. Oh - by the way - I came here via your page on the kimono sleeve - and your sleeve is explained FAR FAR better than any women's clothing page I have ever read. Thank you a million. I hope your site is up forever - that other budding seamstresses find it - and I also wish you much goodness in life in general. :-)
ReplyDeleteThank you for your very lovely message. The base of my tutorials starts with regular pattern making for women, but I modify it to suit the limitations imposed by the doll's proportions and I simplify it to suit those who've never before made a pattern. When making patterns for yourself, you can find one of those tutorials that show how to make a double of your body using duck take and a T-shirt. Then you can mark it the same way I've marked the doll's body and create the slopers from them. You'll also need to add a little ease (for movement). Good luck. Thank you for your well wishes!
DeleteThank you LM for your very kind words. I try to make things as simple and clear as possible so that making clothes remains a passion and not a chore.
DeleteYour blog is wonderful! This is the year I decided to do a little dolly fashion designing. I made slopers a couple of weeks ago before seeing your blog. But I'm looking forward to checking out your other posts. I'm sure they will come in handy.
ReplyDeleteThank you Vanessa. Once you've got a set of well-fitting slopers, the rest is easy! Take a look at my "pages" section. They serve as a "table of contents" for the entire site!
DeleteHi! Love this article. I wanted to ask, how do you transfer the slopers from muslin to paper? Thanks!
ReplyDeleteHi and welcome to my b log. Place a piece of tracing paper over the muslin and trace off your lines. Use a ruler to straighten your lines. Trace this off onto graph paper and make any necessary adjustments. (You might even trace this back onto another piece of muslin and pin it together to try on the doll one more time to check for fit (and placement of the darts). If you have made corrections, make sure you transfer this to the pattern you traced onto graph paper. Now, place a sheet of Bristol board (heavyweight paper) over the graph paper and trace. I tape the graph paper pattern onto a window, then tape the Bristol board over so I can see the lines underneath. I really advise you take the time on the slopers. Because if they fit, then every pattern you create from your slopers will fit as well!!
DeleteThank you so much. Very helpful. I wanted to also ask,do you find it difficult to make slopers for the basics dolls/model muse as their bodies are curved from those fierce poses lol. I'm finding it a bit challenging. I'll take any advice you have to offer. Thanks in advance and Merry Christmas! :)
ReplyDeleteEach time a new doll with a new body type enters my home, I make slopers just for her (being careful to indicate what belongs to who.) For me, making slopers for the Model Muse Barbies is not difficult at all. Here's why. Though the doll's hips are tilted, you will measure them at the widest part but the hip line will be a straight line perpendicular to the Center Front line, just as the waist and bust lines are. Those dolls have really slim bodies, so their waist darts on the skirt will be thin and I don't even bother with a back shoulder dart (which normally you would have in a human scale sloper. Do make another muslin to verify everything still fits after you make this adjustment. What I did find difficult at first, was making sleeves for the dolls with both bent arms. For that, it's better to plan your sleeve and do fittings of garments with sleeves, on a doll with two straight arms. Whatever fits her will automatically fit the others. Don't hesitate to pose any other question you may have. Have a very Merry Christmas!
DeleteI finally did it!I marked my doll and made a couple of slopers. I took some pictures to show you - you are a great teacher and your instructions were very easy to follow. thanks so much. I have always wanted to learn to sew and now I can.
ReplyDeleteNaomi
Hi Naomi. Thank you for your kind words and very happy my blog could be of help. I would love to see your photos. You can either post them on our Facebook page. OR...if you don't want the general public to see them, you can send me a Direct Message on Facebook with photo. As you begin to make clothing, please join us on Instagram and show off your creations! Welcome to my blog. Come back any time! April
DeleteThank you! i will definitely go there. thanks
DeleteHi there, I'm Kate, I'm a student of Laura Volpintesta's and she referred me to your website...it's wonderful! Thank you! I'm trying to make a sloper for a Gingermelon doll which is soft and has no bust, I was wondering if I go about preparing the sloper in a similar way to your video tutorial? What do I do about creating a bust dart? Many thanks, I can't wait to hear from you, Kate.
ReplyDeleteHi Kate. I Googled Gingermelon dolls to see what they are. Creating a sloper should be pretty simple. Yes, you can create a sloper for her using the method in the video. But she won't have any darts because she's flat and doesn't have breasts! Darts occur when there are protrusions from a flat surface like breasts or round hips. In the same way we create slopers for Ken dolls--who also don't have breasts or round hips, slopers for your doll and patterns, will be very simple. Any style lines (like princess lines, yokes, placards and the like) will be simply drawn on that flat shape, cut apart, seam allowance added, then sewn back together. If this sounds confusing, take a peak at one of my posts on creating a basic sloper for Ken. (Do a search here for the post, "The Slim Bodice Sloper for Ken (VIDEO)") You'll notice how simple (and without darts) the sloper for Ken is. Take your time. After you have created the sloper, turn it into a pattern by adding seam allowance. Then make a basic garment and try on the doll. Make any adjustment needed. Then re-draw a new sloper using the amended basic garment. If you take the time to ensure a proper fit...everything you make will always fit perfectly! Since the doll is simple...your sloper and consequent patterns will also be simple. In any case, I'm always here. April
DeleteThank you SO much, April! I'm SO excited to have discovered your wonderful tutorials, they're so informative and accessible. Can I ist the same formula outlined for the sleeve sloper? Also, do you have a pants sloper tutorial?
ReplyDeleteI'm also working on some larger (20 inch) soft cloth dolls. Do you think I could make the sloper in a similar fashion for them? Thanks again, I'm so pleased to have found you! Xo
Just finished my first sloper! turned out great! Merci beaucoup!
ReplyDeleteFelicitations!!! Je suis TRES contente!!!!
DeleteYou are so very kind to share this others! I wish I could find the patience to do it. If I can find someone who does I am going to be getting a lot of clothing for my ladies! :-)
ReplyDeleteThanks again
You are most welcome. Well......I know how you feel. There are things I have tried to teach myself (knitting, crocheting and rerooting my FR dolls)...to no avail. In any case, I am always here with ideas and the techniques for the patterns!
Deletethank you so much very informative, thank you
ReplyDelete