Saturday, September 14, 2013

Doll's Eye View: NY S/S '14 Fashions, Pt.1

Fashion season is one of my favorite series of events. Twice a year, fashionistas of all sorts come together to see what the lords of style have dreamed up for the rest of us mortals. The season begins with New York, travels over the ocean to London, then drifts over to Milan before making its final, and perhaps, it most spectacular splash in Paris.

The "Dolls Eye View" series, presents fashion collections from the doll perspective. By that, I mean that we sift through most of the new designer looks to find new clothes and accessories we think will translate well into styles for fashion dolls of all sizes. Within a period of a week, New York hosted some 300 catwalk shows. We've broken our summary into two parts which we will show over two posts.

WHITE NIGHTS
Short and sweet, long and lanky, it's one of the sweetest ways to stay cool. Pure white silhouettes are slightly flared. A little bit of the 1960's revisited.


ART NOUVEAU/DECO ARCHITECTURE
Stop and admire landmarks and buildings from the past for inspiration.  Monochromatic patterns and prints are etched onto wovens and knits. Silhouettes are stark and simple.

THE DOPPLER EFFECT
Digital prints are breaking the sound barrier. Fingerprint motifs, sound waves at warp speed, the message here is, once again, to keep things simple. But let the print speak volumes.
 
STEEL MAGNOLIAS
Won't you take a stroll into the garden? Then with a simple pencil and paper, tell me what you see. These floral prints pay black and white homage to Georgia O'Keefe, but without the pomp and circumstance of color. Silhouettes take a page out of "Princess Diaries."

We love the look of laser cut lace. Our girl's top is a simple bodice with a non-woven over-layer cut into a snowflake then stitched down.
 
50 SHADES OF BLACK
The "little black dress" takes on a modern allure. Criss-cross and slash bring back memories from the Flash Dance era. Paillettes, ribbon embroidery, a patchwork of black sheers...each garment is special. Each is a jewel. The important thing is to mix and match different textures and techniques.


THE GRASSLANDS
Back to nature. We like the look of fringe that resembles swaying grass of sun bleached fields, dresses that look as though they might have been crocheted from natural jute. Or a simple shorts suit in natural linen. Look for fabrics with vegetal aspects, but keep the garment simple!
 
That's not all..... Stay tuned for Part II. It's still New York.....but in "Living Color!!!"
 
Follow us on Twitter: @FashDollStylist


Wednesday, September 11, 2013

Sweater Girl

Like it or not, it's sweater weather! Sweaters are essential staples for anyone living in a temperate zone. For my dolls (and myself), black sweaters are a necessity in every fashionista wardrobe. Though, I have yet to learn how to knit, my dolls will not go cold  thanks to "cut and sew knitwear." This is a real fashion term to describe garments (sweaters, tops, dresses, jackets, etc) cut from knit fabric using patterns.

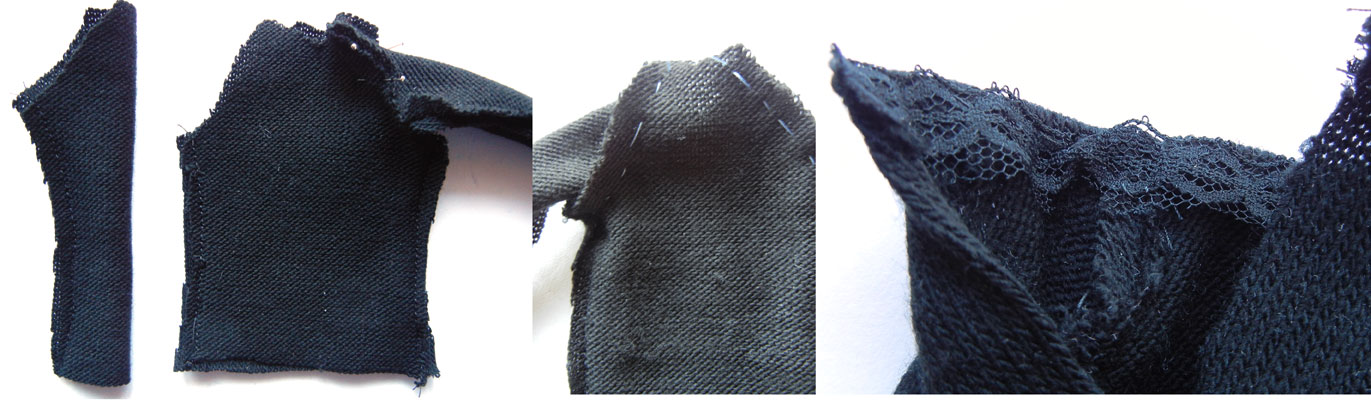
When draping a garment, you should use a fabric that mimics the properties of the finished product. So, for sweaters or knit garments, cotton knit is perfect for draping the pattern. (Worn out T-shirts are a perfect source.) The patterns for the cut & sew sweaters are fairly simple, so putting it together will take you no time at all. However, as with the Ken doll garments, the devil lies in the details. In this particular case, it means finding a proper way to finish the edges. With clothes for humans, the edges are turned and topstitched, or have the addition of a knitted trim and cuffs. Thus far I have not been able to locate knitted trim small enough for the 11.5-inch doll, so my finishings are limited: 1) leaving the edges raw and machine stitching to prevent unraveling, 2) turning the edges and gluing, hand-stitching, or topstitching them down, 3) stitching tulle, stretchable lace or a similar product to the edge of the garment, turning under and stitching down.

Next you will have to decide whether or not you want a back seam with closure. For things like T-shirts and sweaters, Mattel generally favors keeping the back seam complete open then using a long strip of Velcro as a closure. More expensive brands may use zippers. I made both types. For the sweater that slips over the head of the doll, she will need to have either articulated arms and hands or arms that are straight down on the sides. Ideally, I would have used a zipper in the back for my sweaters which would allow for the most narrow turtleneck collar. In any case, be particularly careful when putting sweaters on your dolls. Their tiny little fingers tend to poke through and get stuck in knit!

Today I'm using wool knit sold by the yard. However, you can also head to the vintage shops for cheap finds like socks, sweaters and caps. Though I'm focusing on the sweater, you can also elongate your pattern to create a sweater dress.
I'm draping 1/2 a garment. I begin by taping a rectangle of cotton knit to the front and to the back of the doll. Be sure to mark your grain line. Pin the front to the back, tracing the silhouette of the doll's form. Mark both sides of the pins. Lay flat and smooth out the lines. Then create your pattern, tracing the right to the left side and adding your seam allowance. For this pattern, I've used my standard set-in sleeve sloper. This gives the sweater square shoulders and thus a "dressier" look.

For more of a "traditional" sweater look, we use a sweater with a raglan sleeve.

Begin with your standard bodice. In this case, I wanted something looser than the first featured look. Feel free to cut in the type of neckline you want: jewel, V-neck, square, etc. After marking the edges and pinning the cotton knit in place, I use a single rectangle draped onto the front and back of the sweater as well as along the length of the arm.
 Again, use the pins to "draw" the sleeve and its placement. It should extend from the shoulder of the garment, cut into the front and back bodice on a slant, then trace from the bottom of the natural armhole to the wrist. Once the pins are in place, mark both sides.


Fold under the seams as they fall on the body of the sweater, front and back, then mark the sleeve's placement onto the body of the sweater.
Remove from the doll and trace onto graph paper. Check to make sure the length on the sides, front to back are of equal length. and that underarm hole points are on the same horizontal plane.
Stitch each sleeve. Stitch the side seams of the bodice. Attach the sleeves. Finish the edges with stretch lace.
To sew: stitch each sleeve under the arms. Stitch the body of the sweater at the side seams. Now pin the sleeve to the bodice, matching them up in the front as well as the underarm seams. Baste. Sew. If you are unhappy with a simple turn under and stitch or glue, you can add stretchable lace to the inside finishing edge.

The men's cut&sew sweater is draped the same way as that of Barbie's. Here, we've added a turtleneck sweater.

The men's version is created in exactly the same way for Ken. Though I've used a standard wool knit for the girls' sweaters, I want you to see how far you can take this project. So I cut up a knitted cap  (1) and laid out my pattern, respecting the verticals of the knit pattern (2). After cutting out the pattern, I hand stitched this sweater due to the very stretchy nature of the knit. After attaching the sleeves, make a collar. Measure the circumference of the neckline and cut a rectangle of the same width by 2-inches. Attach this on the inside of the neckline. You will fold it over to the front. I used a product called "Sew Easy," which is essentially a thin diagonally-cut tulle edging.


You know that unless your doll is wearing a very bulky over garment, (or a sweater cut from a super thin knit) she will not be able to wear another garment on top of her sweater. For those moments when you just want the look but without the bulk, I use a "collar."
 This is a tube which simply slips over the doll's head to give the illusion of her wearing a turtleneck sweater.
Same sweater, two looks: Crew neck to turtle neck with the simple addition of a tube.


Follow us on Twitter: @FashDollStylist
 
Stay Tuned! Catwalk season is underway. Our "Doll's Eye View" of the Spring Summer 2014 Collections are coming soon!!!!!
 
All images and text property of © Fashion Doll Stylist. 2013. Please do not reproduce without prior permission.


Friday, September 6, 2013

Warm Leatherette

NOTE: This tutorial has been updated to reflect working with finer leathers and a more sophisticated output. See Leather Weather 2.0

The days are getting shorter; the nights more chilly, everyone's hard at work and so....it's time to break out the leather gear!

Richard has been sending me pix of menswear he'd like to see for Ken including the inspiration for the Ken doll "leather" outfit featured today. It's made from a faux leather I recycled from an old soft belt. You can also buy "leatherette" (as it is sometimes called) but go for the thinnest available. Stick to simple patterns like the ones I've used here. But don't hesitate to recycle things you find lying around the house or "finds" from the neighborhood Salvation Army (or the equivalent).

If the leather or leatherette is thin enough, you should have no difficulties putting it together on your sewing machine. Stay away from thick leathers. If you end up with something slightly difficult to sew, put the garment together by overlapping the seams against each other. I liked the idea of "recuperation." So when I began making clothes for my Barbies, I used anything I could get my hands on, including an odd, old glove of my father's. So, let's get started.

TOUGH CHIC
Ken's jacket is simple. I used his coat pattern (which is essentially an elongated version of the shirt) as a base minus the collar, but cut it down to hip length. You cannot pin anything to leather or leatherette, otherwise it will leave holes. So, one by one, I trace the pattern directly onto the backside of the leatherette. (BTW...There is no fabric grain to respect.) You cannot really "press" the seams, which is why leather garments are either topstitched along the seams or the seams are held flat with glue.

For the trim, I didn't have nylon fabric as indicated by the original garment, so I used nylon tights which I cut into strips. Stitch each strip about 1/4 away from the jacket edge, then folded it over to the wrong side and tape. Turn back to the right side and topstitch.

The trousers are low-riding, low crotch pants. Flat pattern drafting would require too much guess work, so I chose to drape my pattern. Normally I would drape 1/2 the pants, but I wanted to get a sense of volume, so exceptionally, both sides are present. I start out with two pieces of fabric (1) which I pin together on the side and along the inseam into my desired silhouette. Next (2), I cut a slit down the Center Front. I adjust the pins on the side so that I can overlap the seams in the middle (3). Turn the doll to the back and repeat (4). Keep adjusting the pins until you have the look and fit you want then trace off your markings (5). Again, turn the doll over to the back and make any needed adjustments (6). Once you are pretty happy. Mark your placement of the pins (7). Remove from the doll. Compare the two legs, adjusting the seam placements. Take one leg then make your pattern (8). Cut out of muslin or cheap cotton, sew and check again for fit.

Note: the boots are a part of the look, so I will try on the muslin with his shoes. In able to get the pants to "crunch" up, I cut the pants a bit longer than normal. My pants are a bit looser than those in the picture because I'll need to be able to get them on and off of the doll. Once you are happy. Lay out your pattern and trace it off directly onto the backing of the leatherette.


The pants pattern looks like this.

 CAR COAT
Fabric stores often sell small remnants of leather for a few dollars each. If you can find a remnant large enough to make a complete garment, all the better. If not, consider marrying the leather with knit (sleeves, for example.)

This is exactly the same basic jacket we did in tangerine linen in our post "Coat Closet: The Basic Jacket" only we've done it in leather and changed the collar. If the leather is fine enough, it should pose no problems sewing. Because leather will not have a backing, I use chalk to trace the pattern piece onto it. Note: you do not have to hem anything since leather does not fray. On this jacket I've turned down and topstitched the center front opening of the coat. The collar is an odd piece of leather attached to the inside of the jacket which turns over at the neck.

KID GLOVES
Now it's time to really have some fun. What to do when you've lost a glove? Make dolly an outfit, of course! In this case, I've used on old, paint-stained leather glove belonging to my father. The interesting thing about streetwear trends is that the helter-skelter, right-out-of-the-trashcan spirit can be easily translated into some very interesting and original gear for the doll. Her basic jacket pattern is cut to fall just at the hips. You'll need the front and back bodice to lay onto the glove. Remember, there is no grain.

The back of the doll's jacket was cut from the back of the glove. I used the middle two fingers as sleeves. Stitch or glue the jacket at the shoulders and sides. Cut the fingers away from the gloves. Carefully take apart enough of the seams near the fingertips to fit within the armholes. You will hand stitch these in place. Don't worry about how it will look because the "artisanal" look adds to the "urban" look of the outfit!


The back of my jacket is placed on the back of the glove to utilize the "vein" stitching. The sleeves are hand sewn in place.

And yes, I did a skirt. I patched together enough of what was left of the glove and assembled them into a mini skirt, constructed directly onto the doll. For any area that bulged away from the doll's body, I made a small vertical slash, overlapped the two edges and glued them in place. Again, we can get away with this in the spirit of urban wear.


I've even left the paint stains for "effect"
Follow us on Twitter: @FashDollStylist

All photos & images property of © Fashion Doll Stylist 2013. Please do not reproduce without prior permission.

Monday, September 2, 2013

Dolly Versace

September marks the end of summer and the beginning of what the French call, "La Rentree." Simply put, this means, back to school; back to work; and back in action! This is also the time of the year that throws us into transition fashion. It's still too warm to wear wool and yet with the cooler days and evenings just ahead, it's time to think about covering up....a bit.

To help my dolls transition into Fall, I decided to add a bit of silk to their summer wardrobes. I also wanted to play with a technique I have read about for some time now. That is, printing on fabric using a personal computer and printer. My target: the iconic Versace shirt. This is also known as a "scarf print" and can also be used for that ubiquitous Hermes, Dolce & Gabana, and any other upscale, in-your-face, designer shirt.

For those of you who do not have a fabric store nearby, textile printing and surface treatments provides the perfect (and the most economical) way to realize your designs. I will immediately refer you to two online companies who sell internationally, with whom (via schools) I have dealt with in the past: Dharma Trading sells white and black silks and cottons by the yard or by the bolt at very reasonable prices. In addition, they have an arsenal of products: from dyes and chemicals to tools and supplies, to help you create a plethora of different textile effects. More focused on basic fabrics as it's name suggests, Silk Connection specializes in the sale of basic silks, cotton and linen.
The jacket is in silk; the dress in cotton. Both of the same print

The technique today is quite easy and simple. We will be creating our own designs on cotton or silk on the computer then printing it out with an ordinary printer. For this you will need a fine 100% silk or cotton. Nothing thick! You will also need Freezer paper which is usually sold at the supermarket. If you cannot find the freezer paper, you can also use Spray Adhesive, though it's trickier to work with and not so great for you nor the environment. You will need a hot, dry iron, computer and an inkjet printer. (Everything I've read have advised against laser printers.)

Design the Motif
On the right, part of an image I found on the web. On the left, I begin to tile my "motif."
I select the background layer and paste in a new motif so that I can slide it under the others to create my desired pattern.
For the Versace inspired print, I downloaded pictures from the internet. Find the largest resolution available. I also use "pieces" of prints from a picture of a jacket or from a scarf, which we will call our "motif." I open my image in an image editing program. My favorite is Photoshop Elements which does pretty much of what the full version Photoshop does, but costs a lot less. Open a blank document scaled at the largest size of paper your printer can handle. I then outline my motif, and "copy." It is "pasted into my blank document. Repeat. Arrange the motifs in a tiled effect. This can be side by side or crisscross. When everything is arranged the way you want. Flatten image.

I created this pattern by setting the motifs on a crisscross grid.
Left,:the base of my motif. Right. side by side tiles create this pattern.
Check the Scale of the Print
It is impossible to see what scale your print will be in relation to the doll without "trying it on" first. Print out a "slice" of your print, on paper first, to check the scale of the print. Make adjustments and print out another sample. This will save you time, money, effort and many tears later.
I print a "slice" of the print in two different scales to see what works best with the doll BEFORE I print my fabric.

Increase the Saturation for Bold Prints
Be aware the colors will be different than what appears on the screen. My first set of fabrics were pale and a bit grey. That's ok if you want subtle. But the nature of a Versace print lies its boldness. This was, perhaps in part, due to my printer which is more than 10 years old and does not use the more vibrant inks employed by newer models. I discovered by increasing the "Saturation" by 80% and increasing the contrast a bit, the gold of the image came alive. Also, resolution matters. If you want all those little details to show, you'll need to plan and print out at 300 dpi.

On the left, the image as I found it. On the right, I have increased saturation by 80% and the contrast. The colors appear richer.

Prep the Fabric
Make sure there is no stiffing or sizing in your fabric. (You may have to wash it first). Consult the instructions of your printer to see the maximum size of paper it accepts. At first I was printing out letter (A3 in Europe) before realizing I could print longer sheets of paper. Cut the freezer paper a bit bigger. Then cut your fabric as big as the freezer paper. Lay the fabric right side down against the ironing board. Place the shiny side of the freezer paper over the wrong side of the fabric. The matte side will be facing up. Now press, press, press. I iron from the center out. Make sure there are no bubbles and that the edges are flush against the paper. When this is done. Cut through the paper and fabric with sharp scissors so that the edges are perfectly clean and the edges are fairly straight. Clip away any stray fibers from the edges. You are ready to print.
Press your fabric well. Iron shiny side of the freezer paper to the wrong side of the fabric. Cut the two so that the edges are clean.


When you're finished printing. Allow to dry, then peel away the paper.
If you are not using freezer paper, you will need to carefully and thoroughly coat a piece of printer paper with spray adhesive, making sure there are no missed spots. Place your fabric right side down. And carefully place the adhesive side of the paper to your fabric. Press until there are no gaps and paper and fabric have become united.

There is a third option just in case the first two do not work for you. Dharma Trading has pre-prepared "Print on Fabric" in silk and cotton.

Print the Fabric
Unless your printer has a special setting for "transfer paper," put the setting on "Matte, Heavyweight Paper." Make sure you are inserting the page into the printer. It should print on the fabric and not the paper! Print only one sheet at a time. Let it dry, then peal back away the paper backing.
Not enough fabric? No problem. Just print more!!!

Updated Disclaimer
As is, this technique is NOT colorfast for those of use using older printers. Given the all-over prints I created, I did experience residue from the ink rubbing off onto my fingers while handling my fabric. None of my dolls were harmed in the process, but  depending on the age and type of printer and the type of ink that it uses, will depend on whether or not you will have to take extra steps to colorfast your fabric.  If you are making clothes as gifts or to sell, you MUST be sure your fabric is colorfast. If this is your case, I would recommend treating the fabric with a special product found at the above mentioned, Dharma Trading or treating your printed fabric with a vinegar bath. For the latter, dip the fabric (prior to cutting out your pattern) in a solution of 1 part vinegar to 1 part water for 5 minutes. Add a sprinkle of salt. Rinse until the water runs clear. Then wash in soapy water to remove any remaining residue. Dry and iron. Expect to lose about 15% of the color using this method. But if you can live with more subtle colors, delight in knowing that your print job is now permanent and there are no fears of ink residue rubbing off on the doll! Personally, I find the washed out version of the vintage Versace print for the fashions I presented today looks newer and in keeping with contemporary fashion! However, for better results you will need a printer that uses dyes on the order of the Epson Piezo system or Durabrite Inks, which is what I intend to do. This project was a LOT of fun and I plan to do a LOT of printing in the future. In fact, I might even buy a bigger printer!

Keep It Simple
With a scarf print, you want to stick with simple garments void of too many seams, darts and pattern pieces. Consider shirts for him and her, basic shift dresses and T-shirts so that the beauty of the scarf print remains in focus.
 
Oh yes. There are designer T-shits and tote bags every fashionista dolly wants!

Follow us on Twitter: @FashDollStylist.
Very Versace. Very stylish dollies!!!
 
All text & images property of © Fashion Doll Stylist. 2013. Please do not reproduce without prior permission.