

Now, transfer to graph paper. More than likely there are adjustments to be made.
You must check to make sure the side seams of both the front and back pattern pieces are of equal length. If one is shorter than the other, note the difference then make the shorter side a bit longer and conversely, make the longer side a bit shorter until both sides line up perfectly. Repeat for the inseam. And don't forget to draw in the "straight of the grain" lines!

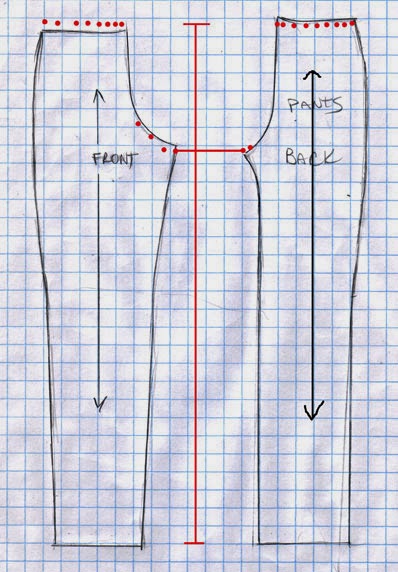
You will need to add the "fly front" flap to the front of the pants sloper. Mine here extends 1/2" (1cm) from the center front seam and goes down where that line begins to curve.
For a simple pair of pants, I've decided not to make a belt. Instead, I'm mimicking the Mattel method....that is, I extend the waist 1/2" upwards. I will fold it down and then topstitch the "belt" as well as the design of the fly front.

Underneath, you can either use a dot of Velcro, or better, a hook and eye for the closure.
Adjust the width of the pants on equally on both sides from the hips down to the hem to make them wider or more narrow. It is always good to make a pair in muslin or cotton first to verify the desired fit.
Follow us on Twitter: @FashDollStylist
We're also on Pinterest: pinterest.com/FashDollStylist
I've made the fitted shirt, the pants are next! Thanks for sharing.
ReplyDeleteWait till you see the jeans jacket-- coming up soon!!!
Deletei'm interested in knowing more about adding flys and pockets to slopers- my brain has a hard time understanding the flattening out of the 3d wrapping on the body.
ReplyDeletei really enjoy your videos, they make a complicated dressmaking process easier to understand. which is why i was wondering if you could create one to explain extending patterns off of the sloper (such as for flys as you did in this tutorial) and altering a sloper for an attachment tab to use with velcro, snaps, eyehooks etc.
i have been trying to get into doll creations for months, reading on full scale (human) patterns which hasn't clicked..but since finding your site i feel i'm finally gaining the skills to help with doll scale. thank you so much for sharing your guidance and inspirations with us all.
Tinny, I will be doing a post on creating jeans and the jeans jacket for the Ken doll very soon. That will explain how to start with the basic sloper then move into a pattern with multiple elements. HOWEVER.....keep in mind that we are creating patterns for 12" figurines and as such, I have greatly simplified the process to eliminate bulk. A true fly front, for example, would have another pattern piece---a rectangle sewn to the extension. For the human, it is a nice way of finishing. For the doll, it adds a lot of extra bulk!. As a result, many times I try to find alternatives to things like tabs or waistbands as a way of eliminating the bulk created by seams. Personally, I feel getting the look (in doll clothes) is better than going for the line for line copy of the human garment. That said, the advantage of making Ken's clothes over Barbie's is that his patterns are more flat since you don't have to worry about darts! His patterns are often about cutting them into shapes then reassembling them back into the garment, sort of like a jigsaw puzzle.
DeleteGlad you find my blog useful.
excellent!! i look forward to it. and i agree- getting the look is more important than copying. it's fun to find these ways of "cheating" too :) the faux belt above is a great doll innovation.
Deletethat is one thing i find interesting in doll clothes..the shortcuts. eliminating the shoulder seams makes for a funny looking pattern piece (and confusing, at first). i didn't realize until just now that it is likely done to eliminate bulk! someday, i will 'get' the basics :) thanks again, i appreciate the thought you put in to your garments. and on top of that you're a great teacher.
oh i meant to ask too- what was that long cylinder you used to press a sleeve in one of your videos? i'm curious to know what it's made of so i can make one!
ReplyDeleteVery simple. That is a pencil wrapped with a piece of a sock! I have one larger one for pant legs and a narrow one for slim sleeves.
ReplyDeleteOh, you've got some good stuff here! Thanks for referring me to your blog. Unfortunately I'm having trouble finding the tutorial you mentioned on Instagram but I'm having so much fun looking around!
ReplyDeleteWelcome, Doll Thang. We have a LOT of fun here!!! The tutorial you're looking for is "Panting for More" (2/18/13). Even better...there's a video to help you! Enjoy my blog and come back as often as you'd like!
Delete