In fashion, everything old becomes new once again. The 1980's are making a comeback...a little bit at a time....starting with big shoulders. We saw a brief appearance of these "power shoulders" last year. A few more six months later. And then again, a few more this past fashion month....most notably on a cape by the house of Chloe in Paris.
Making this cape was pretty simple. I took the pattern for the cape (click HERE to find it) and simply lifted and squared off the shoulders. Easy!
But when it comes to putting big shoulders on dolly garments with sleeves, I needed to slow down a bit and find an easy solution that works best for our 12 inch divas.
First, let's talk shoulders. In human beings, the spine becomes part of the neck and holds up the head. From the clavicle or shoulder bone, the rest of the skeleton is suspended. The area between the base of the neck and the shoulder appears to be a diagonal slope due to a triangular mass of muscles (deltoids). A garment with shoulder pads gives the illusion of a squared off look...as if the head and neck have popped up like a mushroom from the shoulders. Since fashion dolls are made in our image (more or less), they have the same morphology. The green area shows how this modified shoulder line (through pattern manipulation and a pad) squares off the look of the garment. There are two main types of big shoulders: squared off (with set in sleeves) and round (with raglan sleeves)
Squaring Off!
For this very tailored look, made famous by the late French haute couturier, Yves St. Laurent, I began by making a new set of slopers from our basic ones by modifying the shoulder line.
1. Line up the front and back slopers so that the tips of the shoulders (top of the neck and top of the armhole) line up. Make sure the center front and center back lines are straight.
2. Raise the tip of the shoulder line at the top of the armhole so that it lines up, horizontally with the tip of the neckline on both the front and back sloper. The width of this line is the same as the original shoulder line+1/8" (3mm) so that it extends slightly past the doll's shoulder line. (Make a note as to how much you raised this point vertically, so that you can lengthen your sleeve cap later on!) For the moment notice the difference between the length of our front as opposed to the back slopers.
3. Flip the front sloper over. Lay it on top of the back sloper, lining it up along the side seam. Note the difference in height between the front and back. (With mine, there is a difference of 1/4" or 6mm.) Find the midpoint. (In my case, it's 1/8" or 3mm.)
4. Since the back is higher than the front, I lower the back by 1/8" (3mm) and raise the front shoulder line by 1/8" (3mm). This is so that there is a front to back balance between the two slopers on the shoulders.
5. You will also need to lower the existing armhole by 1/8" (3mm) to accommodate a sleeve. This is what my new sloper looks like. (To make a pattern, you will need to add seam allowance, of course.)
Because we have more space in the armhole, you will need a sleeve with a deeper cap.
1. Trace the sleeve cap.
2. Raise it as much as you raised the the shoulder line plus the 1/8" (3mm) representing the lowered armhole. For me, that meant I raised mine 5/8" (1/2"+1/8") or 9mm (6+3mm).
3. Create your new sleeve by tracing around the modifications, rounding the line as it gets to the bottom of the sleeve cap.
4. My final sleeve for this exaggerated sleeve resembles this. Add seam allowance to make your pattern.
If your fabric has enough body, you may not need shoulder pads, but if your shoulders are not holding up, you can insert a pat at this point BEFORE you line your garment.
Rounding Out the Difference
For round power shoulders, think football players! For garments with round shoulders you will need to use patterns with raglan sleeves (click HERE to learn more).
1. Start by using the squared off slopers we just created. Make a point midway on the neckline of the front and back necklines. Make another 1/8" (3mm) below the bottom of the armhole. Draw a diagonal line between the two points. In the front, you should curve the line upwards a bit midway. Mark the areas above this line A for the front and B for the back. Also note the direction with arrows. Cut away and set aside.
2. Your bodice should resemble this.
3. Take the top pieces (A and B) and line then along the top of the sleeve sloper. Starting at the midpoint of the sleeve, lay each piece with the armhole touching the sleeve cap as shown in the diagram.
4. Trace around to create the pattern and add your seam allowance.
This is a look that works well particularly for jackets and coats. Here too, we can add shoulder pads to give the look a bit of a lift and more structure.
Padded Sells
The rule is simple. Rounded pads for round shoulders and square pads for square shoulders. I make tiny pouches using bit of cotton (from makeup pads) and scraps from the fabric from the final garment. If you plan to line your garment, the lining goes in after the pad so that you don't see it. You will need to tack the lining onto the pad to keep everything in place.
1. For the square shoulders, make sure the pad extends slightly past the armhole seam. Tack the pad in place onto the shoulder seam.
2. You might want to put the garment on the doll first then slide in the pad and adjust. The pad should not be too close to the neck.
3. For the round shoulders, again, be careful the. Pad is not too close to the neck.
4. In this case, the pad will cover the top of the arm. The dotted red line shoulders the area the pad will cover. Tack onto the top seam of the sleeve. Again, if you plan to line, you will need to insert the pad first then the lining.
With some of your existing patterns you make be able to modify them simply by lifting the shoulders and making a new deeper sleeve. This was the case for a princess line jacket pattern I made awhile ago. Since only the shoulder line and sleeve needed to be redrawn, this did not affect the side front or side back. But if you are modifying an existing pattern, I strongly suggest making a cheap cotton version first before moving ahead to your final fabric.
All photos and text property of Fashion Doll Stylist 2017.
Follow us on Twitter: @FashDollStylist
Like us on Facebook: facebook.com/FashDollStylist
We're also on Pinterest: pinterest.com/FashDollStylist
Come join us on Instagram and show off your stuff: instagram.com/fashiondollstylist
- Posted using BlogPress from my iPhone
All things FASHION, all things DOLLS! From following trends to creating modern clothes, it's Fashion Design 101 for the doll collector. A DIY guide for creating sophisticated clothes and accessories for the 12" fashion doll.
Showing posts with label Slopers. Show all posts
Monday, May 15, 2017
Friday, July 11, 2014
Good Foundations: The Pants Sloper for Ken (VIDEO)
Before the girls get back, I thought I would post one more video for Ken. Prior to this, we did a basic pant pattern for Ken with just one seam. It's fast and easy, but there are times when you may want a better fit or a different look.
Once you have removed the muslin from the doll, flatten it out and smooth out the lines.

Now, transfer to graph paper. More than likely there are adjustments to be made.
You must check to make sure the side seams of both the front and back pattern pieces are of equal length. If one is shorter than the other, note the difference then make the shorter side a bit longer and conversely, make the longer side a bit shorter until both sides line up perfectly. Repeat for the inseam. And don't forget to draw in the "straight of the grain" lines!
You will need to add the "fly front" flap to the front of the pants sloper. Mine here extends 1/2" (1cm) from the center front seam and goes down where that line begins to curve.
For a simple pair of pants, I've decided not to make a belt. Instead, I'm mimicking the Mattel method....that is, I extend the waist 1/2" upwards. I will fold it down and then topstitch the "belt" as well as the design of the fly front.
Underneath, you can either use a dot of Velcro, or better, a hook and eye for the closure.
Adjust the width of the pants on equally on both sides from the hips down to the hem to make them wider or more narrow. It is always good to make a pair in muslin or cotton first to verify the desired fit.
Follow us on Twitter: @FashDollStylist
We're also on Pinterest: pinterest.com/FashDollStylist
Wednesday, July 9, 2014
Good Foundations: The Slim Bodice Sloper for Ken (VIDEO)
I will point out to you immediately that I have not allowed for any ease because I wanted something very close to the body to make that St. Laurent "embroidered" leather vest and eventually slim fitted shirts or jackets like the leather shirt-jac worn by Zac in the photo above.
Measure and mark the male doll much in the same way as you did with the girl doll. Wrap a piece of yarn around the circumference of his neck, on top of the shoulder between the neck and the tip of the arm. Mark the entire armhole. Then mark his chest, his waist and then the top of his hips.
Prepare two rectangles of muslin (large enough to cover half the front from under the chin to just below the hip), making a vertical line, intercepted with a horizontal line.
After you have followed the instructions in the video, remove the muslin from the doll. Smooth out the lines then transfer to graph paper. Make sure the shoulder seams are equal in width and that the side seams are equal in length and in form. Make the necessary adjustments on the graph paper. Use this draft for your basic bodice sloper. After you design your garment, be sure to add seam allowance which thus transforms it into a real pattern.
For my vest, (1) I put the muslin pattern back on the doll then with a narrow tape or ribbon, I design the shape of the vest front. Again, (2) transfer your markings to paper and add seam allowance. Here in the final version, (3) I have cut this in leather. I overlapped the seams and glued in place. The seam allowance here has been cut away from the front, the neckline and the armhole.
I used beaded stickers (normally reserved for scrapbooking) for my "embroidery."
The drape of the sleeve is identical to that for the Barbie doll.
I began by preparing a rectangle of cotton muslin. It should be a little longer than the length of the doll's arm and three times the width of the doll's open hand. (For the Ken doll it will measure about 2-1/5 by 5 inches). Fold in thirds and pin. Cut a groove on the under side (where the fabric is overlapped). Slide onto the doll's arm and pin onto the bodice using the armhole markings as a guide. Then pin the underarm seam together. Mark. Then remove and transfer to paper. Make sure the underarm points fall on the same level. Make sure the underarm seams are equal. Adjust if necessary. Add seam allowance to transform into a pattern.
With this very simple bodice sloper and the addition of the sleeve, I was able to make Zak's form fitting, "European-cut" leather jacket. I simply added seam allowance to my sloper to the side and shoulder lines, then extended the center front by 1/2" (1cm).
I did sew the seams by machine. I stitched each seam twice for strength, glued down the seams inside the garment. Then (using a mallet or hammer) pounded the seams and around the armholes of the sleeve to eliminate bulk.
Using this same sloper, I was able to make a pretty successful jeans jacket for Ken which I will post very shortly!
Follow us on Twitter: @FashDollStylist
We're also on Pinterest: pinterest.com/FashDollStylist
Up next: The girls are back with Fall/Winter 2014 Paris Haute Couture!
Thursday, May 1, 2014
Dolly Patrick Kelly (Video Included)

Many of Patrick Kelly's signature stretch dresses can be easily converted into stylish doll clothes. Before his collections were financed by Warnaco and professionally manufactured, Patrick made his dresses by hand using locally sourced cotton knit tubing. Those early garments were not finished at the edges, but simply rough cut! So don't feel guilty if you don't feel like turning under your edges. Do as the late designer did...leave them as is!
Though some of Patrick's dresses can be made using a simple tube or sock, many were created with a basic jersey dress which is why I thought we should begin with this video tutorial on making the jersey knit dress sloper.
With the basic knit dress made with the help of the video, you can add any combination of buttons to create the Patrick Kelly look.
If you can find small enough buttons to scale and feel like seeing them in place, all the better. However, for this post I've used bejeweled stickers!
Patrick's studio used a template to ensure the heart patterns on his clothes were consistent. Just make sure you are making a real heart shape. You can lightly make a sketch and then fill in. Instead of the heart, you can also make a simplified Eiffel Tower pattern in buttons...another popular theme of Patrick's.
Aside from buttons, Patrick also loved to use bows. For this dress, I used cotton panties (taking advantage of the sewn edge). I cut a deep neckline in the back. Then with small rectangles pinched with tiny stitches, I made 10 bows which I then stitched down the center back to the hem. Patrick loved opera length gloves. I made tubes from the same fabric of the dress. I don't like to make mittens for dolls which is why my gloves are always fingerless.
Patrick Kelly's clothed always had lots of glam. This strapless dress was a favorite of his.

I start with the basic stretch dress. Even if you use a tube to make this dress, you will still need to make it with two side seams and a pinched waist for shape. On the other hand, you will not need any closure, since the knit should have sufficient stretch to slip the doll in and out. Make two small tubes. Slide them on a pencil to make it easier to stitch.

Hand stitch the sleeves to the dress under the arms. Cut another length of fabric wide enough to wrap around the doll's shoulders (including around the sleeves). Turn down the top edge and carefully press. Now, stitch this to the top edge of the dress and onto to top outer edge of the sleeves. After everything is in place, you can go back and better secure the sleeves under this "collar."

This collar is stitched down the center back. Again, there is no closure. The doll should be able to easily slip in and out of the dress. Again, I've used heart shaped jewel stickers.

Not all of Patrick's shirred dresses were tubes. Some were regular knit dresses shirred from the hips to the hem.

The striped dress was inspired by one of Patrick's early collections. I began with a basic knit dress cut longer than usual. I made a running stitch on the inside then turned the dress to the right side. Draw up the running stitched. Adjust the drapes from side to side, then stitch the drapes together. This dress was created with a pair of socks so I was able to take advantage of the knitted edge at the hem. I also made matching opera length gloves. Patrick would not have wanted it any other way!
Follow us on Twitter: @ FashDollStylist
OK, so now that you've taken care of your "girls," treat yourself by making a Patrick Kelly cocoon coat for yourself! Click here for pattern and instructions courtesy of the Philadelphia Museum of Art.
Next: You're in for a real treat! The girls have just returned from the Barbie Retro Chic exposition Barbie at La Musée de la Poupée (Paris' Doll Museum) with lots of pix!
Toutes-Les images, les vidéos et le format texte, propriete de poupée de styliste de mode de. 2014. S'il vous plaît Ne Pas Reproduire sans autorisation Préalable. Merci.
Tuesday, April 1, 2014
Making Fashion Doll Slopers: Pt. 2-6 (VIDEOS)
As many of you have discovered by now, I have added video tutorials to the mix. I began by embedding these videos directly in the original tutorials, then indicating the links in our Video Tutorial page to the left. The entire YouTube process is quite new, and while figuring out how to get the videos into this blog, I accidently created a separate post, Part 1 of the series, "How to Make Slopers for the Fashion Doll"on March 26" I apologize for that tutorial appearing seemingly out of sequence with the rest of the blog.
Nonetheless, I didn't want it to look as though there haven't been anymore new additions, so I've decided to post Parts 2 through 6 together on today's post before getting back to my normal set of projects. Inasmuch as I am a one-woman operation here (photographer-demonstrator-director-producer, and video editor), things do not always come out as pristine as I'd like. So please excuse the occasions when the doll goes a bit out of frame.
I will continue to add videos to the site. However if it's a subject I've already covered, I'll continue to embed them directly onto the original post then list them in the index. Otherwise, all videos with new subject matter will be directly embedded in that day's post and then listed in the index. Be sure to check the Video Tutorials from time to time to see what's there.
As I've stated in the videos, take your time with these basic slopers. Once they are as perfect as possible, you will discover that everything you make with them will fit the doll perfectly.
For those of you who create your own patterns by directly draping on the doll, the slopers are good for basic items. Things like shirts, simple skirts, jackets, tops, pants and skirts. Simple things you make over and over. Some things are easily drafted with slopers. Other things with complex construction and more "organic" detailing are better off draped.
When you are ready to transfer the markings from the cloth to the paper, be sure to cut your slopers from a stiff paper like Bristol and store them in an envelope with indications as to the doll body for which they were created. When you are ready to use them, you will do all of the manipulations necessary to achieve the desired pattern, first and THEN add your seam allowance.
Follow us on Twitter: @FashDollStylist
Nonetheless, I didn't want it to look as though there haven't been anymore new additions, so I've decided to post Parts 2 through 6 together on today's post before getting back to my normal set of projects. Inasmuch as I am a one-woman operation here (photographer-demonstrator-director-producer, and video editor), things do not always come out as pristine as I'd like. So please excuse the occasions when the doll goes a bit out of frame.
I will continue to add videos to the site. However if it's a subject I've already covered, I'll continue to embed them directly onto the original post then list them in the index. Otherwise, all videos with new subject matter will be directly embedded in that day's post and then listed in the index. Be sure to check the Video Tutorials from time to time to see what's there.
As I've stated in the videos, take your time with these basic slopers. Once they are as perfect as possible, you will discover that everything you make with them will fit the doll perfectly.
For those of you who create your own patterns by directly draping on the doll, the slopers are good for basic items. Things like shirts, simple skirts, jackets, tops, pants and skirts. Simple things you make over and over. Some things are easily drafted with slopers. Other things with complex construction and more "organic" detailing are better off draped.
When you are ready to transfer the markings from the cloth to the paper, be sure to cut your slopers from a stiff paper like Bristol and store them in an envelope with indications as to the doll body for which they were created. When you are ready to use them, you will do all of the manipulations necessary to achieve the desired pattern, first and THEN add your seam allowance.
Follow us on Twitter: @FashDollStylist
Wednesday, March 26, 2014
How to make slopers for the fashion doll Pt.1 (VIDEO)
Last year, when I began this blog, I posted tutorials on creating basic slopers. The hope was that those "basic blocks" would facilitate my visitors in following along with all of the other posts. I realize that this is virgin territory for many of you who are just getting started in the adventure of making doll clothes. So for all of you, who could use a little more help, I've created this series of, "How to make slopers for the fashion doll."
Though I feature mostly 11-1/2 to 12" dolls in this blog, the same instructions can be applied to any size doll! In fact, I created slopers for my 16" Tonner dolls using the same method!
Here, we begin with Part I: Measuring the doll for slopers.
Though I feature mostly 11-1/2 to 12" dolls in this blog, the same instructions can be applied to any size doll! In fact, I created slopers for my 16" Tonner dolls using the same method!
Here, we begin with Part I: Measuring the doll for slopers.
Wednesday, February 20, 2013
Sleeve me alone... (VIDEO)
Let's stop and play catch up a bit. Though you've already created the bodice sloper (Block Club: Upper East Side), we need to create a separate sleeve sloper. This exercise is a tad bit more complicated than the others in that we must draft the pattern. Don't worry, I have simplified the steps for drafting a sleeve.
When you marked the doll, you were instructed to extend the shoulder line onto the tip of the arm (about 1/8"). You should have also drawn the "armhole" from that point dropping roughly 1/4" under the doll's natural joint (which aligns to the top of the bust), which is what we call the armhole length.

Measure the length of the doll's arm to her wrist to arrive at the arm length. Using a tape measure, determine the doll's most narrow arm width which slips over the her outspread hand. (Her hand limits the width of the sleeve).

1)With these these 2 measurements, create a vertical rectangle. Divide in half and mark with a center line. 2) Using the measurement of the armhole length, make a second line (in my case it's 3/4" down from the top). 3) From the center top point, draw a diagonal line to the horizontal line on both sides. 4) Mark the center of each diagonal. 5) from the bottom point of the diagonal make another mark 1/4". 6) Draw a bell curve above each diagonal. The midpoint of the curve should arc up 1/8" from the diagonal line and it should dip slightly below the 1/4 mark.The end result should resemble the last diagram. Be sure to label the sloper, noting the front and back of the sleeve. Note I have put tiny "notches" or small lines--1 on the front and 2 "notches" on the back. Place the front and back slopers against the sleeve sloper and put notches at precisely the point on the armhole that correspond to the sloper. This will help the placement of the sleeve to the bodice and will also remind you as to the right side of the sleeve.
As-is, this sloper produces a basic, straight sleeve like the one on the shirt in the picture at the top. It can also be manipulated to create a wide variety of sleeves from batwings to bouffants and everything in between.
There is another way to make a sleeve sloper and that's by draping it directly on the doll. Here is a video tutorial of that technique.
Content & Photos: © Fashion Doll Stylist 2013. Please do not reproduce without prior permission.
Monday, February 18, 2013
Panting For More (VIDEO)
We cannot even begin to imagine fashion without including trousers, a principle wardrobe staple. Jeans were created more an a century ago as a utility garment for women working on the farms. During World War II, women traded in their skirts and dresses for trousers as they replace men in the workplace and headed to the factories. However, thanks to legendary designers like Claire McCardell, the inventor of American sportswear and French Couturier, Yves Saint Laurent, known for introducing trousers to the world Haute Couture, that this garment has become an essential wardrobe staple.
Actresses Marlene Dietrich, Greta Garbo and Katherine Hepburn were also ambassadors to the cool, groovy look of this men's into womenswear trend. Your fashion doll can have the same allure.
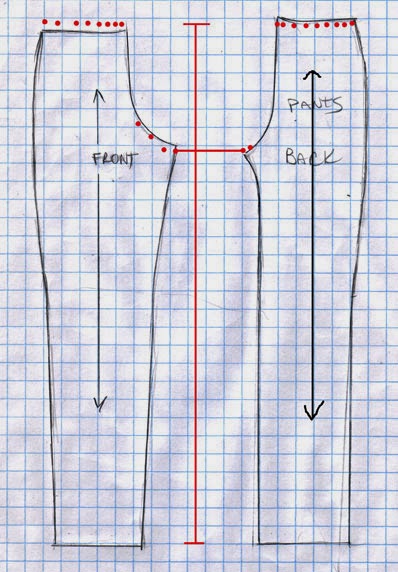
The pants sloper and pattern featured here is designed to produce a classic straight legged trouser that can be cut from all types of fabric. The doll's pants in these pictures are cut from a crepe fabric, which explains why it fits and hangs quite so well.
You begin much in the same manner as you did with the skirt sloper. A rectangle of fabric is taped to the doll with the grain falling perpendicular. The fabric should extend from the center front line to the center back line, inasmuch as this is a 1-piece pants pattern. Next, fit the fabric to the bottom mid-point of the doll. Cut a curve so that you can fit this snugly. Mark the CF and CB of the doll. Create a front dart on the quarter mark. Create a back dart on the quarter mark in the back. Pin the leg, keeping your line from the knees down straight (perpendicular) to the floor.
Mark the side line. Next, I pin the inner seam and check the fit. Adjust if necessary. Your draped pattern should resemble the image.
Next, trace the pattern onto Bristol paper.
For the pattern you will need to add your seam allowance AND...a flap to the center front or center back (depending on your style). This is to allow for the closure. Here, I have added it to the back. Remember to mark "Front" and "Back" on your sloper.
This pattern will not allow you to make flared pants. For that you will have to create your pants in two pieces. The procedure is the same for creating the normal skirt sloper.
As far as the waistband for this pattern as well as for that of the skirt, I prefer using ribbon instead of creating the usual waistband. Most of the time the waistband will be hidden under some other garment or a belt. What is important is that it should fit as close to the body as possible. Cut the length of ribbon while the doll has the skirt or pants on to ensure the length is correct. Stitch in place by hand. You can top stitch with the machine afterwards. Turn up the hem and glue in place.
Looking for a traditional 2pc trouser sloper. Here is a video tutorial to show you how:
![]() |
| A tribute to the late Yves Saint Laurent whose Haute Couture pants suits were legendary. |
Actresses Marlene Dietrich, Greta Garbo and Katherine Hepburn were also ambassadors to the cool, groovy look of this men's into womenswear trend. Your fashion doll can have the same allure.
The pants sloper and pattern featured here is designed to produce a classic straight legged trouser that can be cut from all types of fabric. The doll's pants in these pictures are cut from a crepe fabric, which explains why it fits and hangs quite so well.
You begin much in the same manner as you did with the skirt sloper. A rectangle of fabric is taped to the doll with the grain falling perpendicular. The fabric should extend from the center front line to the center back line, inasmuch as this is a 1-piece pants pattern. Next, fit the fabric to the bottom mid-point of the doll. Cut a curve so that you can fit this snugly. Mark the CF and CB of the doll. Create a front dart on the quarter mark. Create a back dart on the quarter mark in the back. Pin the leg, keeping your line from the knees down straight (perpendicular) to the floor.
Mark the side line. Next, I pin the inner seam and check the fit. Adjust if necessary. Your draped pattern should resemble the image.
Next, trace the pattern onto Bristol paper.
For the pattern you will need to add your seam allowance AND...a flap to the center front or center back (depending on your style). This is to allow for the closure. Here, I have added it to the back. Remember to mark "Front" and "Back" on your sloper.
This pattern will not allow you to make flared pants. For that you will have to create your pants in two pieces. The procedure is the same for creating the normal skirt sloper.
As far as the waistband for this pattern as well as for that of the skirt, I prefer using ribbon instead of creating the usual waistband. Most of the time the waistband will be hidden under some other garment or a belt. What is important is that it should fit as close to the body as possible. Cut the length of ribbon while the doll has the skirt or pants on to ensure the length is correct. Stitch in place by hand. You can top stitch with the machine afterwards. Turn up the hem and glue in place.
![]() |
| The 1-pc trousers is worn with the 1-pc camisole and a simple faux fur stole. |
Content & Photos: © Fashion Doll Stylist 2013. Please do not reproduce without prior permission.
Subscribe to:
Posts (Atom)